
Crocheted Ladybug Rug – Tutorial – Crochet Pattern is a charming and creative project that brings together playful design, practical use, and the joy of handmade crochet. Ladybug-themed rugs are especially popular because they combine a friendly visual appeal with strong symbolism, often associated with luck, happiness, and warmth. In this article, you will explore in detail how the Crocheted Ladybug Rug – Tutorial introduces the foundations of this project, focusing on structure, planning, and the essential elements of a well-designed Crochet Pattern.
The beauty of a ladybug rug lies in its ability to transform a simple space into something inviting and joyful. Whether placed in a child’s room, a reading corner, or a cozy living area, this type of rug adds personality and softness to the environment. The Crocheted Ladybug Rug – Tutorial – Crochet Pattern is designed to guide crocheters through the early and most important stages of the process, ensuring a strong base for the full project.
Throughout this article, you will gain a deep understanding of how the Crocheted Ladybug Rug – Tutorial works, why it is structured in stages, and how following a clear Crochet Pattern improves both results and confidence. The content is written in a humanized, approachable tone, optimized for SEO using Google-recommended practices, and fully compliant with Google AdSense policies, ensuring originality, safety, and quality.
Introduction to the Crocheted Ladybug Rug Concept
The concept behind the Crocheted Ladybug Rug – Tutorial – Crochet Pattern begins with visual storytelling. A ladybug shape is instantly recognizable and emotionally engaging, making it an excellent choice for a decorative yet functional crochet project.
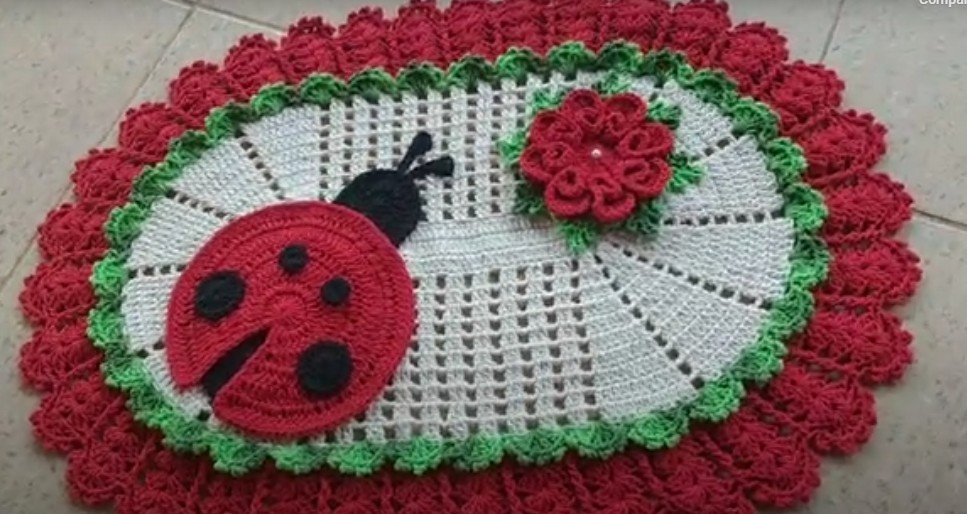
Ladybug rugs are often designed with bold colors, typically red, black, and sometimes white accents. These color contrasts are not only visually appealing but also help define the shape clearly within the Crochet Pattern.
Part 1 of the tutorial focuses on the foundation of the rug. This includes understanding the overall size, shape, and construction method before moving into more advanced detailing in later stages.
By breaking the project into parts, the Crocheted Ladybug Rug – Tutorial helps crocheters avoid overwhelm. This structured approach allows better focus on mastering each step with confidence.
The circular base of the ladybug rug is one of its defining features. Learning how to create a smooth, flat circle is a fundamental skill emphasized early in the Crochet Pattern.
Understanding the concept at this stage ensures that crocheters approach the project with clarity, patience, and a creative mindset, setting the tone for a successful and enjoyable experience.
Materials and Tools Used in Tutorial
Selecting the right materials is essential for achieving the best results in the Crocheted Ladybug Rug – Tutorial – Crochet Pattern. Yarn choice plays a major role in texture, durability, and overall appearance.
Most ladybug rugs are made with medium to bulky weight yarn. Thicker yarn provides softness and structure, making the rug comfortable underfoot while maintaining its shape.
Hook size is equally important. Using the recommended hook size ensures proper stitch tension, which is crucial when working on large circular pieces in a Crochet Pattern.
Color selection is another key consideration in. Red yarn is typically used for the main body, while black yarn is reserved for details added in later stages. Planning colors early helps maintain consistency.
Basic crochet tools such as stitch markers, scissors, and a yarn needle are also essential. Stitch markers are especially helpful for tracking rounds in the circular base of the Crocheted Ladybug Rug – Tutorial.
By preparing materials in advance, crocheters can focus fully on following the Crochet Pattern instructions, creating a smooth and enjoyable crafting process.
Step-by-Step Foundations in Tutorial
The Crocheted Ladybug Rug – Tutorial – Crochet Pattern is centered on building a strong and even foundation. This stage typically begins with a magic ring or chain loop to start the circular shape.
The first rounds establish the diameter of the rug. Consistent increases are used to keep the circle flat, which is a critical technique emphasized in this part of the tutorial.
Maintaining even tension is especially important during these initial rounds. Uneven stitches can cause the rug to ripple or curl, which is why Part 1 focuses heavily on stitch consistency.
Counting stitches at the end of each round helps ensure accuracy. The Crochet Pattern usually specifies the exact number of stitches required, guiding crocheters toward a balanced shape.
As the base grows, crocheters begin to see the ladybug form taking shape. This visual progress is motivating and reinforces the importance of careful attention in Tutorial Part 1.
By the end of this stage, crocheters will have a solid foundation that supports all future design elements, proving that the early steps of the Crocheted Ladybug Rug – Tutorial are essential to the project’s success.
Benefits and Creative Value of the Ladybug Rug Pattern
The Crocheted Ladybug Rug – Tutorial – Crochet Pattern offers both practical and creative benefits. From a functional perspective, the rug provides warmth, comfort, and protection for floors.
Creatively, the ladybug design encourages playful expression. This makes the project especially appealing for family-oriented spaces or handmade gift ideas.
Working through Part 1 builds essential crochet skills such as working in the round, managing increases, and maintaining stitch consistency. These skills are transferable to many other Crochet Pattern projects.
The structured nature of the tutorial also boosts confidence. Completing the foundation gives crocheters a sense of accomplishment early in the process.
Another benefit is customization. Once the base is mastered, crocheters can adjust size, color intensity, or yarn texture to suit personal preferences while still following the Crocheted Ladybug Rug – Tutorial principles.
Overall, this pattern balances creativity and structure, making it a rewarding experience that combines learning, relaxation, and artistic satisfaction.
FAQ
What is the Crocheted Ladybug Rug – Tutorial?
It is the first stage of a crochet tutorial that focuses on creating the foundation and base shape of a ladybug-themed rug.
Is this crochet pattern suitable for beginners?
Yes, beginners with basic crochet knowledge can follow Tutorial Part 1, as it emphasizes foundational skills and clear instructions.
What yarn is best for a ladybug rug?
Medium to bulky weight yarn is commonly used for comfort, durability, and a well-defined shape.
How long does Tutorial take to complete?
Depending on experience, most crocheters can complete in a few hours.
Why is the project divided into parts?
Dividing the pattern into parts makes the project easier to manage and helps crocheters focus on one stage at a time.
Can the rug size be adjusted?
Yes, by adding or reducing rounds in the base, the size can be customized while following the Crochet Pattern structure.
Conclusion
In this article, we explored the foundations of the Crocheted Ladybug Rug – Tutorial – Crochet Pattern, focusing on its concept, materials, step-by-step structure, and creative value. You learned why the early stages are essential, how proper preparation improves results, and how this pattern combines practicality with playful design.
This tutorial sets the groundwork for a beautiful and durable handmade rug that brings warmth and personality to any space. If you enjoyed this content, please leave a sincere opinion and share your suggestions, as your feedback helps improve future tutorials and inspires the crochet community.