
Crochet Pumpkin Pattern is a charming seasonal project that combines texture, warm colors, and sculptural crochet techniques to create a handmade pumpkin inspired by cozy autumn décor. The design shown here features alternating raised sections in cream and warm brown, giving the pumpkin a beautifully ribbed appearance that resembles the natural grooves of a real pumpkin.
A muted green stem and curled leaf complete the rustic look while adding an extra level of handmade character.
This project is suitable for crocheters who already know the basic stitches but can also be approached by adventurous beginners who want to practice working in rounds, increasing, decreasing, and creating raised texture.
The finished pumpkin can be displayed on a table, shelf, mantel, entryway console, or as part of a Thanksgiving centerpiece.
Because the design is decorative rather than wearable, it is also easy to customize the yarn weight, finished size, and color combination.
Throughout this tutorial, you will learn the essential stitch abbreviations, construction sequence, shaping techniques, stuffing process, stem, and leaf needed to create your own Crochet Pumpkin Pattern.
One of the most attractive features of this Crochet Pumpkin Pattern is its strongly defined vertical texture. Instead of making a perfectly smooth crochet sphere, the pumpkin is constructed so that individual ribs remain visible from the top all the way to the lower center.
Alternating cream yarn and brown yarn makes those sections even easier to see and produces a striking farmhouse-style contrast.
You can recreate this appearance with cotton, cotton-blend, acrylic, or another medium-weight yarn that provides enough stitch definition.
A hook slightly smaller than the yarn manufacturer’s usual recommendation is helpful because decorative stuffed crochet pieces look better when the stitches are firm and the stuffing cannot easily show through.
Polyester fiberfill provides the rounded body, while a tapestry needle helps create additional sculptural definition when the pumpkin is assembled.
The pattern below is written using common US crochet terminology, making the instructions easier to follow for readers familiar with American crochet abbreviations.
Before beginning, remember that handmade crochet naturally produces small variations in tension, dimensions, and texture, so your pumpkin does not need to match a photograph stitch for stitch to look beautiful. The following pattern is designed as a practical interpretation of the pictured style, focusing on the same ribbed shape, contrasting colors, soft stuffed body, green stem, and decorative leaf.
For a medium decorative pumpkin, prepare approximately 100–150 g of medium-weight yarn for the body, with a smaller amount of green yarn for the top details.
You will also need a suitable crochet hook, polyester fiberfill, scissors, stitch markers, and a yarn needle.
Working with a stitch marker is especially useful because several parts of the project are crocheted continuously without joining each round.
Maintain firm but comfortable tension so that the fabric remains flexible enough to shape while still being dense enough to contain the filling.
Once these basic materials are ready, you can begin building the distinctive textured body that makes this crochet pumpkin such an appealing fall project.
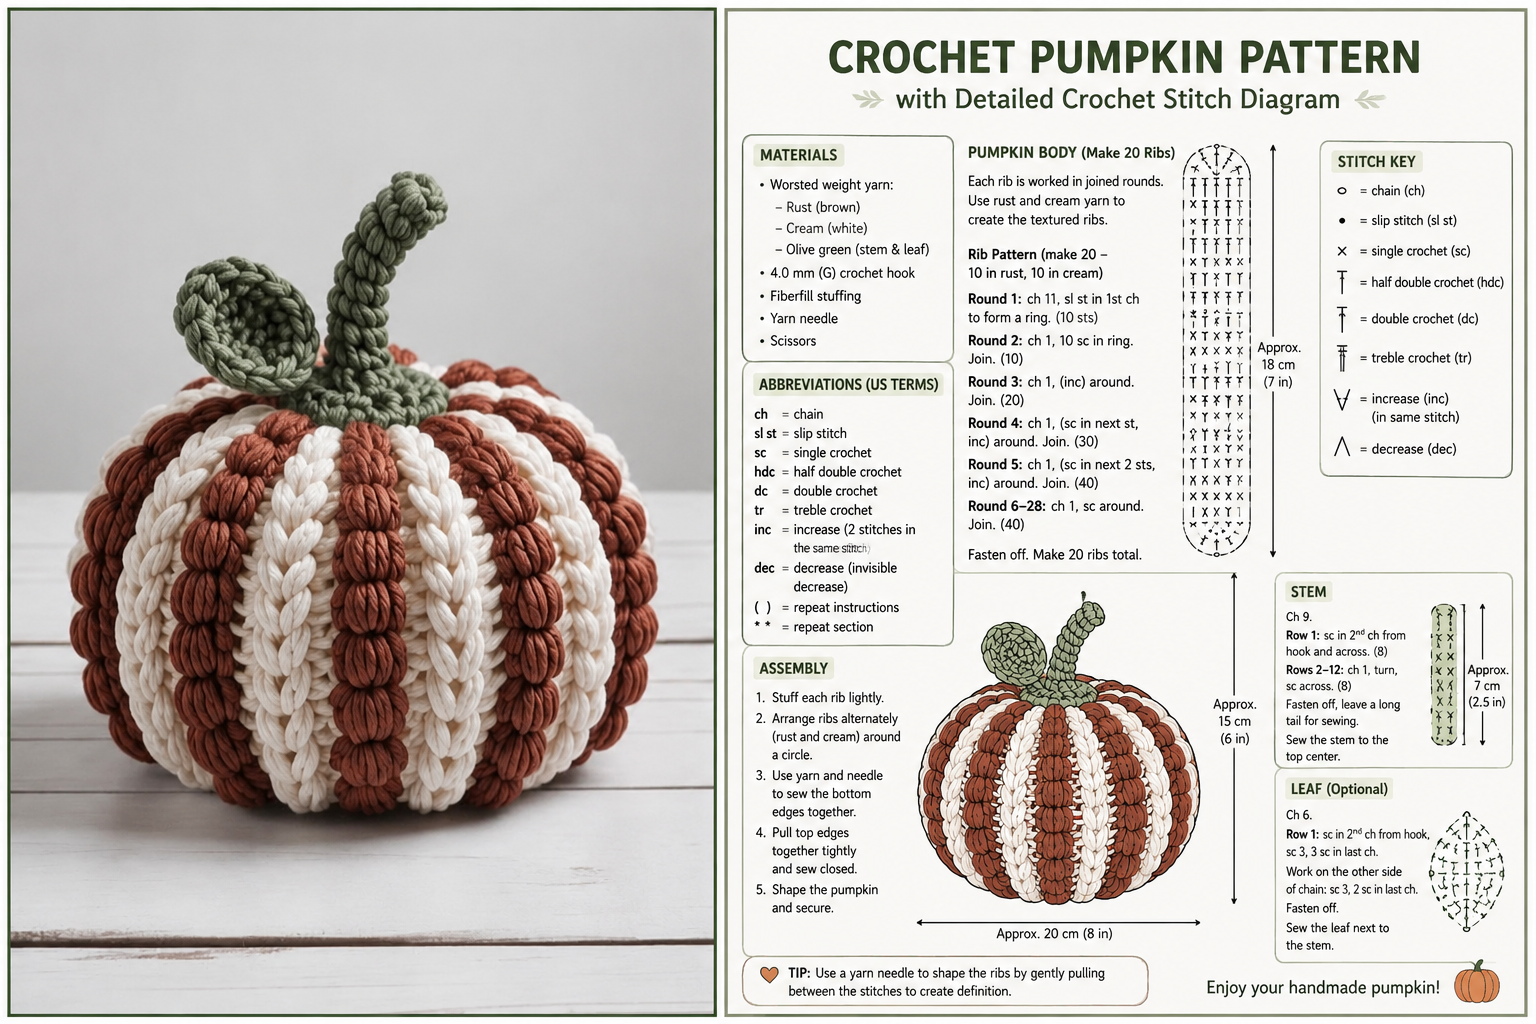
Crochet Pumpkin Pattern Materials, Stitch Key, and Preparation
For this Crochet Pumpkin Pattern, choose two contrasting body colors and one natural-looking green for the stem and leaf. The photographed style works particularly well with ivory or cream, rustic brown, and sage green, although orange, mustard, terracotta, beige, or burgundy can be substituted to coordinate with your home décor.
DISCOVER MORE FREE PATTERNS HERE!
The recommended materials are medium-weight yarn, approximately a 4.0 mm to 5.0 mm crochet hook depending on your tension, polyester fiberfill, scissors, a tapestry needle, and stitch markers. A smaller hook creates firmer stitches, which is helpful when making amigurumi-style crochet décor because it minimizes visible gaps between stitches.
Here is the essential crochet stitch key used throughout the pattern: MR = Magic Ring, ch = chain, sl st = slip stitch, sc = single crochet, hdc = half double crochet, dc = double crochet, BLO = back loop only, FLO = front loop only, inc = increase, and dec = decrease. An increase means working two stitches into the same stitch, while a decrease combines two stitches to reduce the stitch count.
The most important texture technique for this project is BLO crochet, or working through the back loop only. When a crochet stitch is viewed from above, two loops form a small V. Instead of inserting the hook underneath both loops, insert it only through the loop farthest from you. Repeating this technique creates visible ridges that help define the pumpkin’s sections.
You can also emphasize the dimensional appearance with front post double crochet, abbreviated FPdc, if you are comfortable with textured stitches. To make an FPdc, yarn over, insert the hook from front to back and around the post of the appropriate stitch, then complete a double crochet normally. This produces a raised vertical line that can imitate the deeply defined ribs visible in decorative crochet pumpkins.
Make a small gauge swatch before starting if you want predictable dimensions, although exact gauge is not critical for this decorative project. A practical target is approximately 16–18 single crochet stitches per 10 cm using medium-weight yarn. If your fabric looks too loose, move down one hook size; if it feels extremely stiff and difficult to crochet, use a slightly larger hook.
Step-by-Step Crochet Pumpkin Body and Rib Construction
Begin the body using your first color. Create a magic ring, work 6 sc into the ring, and pull the center closed. Place a stitch marker in the first stitch because the body can be worked in continuous rounds. For Round 2, work 2 sc in each stitch around, giving you 12 stitches.
Continue increasing evenly. For Round 3, repeat 1 sc, inc around for 18 stitches. Round 4 is 2 sc, inc around for 24 stitches. Round 5 is 3 sc, inc around for 30 stitches, and Round 6 is 4 sc, inc around for 36 stitches. Continue the same progression if you want a larger pumpkin.
Once the lower portion has reached the desired width, begin establishing the pumpkin texture. Work several rounds evenly without increases, keeping the same stitch count. You can alternate ordinary sc sections with BLO sc rounds to create additional ridging. A medium pumpkin may require approximately 8–14 straight rounds depending on your yarn and desired height.
To reproduce the alternating cream-and-brown appearance, divide the pumpkin visually into sections. One method is to change yarn colors every few stitches while carrying the unused yarn neatly along the inside. A simpler option is to crochet individual ribbed panels separately and seam them together. Both techniques produce attractive results, but individual panels often create stronger ribs.
For a panel-based version, chain approximately 21–26 stitches, depending on the desired pumpkin height. Starting in the second chain from the hook, work sc in BLO across. Ch 1, turn, and repeat BLO sc across each row. Make each panel wide enough to form one rounded segment, then alternate brown and cream panels until you have enough pieces to form a complete circular body.
When all sections are ready, join the first and last edges using slip stitches or mattress stitch. Close one end securely with a yarn needle by weaving through the edge stitches and pulling firmly. Stuff gradually with polyester fiberfill, distributing the filling evenly instead of pushing one large clump into the center. Close the second opening after the pumpkin has a full but still slightly flexible shape.
How to Shape, Stuff, and Add the Green Crochet Stem
The characteristic pumpkin silhouette appears during the shaping stage. Before closing the final opening completely, check the stuffing from every angle. The center should remain slightly compressed while the sides should feel rounded and plump. Overstuffing can make the pumpkin resemble a ball and reduce the visibility of the ribs.
After closing the body, thread a long length of matching yarn onto a tapestry needle. Insert the needle through the center of the pumpkin from bottom to top. Bring the yarn around the outside along one of the natural crochet grooves, then insert the needle through the center again. Pull carefully to deepen the groove without crushing the stuffing.
Repeat this process around the entire pumpkin, spacing each strand evenly. These shaping strands function almost like invisible structural lines and are one of the easiest ways to transform a stuffed crochet sphere into a recognizable crochet pumpkin. Secure each strand firmly while avoiding excessive tension that might distort the stitches.
To crochet the stem, attach sage or olive-green yarn and make a magic ring with 6 sc. Work several rounds of 6 sc without increasing to form a narrow tube. For a thicker stem, increase to 8 or 10 stitches near the base. Continue until the stem measures approximately 7–10 cm, depending on the size of your pumpkin.
For the curved appearance shown in the inspiration image, lightly stuff only the lower portion of the stem. Leave the upper section more flexible and gently bend it to one side. You can also create natural curvature by making a few strategically placed slip stitches along one side or by varying stitch height from sc to hdc.
Sew the stem securely over the center opening using green yarn and a tapestry needle. Make several passes around its base because the stem may be used as a convenient place to pick up the decoration. Although this pumpkin is intended primarily as home décor, secure construction will help it maintain its shape through repeated seasonal storage and display.
Crochet Leaf, Finishing Details, and Creative Variations
The decorative leaf adds a recognizable finishing touch to the Crochet Pumpkin Pattern. Using green yarn, ch 8–12 depending on the desired leaf size. Starting in the second chain from the hook, work a combination such as sl st, sc, hdc, dc, dc, hdc, sc toward the end of the chain.
Work several stitches into the final chain so you can continue along the opposite side. Reverse the stitch sequence as you crochet back toward the beginning. This creates a pointed oval leaf. Finish with a sl st, fasten off, and leave a long tail for sewing.
For a more sculptural leaf similar to the photographed design, work the leaf in short rows or use increases through the middle section to make it wider. Adding a line of surface slip stitches through the center can represent the central vein and make the leaf look more dimensional.
Position the leaf beside the stem rather than directly underneath it. Sew only the base of the leaf to the pumpkin so that its outer portion remains raised. This small detail adds movement and prevents the top of the project from looking completely flat. Weave all yarn ends securely into the dense crochet fabric.
Color is one of the easiest ways to transform this pattern. A traditional autumn version can use burnt orange, cream, and forest green. For neutral farmhouse décor, combine beige, ivory, taupe, and sage. A modern version might feature mustard yellow, terracotta, dusty rose, or even monochromatic white with a contrasting green stem.
You can also make several pumpkins in different sizes using the same Crochet Pumpkin Pattern. Use thicker yarn and a larger hook for a chunky centerpiece, or thinner yarn and a smaller hook for miniature decorations. A coordinated collection of small, medium, and large pumpkins creates an attractive handmade autumn arrangement without changing the fundamental construction technique.
Frequently Asked Questions About the Crochet Pumpkin Pattern
What is the best yarn for a Crochet Pumpkin Pattern?
Cotton, acrylic, and cotton-blend yarns all work well. Cotton provides excellent stitch definition and produces very visible ribs, while acrylic tends to create a softer and slightly lighter finished piece. Medium-weight yarn is a practical choice for beginners because it is easy to handle and produces a good-sized decorative pumpkin.
What crochet hook size should I use for a pumpkin?
For medium-weight yarn, approximately 4.0–5.0 mm is a useful starting range. Many crocheters deliberately choose a hook slightly smaller than they would normally use for the yarn because tighter stitches help prevent polyester filling from appearing between the loops.
How do I make a crochet pumpkin look more realistic?
The key is shaping. Instead of relying only on the crochet fabric, pass yarn strands from the top center to the bottom center and around the outside. Tightening these strands creates deep grooves and clearly separated ribs. A slightly flattened top and bottom will also make the finished piece resemble a real pumpkin.
How can I make the ribs stand out more?
Use BLO single crochet, textured post stitches, contrasting colors, or external shaping strands. Combining two or three of these methods creates especially strong definition. The brown-and-cream contrast also makes each rib visually distinct even before the final shaping stage.
Can beginners make this Crochet Pumpkin Pattern?
Yes. A beginner who understands chain stitches, single crochet, increases, decreases, and basic seaming can complete the project. The panel method is particularly approachable because it mainly involves repeating rows of back-loop single crochet before sewing and stuffing.
Can I crochet the pumpkin without a magic ring?
Yes. Chain 2 and work the starting stitches into the second chain from the hook. This alternative creates a similar center and is useful for anyone who finds the magic ring uncomfortable or difficult.
How much stuffing should I put inside the pumpkin?
Add enough filling to make the sides full and smooth, but stop before the pumpkin becomes extremely firm. A small amount of flexibility is necessary because the shaping yarn needs to compress the body to form the characteristic grooves.
Why is my crochet pumpkin becoming too round?
This usually happens because of excessive stuffing or insufficient shaping. Remove a small amount of fiberfill if necessary and tighten the strands that pass around the body. Flattening the upper and lower centers with your hands can also improve the silhouette.
Can I make the pumpkin bigger?
Absolutely. With round construction, continue adding increase rounds before working the straight sides. With panel construction, increase both the starting chain length and the number of rows in each section. Using bulky yarn is another simple way to create a larger pumpkin without dramatically changing the pattern.
Can leftover yarn be used for this project?
Yes, and this is an excellent project for using coordinated yarn remnants. Because the design can feature multiple colors, small amounts of leftover cream, brown, orange, green, beige, or mustard yarn can become individual pumpkin ribs, leaves, or stems.
How do I keep the stem upright?
Crochet it with firm tension and avoid excessive stuffing. A dense tubular stem normally holds its shape well. For a deliberately curved stem, leave the top softer and gently shape it after sewing it to the pumpkin.
How long does it take to crochet a pumpkin?
The time varies with yarn weight, size, crochet experience, and the amount of decorative detail. A small simple pumpkin can be completed relatively quickly, while a larger ribbed version with alternating color sections, shaping, a stem, and a leaf naturally requires more time.
Conclusion
This Crochet Pumpkin Pattern combines straightforward crochet techniques with thoughtful shaping to create a textured piece of handmade autumn décor. The project begins with choosing complementary yarn colors and understanding important abbreviations such as sc, BLO, inc, dec, and sl st. From there, the body is crocheted and shaped into pronounced ribs, filled carefully with polyester fiberfill, and finished with a green stem and dimensional leaf.
The most important lesson is that the final shape comes from both the crochet stitches and the finishing process. Firm stitches create a durable fabric, back loop crochet develops natural ridges, contrasting colors highlight the individual pumpkin sections, and long shaping strands create the deep grooves that give the project its realistic appearance.
EASILY FIND THE PDF FOR THIS PATTERN HERE!
Once you understand these techniques, you can adapt the same pattern into miniature pumpkins, oversized decorations, farmhouse-style neutral pumpkins, colorful autumn collections, or personalized seasonal centerpieces. Changing the yarn weight, hook size, colors, number of ribs, stem length, or leaf shape gives you many possibilities while preserving the core construction of the Crochet Pumpkin Pattern. If you make your own version, leave your sincere opinion about the pattern and share any suggestions that could make the project even clearer or more creative. Your ideas about color combinations, yarn choices, rib textures, and finishing details can inspire new variations and help other crochet lovers enjoy this beautiful seasonal project.