
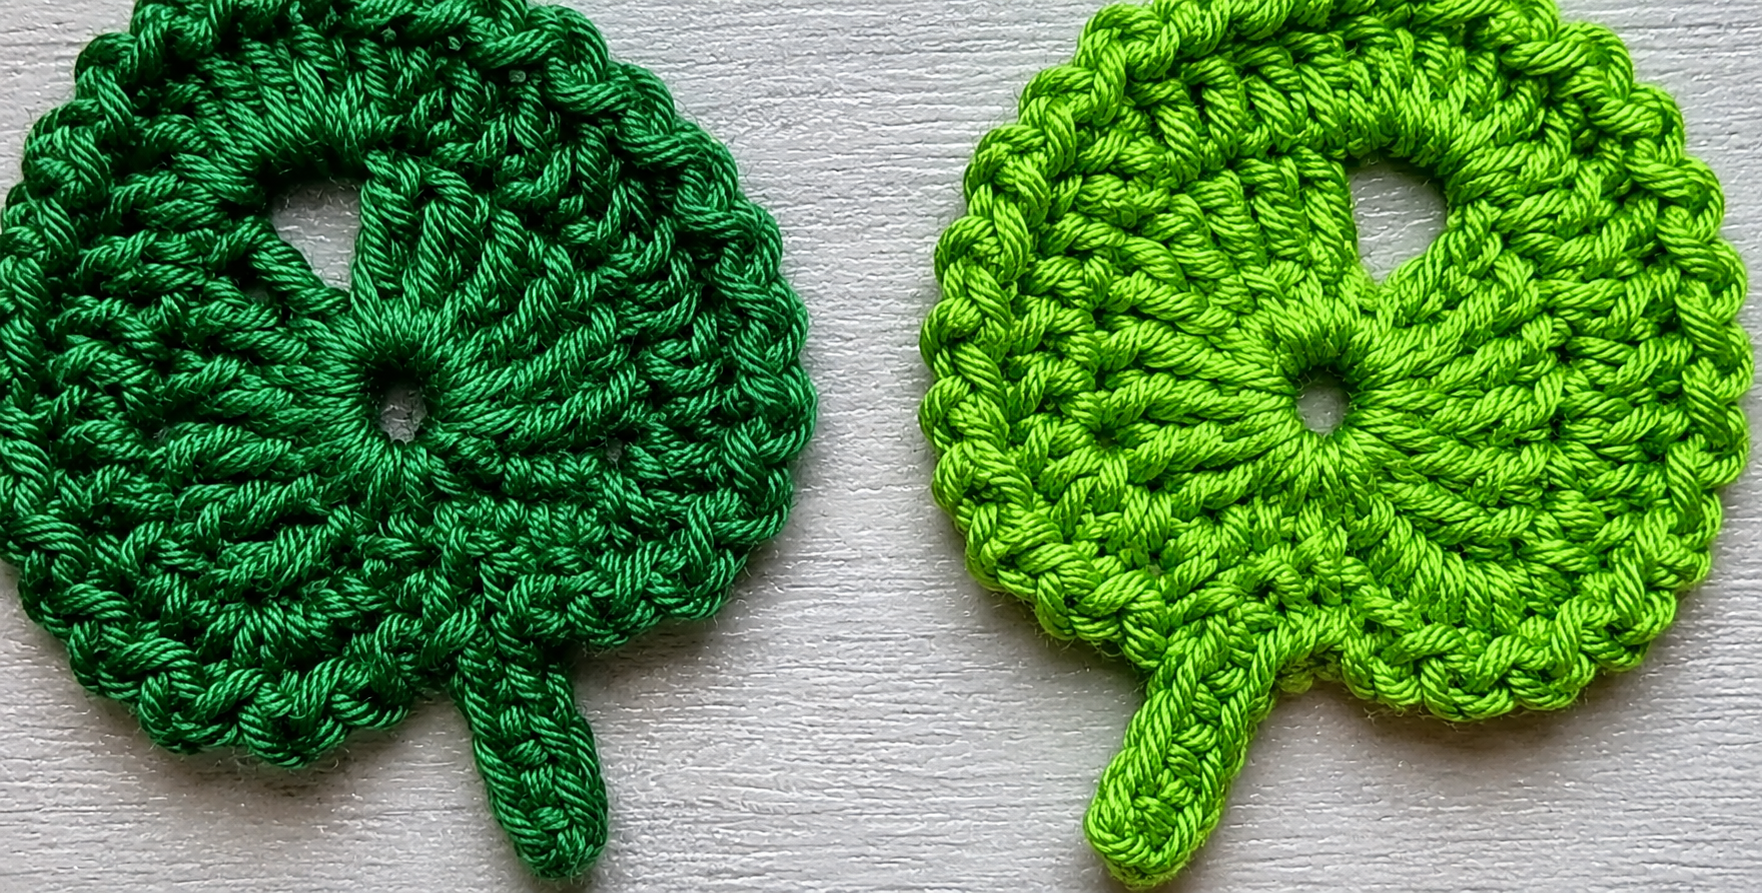
Crochet leaf with an outline Pattern is a charming crochet project that turns a small amount of yarn into a decorative leaf with a clearly defined center, rounded lobes, and a textured outer edge. Inspired by the handmade leaves shown in the reference image, this design works beautifully as an appliqué for blankets, bags, table decorations, garlands, seasonal projects, coasters, wall hangings, and many other creative pieces. The construction is compact enough for crocheters who want a quick project, yet it includes several useful techniques that make it interesting for more experienced makers as well. The pattern is created primarily with chains, slip stitches, single crochet, half double crochet, double crochet, and taller stitches that help shape the leaf naturally. A final outline gives the piece a polished appearance and highlights its silhouette. Because yarn thickness and crochet tension can vary, the finished dimensions may differ slightly from one maker to another.
One of the most appealing details of this crochet leaf pattern is the way the stitches radiate from a central foundation and gradually create the recognizable shape of a leaf. Instead of relying on complicated sewing or assembly, most of the structure can be worked directly with the crochet hook. Taller stitches form the fuller sections of the leaf, while shorter stitches help create curves and narrow points. The stem is added as an extension of the main body, allowing the project to remain visually continuous. A contrasting or matching outline can then be crocheted around the outside to strengthen the edge and emphasize the shape. This makes the Crochet leaf with an outline Pattern a useful exercise for understanding stitch height, shaping, tension, and decorative edging.
The project can also be customized easily, which is one reason handmade crochet leaves are so versatile. A dark forest green yarn creates a classic botanical effect, while lime green produces a brighter and more playful look similar to the second leaf in the reference image. Autumn shades such as rust, mustard, burgundy, brown, or gold can transform the same instructions into fall decorations. Cotton yarn is especially practical when the leaves will be used as appliqués, coasters, or home décor because it usually provides good stitch definition. Acrylic yarn creates a softer result and may be especially suitable for blankets or accessories. By understanding the construction rather than simply memorizing the instructions, you can adjust the Crochet leaf with an outline Pattern to create larger, smaller, wider, or more pointed leaves.
Crochet Materials, Stitch Key, and Pattern Preparation
Before beginning the Crochet leaf with an outline Pattern, choose a yarn that produces clear and well-defined stitches. Medium-weight cotton yarn is a practical choice for a firm decorative leaf, although lightweight cotton can be used for smaller appliqués. Select a crochet hook appropriate for your chosen yarn; for medium cotton, a hook around 3.5 mm to 4.5 mm is often suitable. You will also need scissors and a yarn needle for weaving in the ends. Stitch markers are optional but can help identify important points around the leaf. Remember that the hook size is a starting point rather than a strict requirement because individual crochet tension can change the final appearance.
DISCOVER MORE FREE PATTERNS HERE!
The crochet key used throughout this pattern follows standard U.S. crochet terminology. CH means chain, SL ST means slip stitch, SC means single crochet, HDC means half double crochet, DC means double crochet, and TR means treble crochet. You may also see ST for stitch, STS for stitches, SP for space, and REP for repeat. When instructions say to work several stitches into the same space, all of those stitches should be inserted into that one location. This technique is important because groups of stitches create the rounded lobes visible along the leaf.
The chain stitch (CH) forms the foundation of many crochet projects and is also useful for creating the stem. Make a slip knot, insert the hook, yarn over, and pull the yarn through the loop on the hook. Repeat this movement for every chain required. Try not to make the chains excessively tight because you will need enough flexibility to insert the hook into them later. Consistent chains contribute to an even finished leaf. If your foundation chain is too tight, switching temporarily to a slightly larger crochet hook can make the first stage easier.
The single crochet (SC) is one of the shortest stitches used in this project and helps shape narrow areas and stabilize the outline. Insert the hook into the designated stitch or space, yarn over, and pull up a loop. You should now have two loops on the hook. Yarn over again and pull through both loops. Because single crochet creates a compact fabric, it is particularly useful around the perimeter of the leaf. It can also help define the transition between one lobe and another.
The half double crochet (HDC) and double crochet (DC) provide progressively more height. For an HDC, yarn over, insert the hook, pull up a loop, yarn over again, and pull through all three loops on the hook. For a DC, yarn over, insert the hook, pull up a loop, yarn over and pull through two loops, then yarn over and pull through the final two loops. Combining shorter and taller stitches is what produces the curved shape instead of a simple flat circle. These changes in stitch height are central to the appearance of this crochet leaf with an outline.
The treble crochet (TR) provides additional height for the broadest or most dramatic sections of the leaf. Yarn over twice before inserting the hook, pull up a loop, and then work through the loops two at a time until only one loop remains. If you prefer a slightly more compact leaf, some treble stitches can be replaced with double crochet. If you want deeper lobes, taller stitches can be emphasized. This flexibility makes the pattern useful as a foundation for personal variations while still maintaining the recognizable leaf structure.
Step-by-Step Construction of the Crochet Leaf
Begin with a small central ring. You can make CH 4 and join with a SL ST into the first chain to create a ring, or use a magic ring if that technique is comfortable for you. The center should remain relatively small because the surrounding stitches will create the body of the leaf. Work carefully during this first stage because the central ring becomes the visual anchor for the radiating stitches. Do not pull the ring so tightly that the next stitches become difficult to work. The small central opening visible in many handmade leaf motifs can be retained as a decorative feature.
For the first shaping section, work a combination such as CH 3, 2 DC into the center ring, CH 2, and SL ST into the ring. This creates the beginning of one rounded section. The exact number of stitches can be adjusted according to your yarn, but the main principle is to use taller stitches in the middle and lower stitches at the edges. Rotate the work slightly as you crochet so that each stitch group sits comfortably beside the previous group. The developing motif will begin to spread outward from the center. At this point, the project may look more like a flower than a leaf, which is completely normal.
Create the next lobe by working CH 2, HDC, 2 DC, TR, 2 DC, HDC, CH 2, SL ST into the central area or designated spaces, depending on how tightly your first section sits. This sequence rises gradually toward the tallest stitch and then descends again. That symmetrical increase and decrease forms a smooth curve. You can gently spread the stitches with your fingers to check the shape as you work. Avoid pulling the slip stitches too tightly because they form the indentation between lobes. Maintaining relaxed tension helps preserve the soft botanical appearance.
Repeat a similar sequence for another side section, adjusting the number of DC or TR stitches when necessary to create a balanced leaf. In the leaf shown in the reference image, the lobes are not perfectly geometric, which gives the finished project an appealing handmade quality. Your crochet does not need to be mathematically identical on every side to look beautiful. However, try to keep the overall stitch count balanced so that the leaf does not twist excessively. Slight blocking at the end can correct minor differences. Working slowly through this shaping stage usually produces a cleaner result than trying to force every stitch into position.
For the upper portion, create a broader lobe using a gradual sequence such as CH 2, HDC, DC, 2 TR, DC, HDC, CH 2, SL ST. The taller stitches near the center give this section additional height and help form the top of the leaf. If you want a sharper upper point, replace one of the central stitch groups with a short chain point, such as CH 2 or CH 3, followed by stitches descending in height on the opposite side. If you prefer the rounded look from the photograph, keep the transition softer. Both versions follow the same basic Crochet leaf with an outline Pattern concept.
Complete the remaining side of the leaf by mirroring the previous shaping sequence as closely as possible. Work shorter stitches near the lower area so that the motif narrows naturally toward the stem. Finish the body with a SL ST into the central or lower joining point. Lay the leaf flat and inspect the lobes before continuing. If one section appears noticeably smaller, you can sometimes correct it during the outline round by adding an extra stitch in that area. The body should now resemble a stylized leaf with a visible central opening and several textured sections radiating outward.
Adding the Stem and Decorative Crochet Outline
To create the stem, begin from the lower point of the leaf and make approximately CH 7 to CH 10, depending on the stem length you prefer. A shorter chain gives the motif a compact appearance, while a longer one makes the leaf suitable for garlands or hanging decorations. After making the chain, work back along it using SL ST or SC. Slip stitches create a narrow, flexible stem, while single crochet produces a thicker and more visible stem. The example shown has a fairly substantial stem, so SC stitches can be particularly effective. Keep the tension even so that the stem stays straight rather than curling strongly.
If you want the stem to look more rounded, work 1 SC into each chain and then place two or three SC stitches around the final chain before working back along the opposite side. This technique creates a small oval end instead of a sharp tip. Continue toward the base of the leaf and join with a slip stitch. The resulting stem will appear integrated into the motif rather than sewn on afterward. This detail also makes the project more durable when it is attached to another crochet piece. Weave the stem end securely into nearby stitches.
The outline is one of the defining features of the Crochet leaf with an outline Pattern. Begin at the stem base or another inconspicuous point and join your yarn. You can use the same color for a subtle textured border or introduce a contrasting shade for more visual definition. Work SC evenly around the outer edge, placing approximately one stitch in each stitch and additional stitches around large curves as needed. Rather than relying only on a fixed count, observe the shape while crocheting. If the border pulls inward, you probably need additional stitches; if it begins to ripple, you may have added too many.
At the deepest spaces between the lobes, use a SL ST or a tightly worked SC to emphasize the indentation. Along the rounded top of each lobe, place two stitches into selected stitches when necessary to help the edging travel smoothly around the curve. This simple variation creates a more defined scalloped appearance. The border should support the shape rather than overwhelm it. For a particularly decorative finish, you can alternate SC and SL ST in selected sections, creating subtle changes in texture. Keep checking the piece on a flat surface during this process.
A slightly more pronounced outline can be created by working a second edging round. After completing the first SC border, join with a slip stitch and continue with SL ST in each stitch around, inserting the hook through the back loop if you want a raised line. Another option is to use reverse single crochet, sometimes called crab stitch, although that technique creates a more textured finish than the smooth example shown. A contrasting second round can make each lobe highly visible. For a botanical look, try dark green around a lighter green center. For a modern decorative style, cream, gold, or another complementary shade can be used.
Finish the border at the stem with a neat SL ST, cut the yarn leaving a manageable tail, and pull the end through securely. Use a yarn needle to weave the tail through several nearby stitches on the back of the leaf. Change direction once or twice while weaving to help prevent the end from working loose. Trim excess yarn only after you are confident that the finish is secure. At this stage, the crochet leaf with an outline should have a defined silhouette, a clearly shaped stem, and an attractive textured surface. The piece can be used immediately or blocked for a more polished appearance.
Finishing, Blocking, Variations, and Creative Uses
Blocking can significantly improve the final shape of the Crochet leaf with an outline Pattern, especially when the stitches are heavily textured. For cotton yarn, lightly dampen the finished leaf and place it on a flat blocking surface. Gently arrange each lobe with your fingers, making sure the stem is straight and the central sections are balanced. Pin the piece only if the yarn and project require it. Allow it to dry completely before removing the pins. Always follow the care instructions for your specific yarn, particularly when using fibers that react differently to heat or moisture.
If you want to make a larger leaf, the easiest method is to use thicker yarn and a larger hook while keeping the same basic stitch structure. You can also increase the number of taller stitches in each lobe. For a miniature leaf, choose fine cotton thread and a smaller hook. The essential shaping principle remains the same: begin with short stitches, increase through taller stitches, and then decrease again. This creates controlled curves. Keeping this principle in mind allows you to modify the crochet leaf pattern without losing its characteristic shape.
Color variations can completely change the personality of the motif. Bright green produces a fresh spring or summer leaf, while dark green gives the design a traditional woodland appearance. Mustard yellow, burnt orange, burgundy, and brown are excellent choices for autumn crochet decorations. Pastel colors can turn the leaves into playful appliqués for nursery blankets or handmade gifts. You can also work the body in one color and the crochet outline in another. Contrasting edges are especially effective when the leaf will be placed against a similarly colored background.
The finished leaves can be sewn onto a crochet blanket, tote bag, cushion cover, scarf, hat, table runner, or handmade wall hanging. They can also be joined together to create garlands and decorative vines. If using them as appliqués, place the leaf in position and sew around several points of the outline using matching yarn and a yarn needle. You do not necessarily need to sew every edge unless the project will receive frequent washing or heavy use. Secure the stem as well so that it does not lift away from the base fabric.
Another creative idea is to make several leaves in different sizes and combine them with crochet flowers. The textured lobes create an attractive background for simple blossoms, while the outlined edge prevents the leaves from disappearing visually beneath larger elements. You can also use the motif as part of seasonal table décor or gift packaging. For reusable decorations, cotton yarn is practical because it tends to hold its shape well. Creating several motifs is also a good way to practice consistent tension and become comfortable with shaping through stitch height.
Most importantly, treat this Crochet leaf with an outline Pattern as a flexible handmade design rather than an inflexible formula. Yarn type, hook size, hand tension, and personal preferences naturally influence the final result. If your leaf curls slightly, adjust the number of border stitches. If a lobe appears too narrow, add another DC or TR in that section the next time you make the pattern. If the leaf feels too loose, try a smaller hook. Learning to observe how stitches influence the shape is an important crochet skill that can later be applied to flowers, appliqués, motifs, and freeform crochet projects.
FAQ – Frequently Asked Questions About the Crochet Leaf with an Outline Pattern
What crochet skill level is recommended for this pattern?
The Crochet leaf with an outline Pattern is suitable for an adventurous beginner or intermediate crocheter. You should ideally be comfortable making chains, slip stitches, single crochet, half double crochet, double crochet, and treble crochet. Beginners can still complete the project by practicing each stitch individually before starting the leaf.
What yarn is best for a crochet leaf?
Cotton is an excellent option because it provides strong stitch definition and helps the leaf maintain its shape. Medium or light cotton yarn works particularly well for appliqués and decorative motifs. Acrylic yarn can also be used when a softer finish is desired.
What crochet hook size should I use?
The correct hook depends primarily on your yarn. A medium cotton yarn may work well with approximately a 3.5 mm to 4.5 mm crochet hook. Check your yarn label and then adjust according to the stiffness you want. A slightly smaller hook can produce a firmer leaf.
Why is my crochet leaf curling?
Curling is often related to stitch tension or the number of stitches around the perimeter. Too few stitches in the border may pull the edges inward, while too many can cause ruffling. Blocking can correct minor curling, but strong distortion usually means the stitch distribution should be adjusted.
How can I make the leaf more pointed?
To create a sharper point, use a short chain at the top of the leaf and work progressively shorter stitches on either side. For example, a section moving from DC to TR, followed by CH 2, then back from TR to DC can create a stronger point. Experiment with the sequence until the shape suits your project.
Can I use a contrasting color for the outline?
Yes. A contrasting outline is one of the easiest ways to personalize the project. A dark outline around a light green leaf creates strong definition, while a lighter outline around a dark leaf produces a softer decorative effect.
How do I make the crochet stem thicker?
Instead of working slip stitches back along the foundation chain, use SC stitches. You can also crochet around both sides of the chain to create a thicker stem. This is especially useful when the leaf will be used on a bag, pillow, or decorative wall piece.
Can this leaf be used as a coaster?
A larger version made with cotton yarn can work as a decorative coaster. Make sure the finished surface lies flat and avoid adding beads, buttons, or raised embellishments if cups will be placed directly on it. Cotton is generally a practical choice for this purpose because it is durable and absorbent.
How can I make several leaves the same size?
Use the same yarn, hook, stitch count, and tension for every leaf. Writing down any modifications you make to the original instructions is also helpful. Blocking the finished leaves to the same dimensions can improve consistency when they are used together in one project.
Do I need to block every crochet leaf?
Blocking is optional, but it can improve the appearance substantially. It helps open the stitch pattern, define the lobes, straighten the stem, and reduce minor curling. Decorative appliqués often look more professional after light blocking.
Can beginners use a magic ring for the center?
Yes, although it is not mandatory. If a magic ring feels difficult, simply make CH 4 and join with a SL ST to form a small ring. Both methods can create an effective center for this pattern.
What does an outline add to the crochet leaf?
The crochet outline defines the silhouette, reinforces the outer edge, and helps each lobe stand out. It can also correct small irregularities in the first round of shaping. When worked in a contrasting color, the outline becomes an important decorative feature of the entire motif.
Can I sew these leaves onto other crochet projects?
Absolutely. Crochet leaves work well as appliqués on blankets, cushions, bags, hats, scarves, and other handmade pieces. Use a yarn needle and matching yarn to attach the outline securely while keeping the stitches as discreet as possible on the front.
How do I make an autumn version of the pattern?
Use colors such as mustard, burnt orange, deep red, burgundy, brown, olive, or gold. You can make several leaves in different shades and combine them into a fall garland, table arrangement, blanket decoration, or seasonal wall hanging.
Can I modify the number of lobes?
Yes. Once you understand how each lobe is formed by increasing and decreasing stitch height, you can add or remove sections. Keep the overall balance of the leaf in mind and leave enough space near the bottom for the stem.
Conclusion
The Crochet leaf with an outline Pattern is a compact project that teaches several valuable crochet techniques while creating a beautiful decorative motif. Throughout this tutorial, you learned how to prepare the yarn and hook, understand the crochet stitch key, build the central foundation, shape the leaf with SC, HDC, DC, and TR stitches, create rounded lobes, add a sturdy stem, and finish the project with a defined crochet outline.
You also learned how stitch height influences the shape of the leaf and why tension is so important when working around curves. Short stitches help form narrow sections and indentations, while taller stitches provide the volume required for each lobe. The outer border brings those sections together and gives the finished motif the characteristic outlined appearance that makes this design stand out.
Once you become comfortable with the basic construction, this pattern offers plenty of room for creativity. You can experiment with different yarn weights, hook sizes, colors, stem lengths, contrasting outlines, and leaf dimensions. A single leaf can become a small appliqué, while multiple leaves can be combined into garlands, floral arrangements, blankets, bags, cushions, or seasonal decorations.
The most useful part of learning this Crochet leaf with an outline Pattern is understanding the shaping process behind it. Once you recognize how combinations of chains, single crochet, half double crochet, double crochet, and treble crochet build curves and points, you can begin creating your own variations with confidence. I hope this step-by-step guide inspires you to experiment with your own crochet leaves and color combinations. If you make this pattern, leave your sincere opinion about the result and share your suggestions too. What colors would you choose for your next leaf, and what other crochet pattern would you like to see explained in detail?