
If you’re looking for a lightweight, elegant, and breathable top to wear during the warmer months, then the Crochet Lacy Summer Top is your perfect handmade project. This garment combines delicate lacework with the versatility and creativity of modern crochet patterns, making it ideal for summer wear. Whether you’re heading to the beach or relaxing at home, this top keeps you cool and stylish.
Creating your own lacy summer top might seem intimidating at first, especially if you’re new to openwork or lace stitches, but don’t worry! This tutorial breaks everything down into clear steps. You’ll learn how to create each panel, seam them together, and add simple finishing touches like neck and armhole trims. This pattern is beginner-friendly with a light touch of intermediate techniques for those looking to expand their crochet skills.
In this post, you’ll find everything from recommended materials and stitch explanations to a full step-by-step pattern with exact stitch counts. You’ll also see how popular crochet patterns like this one can elevate your wardrobe and become go-to pieces for years to come. Let’s jump into the world of lace and loops and make something truly special.
Why Choose a Crochet Lacy Summer Top?
Crochet lacy tops are incredibly trendy and offer both fashion and function. They’re airy, lightweight, and stylish—perfect for layering or wearing solo over a tank or bralette. The open stitches provide great ventilation, which is especially ideal when temperatures rise.
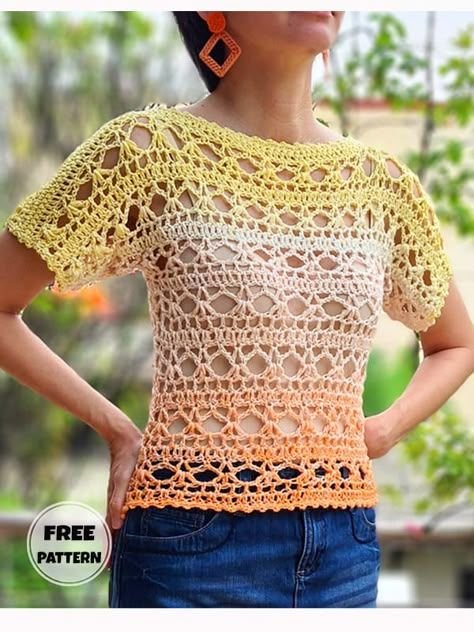
What sets the Crochet Lacy Summer Top apart from other crochet patterns is its delicate, almost floral stitchwork and flattering drape. Whether you’re using cotton yarn for a cool feel or a bamboo blend for extra softness, this design works beautifully with various fibers and finishes.
Beyond aesthetics, this top is also a great skill-building project. You’ll practice chaining, double crochet, shell stitches, and simple shaping techniques—all while creating something functional. It’s a fantastic way to improve your crochet technique while crafting something wearable.
Materials and Tools You’ll Need
To get started, make sure you have the right tools and materials. The yarn you choose will affect the look and feel of your top, so it’s worth picking something soft and breathable.
Materials:
- 3 (4, 5) skeins of lightweight cotton yarn (DK weight or size 3) – approx. 750 to 1000 yards depending on size
- 4.0mm (G-6) crochet hook
- Scissors
- Yarn needle
- Stitch markers (optional)
Cotton yarn is perfect for summer tops because it absorbs moisture and has a smooth, crisp stitch definition. It also helps the lace pattern stand out clearly. You may also experiment with bamboo, linen, or lightweight acrylic blends for slightly different drape effects.
Be sure to check your gauge before starting. The gauge for this pattern is 16 dc x 8 rows = 4” in lace stitch pattern. Adjust your hook size as needed to meet this gauge.
Stitch Guide – What You Need to Know
This pattern uses common stitches with a simple repeat, so once you get the hang of it, the top works up quickly.
Stitches Used:
- ch – chain
- sc – single crochet
- dc – double crochet
- sl st – slip stitch
- shell stitch – 5 dc in same stitch
The main body of the top features a repeating shell lace pattern, which gives it a scalloped, open look. The shell stitch clusters create gentle waves that drape beautifully when worn.
If you’re unfamiliar with the shell stitch, here’s how to make one: In the same stitch or space, work 5 double crochet (dc) stitches. The following rows alternate shells and single crochets to create the lace effect.
Step-by-Step Pattern Instructions
This top is worked in two identical rectangular panels (front and back) and then seamed at the sides and shoulders. Armholes and neckline trims are added afterward.
SIZES:
Small (Medium, Large) – Finished bust: 34” (38”, 42”)
STEP 1: Create the Front and Back Panels (Make 2)
Foundation Chain:
Ch 70 (80, 90) – or a multiple of 6 + 4 to adjust width.
Row 1:
In 2nd ch from hook, sc. Skip 2 ch, 5 dc in next ch (shell made), skip 2 ch, sc in next ch. Repeat from * to end. Turn.
Row 2:
Ch 3 (counts as dc), 2 dc in first sc (half-shell). Sc in center dc of next shell, shell in next sc. Repeat to end. End with 3 dc in last sc. Turn.
Row 3:
Ch 1, sc in first dc. Shell in next sc, sc in center of next shell. Repeat from * to end. Turn.
Repeat Rows 2 and 3 until piece measures:
16” (17”, 18”) long – or desired length.
Fasten off both panels and weave in ends.
STEP 2: Assemble the Panels
Place both panels on top of each other, right sides facing.
Seam Shoulders:
Measure and mark 7” (8”, 9”) from each side at the top edge for the shoulder seams. Use whip stitch or mattress stitch to join the shoulder areas, leaving space in the center for the neckline.
Seam Sides:
From the bottom edge, measure up 5”–7” (depending on fit preference) and mark for armholes. Seam up the sides, leaving the marked area open.
Flip right-side out. The lacy shell stitch will now form a delicate pattern all over the front and back.
STEP 3: Add Neckline and Armhole Trim (Optional)
This step helps to clean up the raw edges around the neck and arms and give a professional finish.
Neckline Trim:
- Attach yarn at any point in neckline.
- Ch 1, sc evenly around the neckline, working 2 sc per dc-row end and 1 sc in each stitch.
- Sl st to first sc, fasten off, and weave in ends.
Armhole Trim:
Repeat the same steps around each armhole, working evenly.
These finishing touches not only polish the look but also stabilize the edges so they don’t stretch out during wear.
Customizing Your Crochet Lacy Summer Top
One of the best parts of following crochet patterns like this one is the ability to make it truly your own. You can adjust the length to create a tunic-style top or crop it for a trendy look.
Another customization idea is to switch colors partway through to create a striped or color-blocked effect. You could also add a drawstring at the waist or decorate the neckline with beaded edging for added flair.
Want to make it sleeveless or give it flutter sleeves? You can do that too by adjusting the armhole shaping and adding a few shell rows over the shoulder area.
Washing and Caring for Your Summer Top
When it comes to lace crochet patterns, it’s important to care for them properly to keep their shape and detail. Always check the yarn label for specific care instructions.
In most cases, hand-washing your top in cool water with a mild detergent will preserve the stitches and fiber integrity. Gently squeeze out excess water without wringing, then lay flat to dry on a towel.
If your top loses its shape, lightly block it by pinning it to the desired dimensions while damp. This helps maintain the shell pattern’s form and overall drape.
Wrap-Up: A Must-Try for Lovers of Crochet Patterns
The Crochet Lacy Summer Top is more than just a seasonal project—it’s a timeless piece that combines beauty, comfort, and handmade charm. Whether you’re new to lacework or a seasoned crocheter, this design is a great way to expand your wardrobe and your crafting skills.
From the elegant shell stitches to the breathable structure, every aspect of this top was made for sunshine and good vibes. Plus, you get the satisfaction of saying, “Thanks, I made it!” every time you wear it.
As always, remember to bookmark or pin this post, and share your finished top on social media using the hashtag #crochetpatterns. We’d love to see your summer makes!