
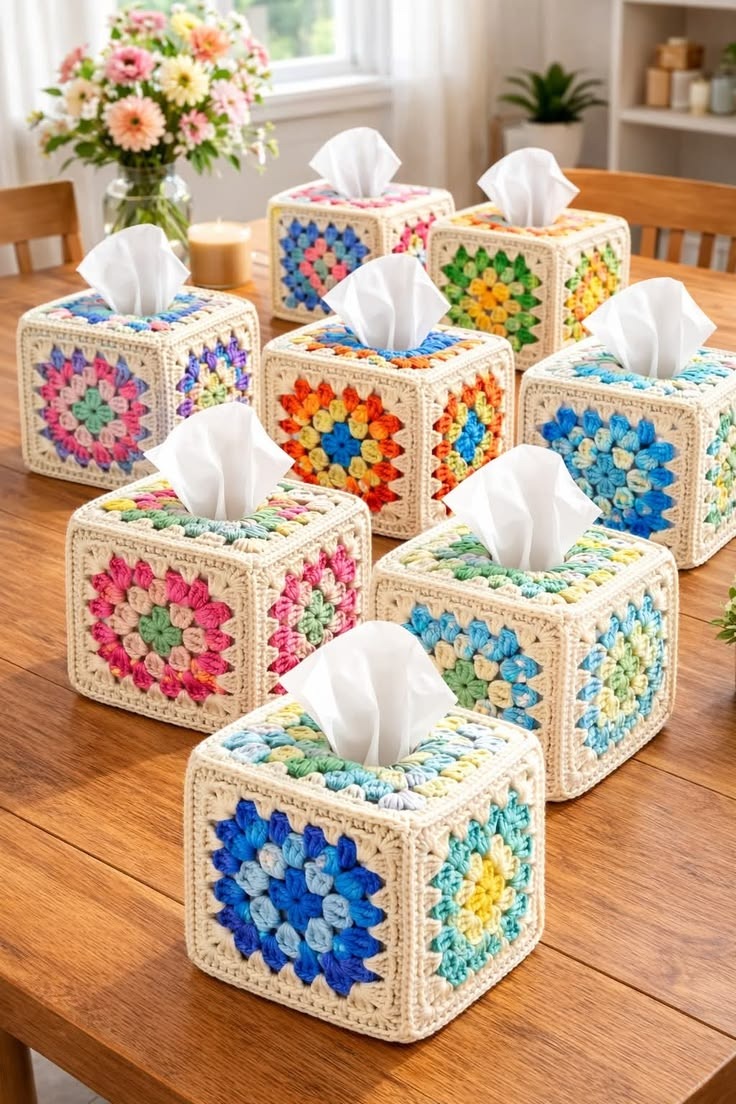
The Crochet Granny Square Tissue Box Cover Pattern is a beautiful way to combine traditional crochet with a useful accessory for the home. Inspired by the timeless look of colorful granny squares, this project transforms an ordinary tissue box into a decorative handmade piece that can brighten a bedroom, bathroom, sewing room, nursery, or living area. The design is especially attractive because it allows crocheters to experiment with different yarn colors while keeping a neutral border that brings all the squares together. A finished crochet tissue box cover can look cheerful, vintage, modern, or rustic depending on the chosen color palette. It is also a manageable project for anyone who already understands basic crochet stitches and wants to practice joining motifs. Throughout this tutorial, you will learn how to crochet the squares, adjust the dimensions, create the tissue opening, assemble the panels, and finish the cover neatly.
One of the most appealing features of the Crochet Granny Square Tissue Box Cover Pattern is its versatility. Traditional granny square crochet is built with repeating groups of stitches, making the pattern easy to memorize once the first few rounds are completed. Instead of crocheting one large fabric panel, you create individual motifs that can be arranged until you are satisfied with the final combination. This makes the project excellent for using small amounts of leftover yarn from previous crochet projects. You can create bright rainbow squares, soft pastel combinations, floral-inspired motifs, or a coordinated palette using only two or three colors. The cream or beige edging seen in many classic versions helps define each colorful square while giving the completed tissue box cover a polished and harmonious appearance.
Before beginning this crochet granny square tissue box cover, it is important to understand that tissue boxes can vary significantly in size. For this reason, the most reliable approach is to measure the specific tissue box you plan to cover before determining the final dimensions of your crochet panels. This pattern is designed as a flexible method rather than a rigid one-size-only formula, allowing you to adapt the granny squares to square or rectangular tissue boxes. You will need yarn, a crochet hook appropriate for that yarn, scissors, a yarn needle, stitch markers if desired, and a measuring tape. Medium-weight cotton or cotton-blend yarn works particularly well because it provides enough structure for the finished cover. Maintaining consistent tension throughout the project will also help your squares stay even and make the final assembly much easier.
Materials, Crochet Stitch Key, and Planning the Size
For your Crochet Granny Square Tissue Box Cover Pattern, choose yarn that creates a fabric with enough structure to hold its shape without becoming excessively stiff. A medium-weight cotton yarn is a practical option, although acrylic or blended yarn can also be used successfully. Select several colors for the center rounds and one main neutral shade for the borders and seams. A crochet hook around 4 mm to 5 mm often works well with medium-weight yarn, but always choose a hook that produces comfortable, even stitches with your particular yarn. You will also need a tapestry needle for weaving in ends and assembling the motifs.
DISCOVER MORE FREE PATTERNS HERE!
The basic crochet stitch key used in this pattern is simple. ch = chain, sl st = slip stitch, sc = single crochet, dc = double crochet, st = stitch, sts = stitches, sp = space, ch-sp = chain space, rnd = round, and rep = repeat. These abbreviations are commonly used in written crochet patterns and make the instructions easier to follow. The primary stitch used for the decorative motifs is the double crochet, while chains create the spaces that form the recognizable corners of the granny square.
Start by measuring the tissue box from side to side, front to back, and from the bottom to the top edge. Write these measurements down before crocheting your first motif. The cover should fit comfortably over the box without stretching dramatically, so adding approximately 0.5 to 1 inch of ease can help with placement and removal. Remember that the exact amount of ease will depend on your yarn and crochet tension. A slightly relaxed fit is generally more practical than a cover that is extremely tight.
Next, crochet one sample granny square and measure it after gently shaping it. Suppose your finished square measures approximately 4 inches. You can then calculate how many motifs will be necessary to cover each side of your tissue box. For example, a side measuring close to 8 inches may work with two 4-inch squares arranged together. If the measurements do not match perfectly, additional border rounds can be added to the granny squares or narrow crochet strips can be worked during assembly.
Your color selection can completely transform this granny square tissue box cover. For a cheerful handmade appearance, use a different combination of three or four colors inside every motif while repeating the same neutral shade around the outside. For a calmer design, choose related tones such as sage green, pale yellow, cream, and soft blue. You could also create a dramatic version using jewel tones surrounded by black, charcoal, or deep navy borders. Planning the colors before beginning will help the different panels look coordinated.
Before making every motif, crochet one complete sample and place it against the tissue box. Check its width, height, flexibility, and overall appearance. This small step can prevent problems later because changing the square size is much easier before dozens of motifs have been completed. If your square is too small, add another round. If it is too large, use fewer rounds, a slightly smaller hook, or a thinner yarn. Once the sample fits your calculations, you are ready to make the remaining squares.
How to Crochet the Granny Squares Step by Step
To begin the first crochet granny square, make a slip knot and ch 4. Join the first chain with a sl st to create a small ring. Alternatively, experienced crocheters can use a magic ring. For Round 1, ch 3 to represent the first dc, then work 2 dc into the ring. Ch 2 for the first corner. Work 3 dc into the ring, ch 2, and repeat this combination until you have four groups of 3 dc separated by four ch-2 corner spaces. Join with a sl st at the top of the beginning ch-3.
For Round 2, you can continue with the same yarn or attach a new color in any corner space. Ch 3 and work 2 dc into that corner. Ch 2, then work another 3 dc into the same corner space. This creates the first corner of the new round. Ch 1, move to the next corner, and work 3 dc, ch 2, 3 dc into that corner. Continue around the square in the same way. Finish with a ch 1 and join the round using a slip stitch.
For Round 3, attach another color if desired. Begin inside any corner with ch 3, 2 dc, ch 2, 3 dc. Ch 1 and work 3 dc into the side ch-1 space from the previous round. Ch 1 again before reaching the next corner. Inside every corner, work 3 dc, ch 2, 3 dc. Each ordinary side space receives one group of 3 dc. Repeat around the square and join neatly with a slip stitch.
Continue adding rounds using the same principle until your motif reaches the required size. Every new round will contain more side spaces, but the corner construction remains unchanged. Work 3 dc, ch 2, 3 dc in every corner and work 3 dc into every standard space along the sides, usually separating the clusters with ch 1. This repetitive construction is one reason the classic granny square pattern remains so popular: the structure becomes intuitive very quickly.
For a design similar to a colorful floral granny square, change yarn colors between rounds. You might begin with dark blue in the center, add pale blue in the second round, turquoise in the third, and finish the motif with cream. Another square could combine pink, coral, mint, and beige. Varying the interior colors while repeating the same final border shade creates visual variety without making the finished crochet tissue box cover look disconnected.
After completing each motif, fasten off and weave the yarn ends securely into the back of the work. Gently shape the squares so that the corners remain approximately 90 degrees. Blocking the motifs before assembly is optional but very helpful, particularly when your squares have slightly different shapes. Place them at the intended measurement, lightly dampen them if your yarn allows it, and let them dry completely. Consistent squares create straighter seams and a more professional-looking finished cover.
Creating the Tissue Opening and Joining the Crochet Panels
The top panel requires special attention because the tissues need an opening through which they can be pulled. One method is to arrange four granny squares around a central opening. Lay the motifs on a flat surface and position them so that their inner corners leave an opening approximately aligned with the tissue opening on the box. Join the surrounding edges while keeping this central section open. Because tissue box designs vary, test the arrangement directly over the box before permanently joining the squares.
If the central opening appears too large, add a narrow single crochet edging around it. Attach your neutral yarn and work sc stitches evenly around the opening. At corners, you may need to decrease or work stitches strategically so the border remains flat. A second round of single crochet can be added if necessary. The finished opening should be wide enough for tissues to pass through easily but small enough to conceal most of the cardboard opening underneath.
Another option for the top is to create a dedicated crochet panel with an opening rather than relying exclusively on several motifs. Crochet the granny squares needed for the top and join them, then work additional rows around the outside and inside edges. The key is maintaining symmetry. Place the top panel over the tissue box several times during construction to make sure that the opening stays centered and that the edges line up with the side panels.
To join the crochet granny squares, arrange the motifs in their final order first. A whip stitch seam is easy and creates a relatively flat connection. Thread your tapestry needle with the border yarn and sew through corresponding stitches on both motifs. Another option is a slip-stitch crochet join. With the wrong sides facing each other or placed according to your preferred seam style, slip stitch through aligned stitches along both edges. Keep the joining tension relaxed enough that the seam does not pull or distort the squares.
Create each side panel separately before attaching it to the top. Depending on your tissue box dimensions and granny square size, a side panel might use one square, two squares, or several smaller motifs. Join them together and compare each completed panel with the appropriate side of the tissue box. When all four side panels fit correctly, connect their vertical edges to form a box-like shape. The result should resemble a soft crochet sleeve before the top is attached.
Position the top panel over the four connected sides and secure the corners temporarily with stitch markers. Join the top edge to the side panels using your preferred method. Work slowly around the corners because they determine how neatly the cover will sit on the tissue box. When finished, turn the cover to the correct side and test the fit. Adjust any loose seams or uneven areas before completing the final edging.
Finishing, Customizing, and Caring for the Tissue Box Cover
The lower edge of the Crochet Granny Square Tissue Box Cover Pattern benefits from a finishing round because it helps the cover maintain a clean shape. Attach the neutral yarn at any seam and work one round of single crochet around the entire bottom. Work approximately one stitch into each available stitch or row end, adjusting as necessary so the edge remains flat. If the cover feels slightly loose, a carefully worked final round can add a little structure.
You can create a more decorative bottom edge by working a simple reverse single crochet, picot edging, or another compact border. However, avoid an excessively large decorative trim because the cover should sit flat on a table or counter. A simple border often complements colorful granny squares better than a complicated edging. The colorful motifs should remain the central visual feature of the project.
The granny square color combinations are almost unlimited. Spring-inspired versions can include pink, peach, mint, lavender, pale yellow, and sky blue. A farmhouse-inspired cover could combine cream, rust, mustard, olive, and muted red. For a coastal style, consider turquoise, light blue, white, sand, and soft green. Using one consistent border color around every motif is one of the easiest ways to make many different colors feel intentional and coordinated.
Small details can also personalize the project. A subtle crochet flower can be added to one side, although keeping the surface relatively flat makes the cover easier to use. You could also embroider small decorative stitches over the neutral borders or create alternating square patterns. The crochet granny square design works especially well with creative customization because every motif can have its own arrangement while following the same basic construction.
When the project is complete, carefully weave in any remaining yarn tails. Check every seam, especially around the upper corners and tissue opening. If you used washable yarn, follow the care recommendations associated with that fiber. Cotton crochet pieces can often be gently washed and reshaped while damp, but yarn characteristics differ. Avoid pulling the cover out of shape, and allow it to dry completely before placing it back over a tissue box.
The finished Crochet Granny Square Tissue Box Cover Pattern combines practical function with the nostalgic charm of traditional crochet. It can also be a thoughtful handmade gift because the color scheme can be adapted to match someone’s kitchen, bedroom, craft room, or office decor. Once you understand the construction, you can make additional covers in completely different palettes without having to learn another technique. That repeatability makes this a satisfying project for both personal decorating and handmade gift ideas.
FAQ – Crochet Granny Square Tissue Box Cover Pattern
What is a Crochet Granny Square Tissue Box Cover Pattern?
A Crochet Granny Square Tissue Box Cover Pattern is a crochet project that uses traditional granny square motifs to create a decorative sleeve around a cardboard tissue box. The individual squares are crocheted separately and then joined to form the sides and top of the cover, with an opening left for pulling out tissues.
Is this crochet tissue box cover suitable for beginners?
It is best for an advanced beginner who already knows how to make chains, slip stitches, single crochet stitches, and double crochet stitches. If you can crochet a basic granny square and join two crochet pieces together, you should be able to complete this project comfortably.
What yarn is best for a granny square tissue box cover?
Medium-weight cotton or cotton-blend yarn is an excellent option because it provides good stitch definition and enough structure for a decorative cover. Acrylic yarn can also work. The most important factor is maintaining a consistent yarn weight throughout the motifs.
How many granny squares do I need for a tissue box cover?
The number depends on the tissue box dimensions and the finished size of your granny squares. Measure the box first, crochet one sample motif, and divide the panel measurements by the size of the completed motif. This method is more reliable than assuming every tissue box has identical dimensions.
How do I make the tissue opening in the top?
You can arrange several granny squares around a central space and join only the surrounding sections, leaving an opening for the tissues. Finish this opening with one or two rounds of single crochet to make it stronger and more polished.
Can I use leftover yarn for this pattern?
Yes. A granny square tissue box cover is an excellent project for using leftover yarn because individual rounds require relatively small amounts of each color. For the most consistent results, try to use yarns with approximately the same thickness.
Do all the granny squares have to be the same colors?
No. In fact, different color combinations can make the project more attractive. One effective approach is to crochet colorful centers and use the same cream, beige, white, or other neutral yarn for the final round of every square. This creates consistency while allowing each motif to remain unique.
Should I block granny squares before joining them?
Blocking is highly recommended when the squares differ slightly in size or shape. It helps straighten the edges, define the corners, and make joining easier. However, always use a blocking method that is appropriate for the fiber content of your yarn.
How tight should the tissue box cover fit?
The cover should fit securely without requiring excessive stretching. A slightly relaxed fit makes it easier to slide the crochet cover over a new tissue box when the old one is empty. Measuring throughout the project is the easiest way to achieve a comfortable fit.
Can I make this pattern for rectangular tissue boxes?
Yes. The same Crochet Granny Square Tissue Box Cover Pattern concept can be adapted to rectangular boxes. Instead of making every panel square, arrange multiple granny squares or add border rows until each crochet panel matches the appropriate dimensions of the box.
How can I make the cover more structured?
Use a slightly smaller crochet hook, select cotton yarn, and keep your stitch tension consistent. Firm granny squares and secure seams usually provide enough structure. You can also add a compact single crochet border around the bottom and tissue opening.
Can the finished tissue box cover be washed?
That depends on the yarn used. Always follow the recommended care instructions for your yarn fiber. When washing is appropriate, gentle handling and reshaping while damp can help preserve the square form and prevent the seams from becoming distorted.
Conclusion
The Crochet Granny Square Tissue Box Cover Pattern is a practical and colorful project that brings one of crochet’s most recognizable motifs into everyday home decor. Throughout this tutorial, you learned how to select yarn and colors, understand the essential crochet stitch abbreviations, measure a tissue box, crochet classic granny squares, create the tissue opening, join the motifs, assemble the side panels, and add neat finishing borders. The greatest advantage of this project is its flexibility. By changing the size, number, and colors of the crochet granny squares, you can adapt the same construction to many different tissue boxes and decorating styles. From soft pastel combinations to bold multicolored designs, every finished piece can have its own personality while following the same simple crochet principles.
EASILY FIND THE PDF FOR THIS PATTERN HERE!
If you make your own Crochet Granny Square Tissue Box Cover Pattern, experiment with the colors and arrangement until the design feels personal to you. Handmade crochet becomes especially rewarding when a familiar technique is transformed into something both decorative and useful. Leave your sincere opinion about this pattern and share your suggestions for color combinations, granny square variations, or other details you would like to see in future crochet projects.