
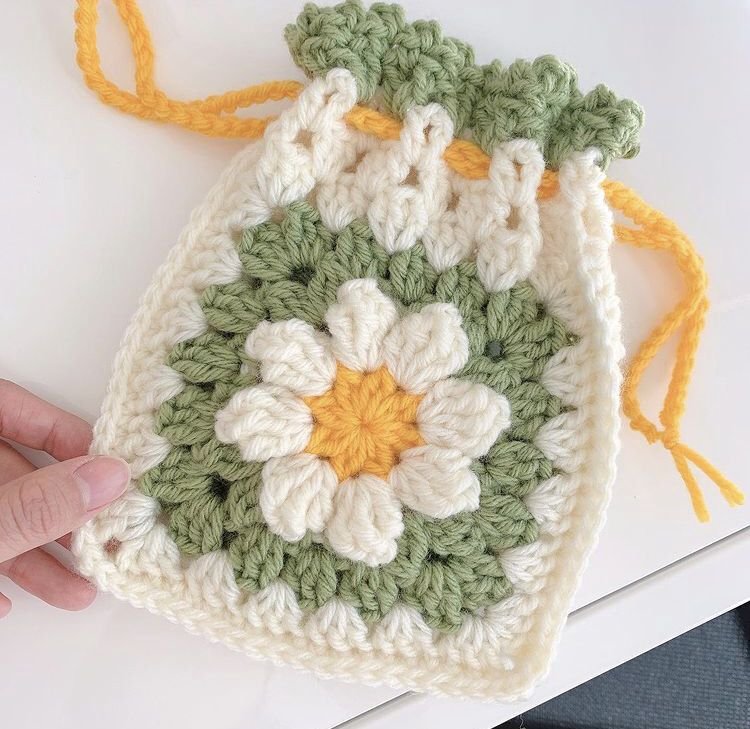
Crochet lovers are always looking for creative ways to use traditional motifs in modern ways. One of the most versatile and beloved crochet patterns is the classic Granny Square. Turning this iconic square into a charming pouch is a fun and rewarding project, suitable for beginners and experienced crafters alike. In this article, we’ll guide you through a detailed step-by-step tutorial to create your own Crochet Granny Square Pouch.
Working with crochet patterns like this pouch is not only satisfying but also allows you to practice essential skills such as color changing, joining squares, and sewing in a crochet context. Plus, this project is a great way to use up yarn scraps and create a functional item for everyday use. Whether you need a small bag for your essentials, a makeup pouch, or a cute gift, the Granny Square Pouch is the perfect solution.
In this tutorial, we will cover everything you need to know, from the materials and stitches required to the exact quantities for each step. Follow along, and by the end of this post, you’ll have a beautiful Crochet Granny Square Pouch in your hands, ready to be admired and used!
Materials Needed for Your Crochet Granny Square Pouch
To get started, you’ll need a few basic materials commonly used in crochet patterns. These materials are easy to find and affordable, making this pouch a perfect quick project for anyone. Gather your supplies before beginning so you can move through the steps without interruption.
You will need medium-weight (worsted weight) cotton yarn in three colors — Color A (main), Color B (accent), and Color C (border). A 4.0mm (G-6) crochet hook is ideal for achieving the right tension. Also, prepare a yarn needle for weaving in ends and a zipper that matches your pouch for the finishing touch.
Make sure to choose yarn that has good durability since a pouch will experience some wear and tear. Cotton is highly recommended because it holds its shape and resists pilling. Following the recommended materials will ensure your crochet patterns look professional and long-lasting.
Basic Stitches Used in the Crochet Granny Square Pouch
Before diving into the pouch creation, let’s quickly review the basic stitches you’ll need. These are very common in many crochet patterns, especially in Granny Squares, so mastering them will help you in future projects too.
-
Chain (ch): This is the most basic crochet stitch and serves as the foundation for the entire Granny Square.
-
Slip Stitch (sl st): Used to join rounds or move stitches without adding height.
-
Double Crochet (dc): The primary stitch that gives the Granny Square its classic, lacy look.
If you are already familiar with these stitches, you’re in great shape. If not, practice them for a few minutes before starting the project. Understanding these basic stitches will make working with more intricate crochet patterns much easier and more enjoyable.
Step-by-Step: Making the Granny Squares
We will start by making two identical Granny Squares for the front and back of the pouch. Here’s how to do it, stitch-by-stitch:
-
With Color A, make a magic ring.
-
Round 1: Ch 3 (counts as 1 dc), 2 dc into the ring, ch 2, 3 dc into the ring, ch 2; repeat * to * 2 more times. Join with sl st to the top of ch-3. (12 dc, 4 ch-2 spaces)
-
Round 2: Sl st to next ch-2 space, ch 3 (counts as 1 dc), (2 dc, ch 2, 3 dc) in same ch-2 space (corner made), ch 1, (3 dc, ch 2, 3 dc) in next ch-2 space; repeat from * to * 2 more times, ch 1, join with sl st to top of ch-3.
Change to Color B: 4. Round 3: Sl st to next ch-2 space, ch 3 (counts as 1 dc), (2 dc, ch 2, 3 dc) in same ch-2 space, ch 1, 3 dc in next ch-1 space, ch 1, (3 dc, ch 2, 3 dc) in next ch-2 space; repeat * to * around, join with sl st.
Change to Color C: 5. Round 4: Repeat the same pattern as Round 3, adding 3 dc clusters in each side space and corners as established. Fasten off and weave in ends.
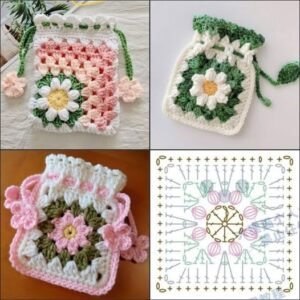
Make two squares exactly the same for the front and back panels of your pouch. The beautiful thing about crochet patterns like this is the flexibility in colors, allowing you to personalize your project!
Assembling Your Crochet Granny Square Pouch
Now that you have your two Granny Squares ready, it’s time to assemble the pouch. Take your time during this step to ensure a clean and professional-looking finish.
Place the two Granny Squares wrong sides together. Using Color C and a yarn needle, whipstitch three sides together, leaving the top open. Alternatively, you can single crochet around the three sides if you prefer a more decorative edge.
Once the sides are stitched, weave in any loose ends carefully. Make sure the pouch lies flat and the edges are aligned. Correct assembly is crucial to the final look of your crochet patterns projects, so it’s worth the extra effort!
THE BEST CROCHET PATTERNS
Adding a Lining and Zipper (Optional but Recommended)
If you want your Crochet Granny Square Pouch to be more durable and functional, adding a fabric lining is a smart choice. It prevents small items from slipping through the crochet holes and gives the pouch a polished look.
Cut a piece of fabric slightly larger than the pouch, sew the sides with a simple straight stitch, and insert it inside. Sew the fabric lining along the top edge by hand using small, discreet stitches.
Then, attach the zipper along the top opening. Use a matching thread and hand-stitch carefully around the edges to secure it. Adding a zipper turns your Granny Square creation into a truly professional-quality item that elevates your crochet patterns even more.
Customization Ideas for Your Crochet Granny Square Pouch
The beauty of crochet patterns like the Granny Square Pouch is their versatility. Once you master the basic pattern, you can start to get creative and customize your pouch however you like!
You could add a wrist strap using chains and slip stitches to create a portable clutch. Try embellishing the pouch with small crochet flowers or tassels for a boho touch. You could even join four small Granny Squares together for a patchwork-style front!
Experimenting with colors, yarn types, and embellishments is a great way to make each project unique. With crochet patterns offering endless possibilities, your imagination is the only limit!
Care Instructions for Your Crochet Granny Square Pouch
Proper care will ensure your pouch stays beautiful for a long time. Since it is handmade, it deserves gentle treatment to keep it looking its best.
Hand wash your pouch in cold water with mild detergent. Avoid wringing or twisting it to maintain its shape. Instead, gently squeeze out the water and lay it flat to dry on a clean towel.
By following these simple care instructions, your Crochet Granny Square Pouch will remain vibrant and functional, just like all well-made crochet patterns should.
Final Thoughts on the Crochet Granny Square Pouch Pattern
Crocheting a Granny Square Pouch is a rewarding project that blends tradition with modern functionality. It’s perfect for those who love working with colorful crochet patterns and want a quick, beautiful project to show off their skills.
Whether you’re making it for yourself, for a friend, or even for craft fairs, this pouch is sure to impress. Plus, the techniques you learn here — like joining squares and sewing in linings — are valuable skills for many future crochet projects.
So grab your hook and yarn and start creating today! The Crochet Granny Square Pouch is waiting for you to bring it to life.