
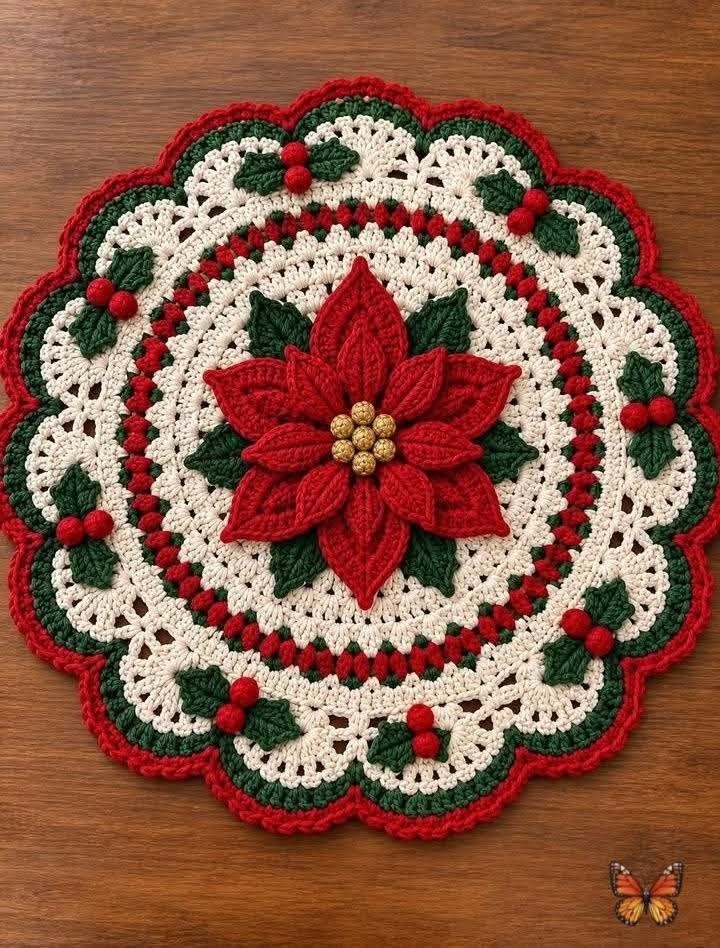
The Crochet Doily with a Christmas Poinsettia Motif Pattern is a beautiful holiday decoration that combines traditional crochet techniques with the timeless elegance of Christmas flowers. Featuring a vibrant red poinsettia in the center, delicate green leaves, a cream-colored lace background, and a scalloped border, this handmade creation brings warmth and festive charm to any home. The combination of textured stitches, decorative berries, and intricate floral details makes this Christmas crochet doily an attractive project for crocheters who enjoy creating meaningful seasonal decorations. Whether displayed on a dining table, coffee table, or decorative sideboard, this design captures the spirit of Christmas through the beauty of handcrafted crochet.
One of the most appealing characteristics of this crochet poinsettia pattern is its combination of different crochet techniques in a single project. The circular foundation is worked in rounds, creating a delicate lace structure that supports the decorative flower. The poinsettia petals are crocheted separately to achieve their dimensional appearance, while the green leaves provide contrast and depth. Small red berries and golden flower centers complete the festive composition. Although the finished piece looks elaborate, the individual components can be approached gradually, making this tutorial suitable for confident beginners who are ready to practice more advanced techniques and intermediate crocheters looking for a rewarding Christmas project.
Creating a handmade Christmas crochet centerpiece is also a wonderful way to personalize holiday decorations while developing valuable crochet skills. Instead of relying on manufactured seasonal accessories, you can choose your favorite yarn colors, adjust the finished dimensions, and create a decorative piece that reflects your personal style. The traditional combination of red, green, cream, and gold works beautifully for Christmas, but subtle variations can produce equally charming results. Throughout this tutorial, you will learn how to crochet the circular foundation, construct the poinsettia flower, create decorative leaves and berries, and assemble the finished doily. The instructions use US crochet terminology, with detailed stitch abbreviations and practical guidance to help you complete the project from beginning to end.
Materials and Crochet Stitches Needed for the Christmas Poinsettia Doily
Before beginning your Crochet Doily with a Christmas Poinsettia Motif Pattern, gather the materials needed to create the circular lace foundation and decorative floral elements. For a doily approximately 38–42 cm in diameter, use approximately 120–150 g of cream cotton yarn, 50–70 g of Christmas red cotton yarn, 35–50 g of dark green cotton yarn, and a small amount of golden yellow yarn. A lightweight cotton yarn, such as sport-weight yarn, provides excellent stitch definition. You will also need a 2.5–3.0 mm crochet hook, scissors, a yarn needle, stitch markers, and rustproof pins for blocking. The finished size will depend on your yarn, hook, and tension.
DISCOVER MORE FREE PATTERNS HERE!
Understanding the basic US crochet stitch abbreviations will make the instructions easier to follow. The main stitches used in this project are ch (chain), sl st (slip stitch), sc (single crochet), hdc (half double crochet), dc (double crochet), tr (treble crochet), and dc2tog (double crochet two together). You will also encounter MR (magic ring), st (stitch), sp (space), rep (repeat), rnd (round), and BLO (back loop only). A puff stitch is made by drawing up several loops in the same stitch and closing them together, producing a raised decorative texture. Unless otherwise stated, the beginning chain counts as a stitch only when specifically indicated.
The cream-colored foundation is an essential part of this round crochet doily pattern, because it creates the delicate background surrounding the Christmas poinsettia. The design shown in the reference image combines solid crochet rounds with open lace sections and decorative clusters. To recreate this appearance, you will alternate rounds of double crochet stitches, chain spaces, shell stitches, and textured elements. A shell stitch generally consists of several double crochet stitches worked into the same stitch or space, creating a fan-shaped decoration. This technique is particularly useful for producing the elegant scalloped sections around the outer edge.
The central poinsettia requires a slightly different approach because its petals need enough structure to maintain their shape. The 3D crochet poinsettia flower is created using elongated oval petals worked around foundation chains. Each petal contains a combination of single crochet, half double crochet, double crochet, and treble crochet stitches. Taller stitches form the wider middle section, while shorter stitches create tapered ends. Working around both sides of the foundation chain produces a symmetrical petal that can be gently shaped after completion. The flower can be assembled in overlapping layers to resemble the rich, dimensional appearance of a natural Christmas poinsettia.
For the green decorative elements, use a crochet leaf pattern that incorporates a central foundation chain and shaped stitches on both sides. The dark green leaves positioned beneath the poinsettia help emphasize the bright red petals, while smaller holly-inspired leaves decorate the outer lace border. The red berries can be crocheted as tiny stuffed spheres using single crochet stitches in continuous rounds. These small details add texture and reinforce the Christmas theme. If you prefer a flatter decoration, the berries can also be represented by small crocheted circles, although raised berries create a more dimensional finish.
Color coordination plays an important role in the overall appearance of this Christmas crochet decoration. Cream provides a soft, neutral background that highlights the decorative stitches, while dark green and red create a classic holiday contrast. Golden yellow adds warmth to the flower center without overwhelming the design. When selecting yarn, choose similar thicknesses for all components so the petals, leaves, and lace remain visually balanced. Cotton yarn is especially suitable because it holds its shape after blocking and provides a neat, defined finish. This tutorial is a practical reconstruction inspired by the photographed design rather than an exact transcription of an original stitch chart.
Step-by-Step Instructions for Crocheting the Round Lace Doily Base
Begin the crochet doily foundation using cream yarn and a magic ring. For Round 1, work ch 3, counting as the first dc, followed by 11 dc into the ring. Pull the ring closed and join with a sl st to the top of the beginning ch 3, giving you 12 dc. For Round 2, ch 3 and work 1 dc into the same stitch, then work 2 dc into each remaining stitch around. Join with a sl st for a total of 24 dc. For Round 3, ch 3, work 1 dc in the next stitch, and continue repeating 2 dc in the next stitch, 1 dc in the next stitch around, adjusting the first increase placement so you finish with 36 dc. Keep your stitches even to maintain a flat circular shape.
Continue expanding the round crochet centerpiece with carefully distributed increases. For Round 4, work 2 dc into every third stitch and 1 dc into the remaining stitches, producing 48 dc. For Round 5, work 2 dc into every fourth stitch and 1 dc into the others, producing 60 dc. For Round 6, work 2 dc into every fifth stitch and 1 dc into the others, producing 72 dc. For Round 7, work 2 dc into every sixth stitch and 1 dc into the others, producing 84 dc. For Round 8, work 2 dc into every seventh stitch and 1 dc into the others, producing 96 dc. Begin each round with ch 3 counting as the first dc, join with a sl st, and distribute the increases evenly rather than stacking them directly above one another.
To create the first decorative section of the lace crochet doily, work Round 9 as follows: ch 4, counting as 1 dc and ch 1, skip the next stitch, and repeat 1 dc in the next stitch, ch 1, skip 1 stitch around. Join into the third chain of the beginning ch 4. This produces 48 evenly spaced chain openings. For Round 10, sl st into the first ch-1 space, ch 3, work 2 dc into that space, and then work 3 dc into each remaining ch-1 space. Join to complete 48 groups of three double crochet stitches, or 144 dc in total. This creates a fuller textured band that visually separates the center from the surrounding lace.
For the festive color band, introduce red and dark green yarn to create a decorative Christmas crochet stitch pattern. In Round 11, attach red yarn, ch 1, and work 1 sc into each stitch around, completing 144 sc. In Round 12, attach green yarn and work 1 sc into every stitch, again maintaining 144 stitches. For Round 13, return to cream yarn and work 1 dc in each of the next 5 stitches, 2 dc in the next stitch around, increasing the total to 168 dc. For Round 14, work 1 dc in each of the next 6 stitches, 2 dc in the next stitch around, producing 192 dc. These rounds form a stable circular foundation while introducing the contrasting Christmas colors.
The next stage introduces openwork to give the crochet lace centerpiece its delicate appearance. For Round 15, ch 4, skip 1 stitch, and repeat 1 dc in the next stitch, ch 1, skip 1 stitch around, creating 96 chain spaces. For Round 16, sl st into the first ch-1 space, ch 3, and work 2 dc into the same space. Continue with 3 dc in every ch-1 space around, resulting in 288 dc. For Round 17, work 1 sc into every stitch to stabilize the lace. For Round 18, create the beginning of a scalloped border by repeating skip 3 stitches, work 7 dc into the next stitch, skip 3 stitches, work 1 sc into the next stitch around. The 288 stitches accommodate 36 repeats, forming an evenly scalloped edge.
Complete the decorative edge of the Christmas poinsettia doily with green and red yarn. For Round 19, attach green yarn at the first shell and work 1 sc into each of the seven dc stitches of that shell, followed by 1 sl st into the sc between shells. Repeat around the entire border, keeping the green stitches aligned with the cream scallops. For Round 20, attach red yarn and work 1 sc into each green sc, using 3 sc in the center stitch of each seven-stitch shell to emphasize the rounded peaks, and 1 sl st at each valley. Fasten off and weave in the yarn ends. This produces a decorative scalloped border inspired by the reference image. If your yarn or tension causes the outer edge to ruffle, adjust the number of stitches at the shell peaks before blocking.
How to Crochet the 3D Christmas Poinsettia Flower, Leaves, and Berries
The centerpiece of this Crochet Doily with a Christmas Poinsettia Motif Pattern is the layered red flower. To make one large poinsettia petal, begin with red yarn and ch 16. Starting in the second chain from the hook, work 1 sc, 1 hdc, 2 dc, 7 tr, 2 dc, 1 hdc, and 1 sc. Work 3 sc into the final chain to turn around the end of the foundation. Continue along the opposite side with 1 sc, 1 hdc, 2 dc, 7 tr, 2 dc, 1 hdc, and 1 sc, then join with a sl st near the base. Work one additional round of sc around the petal, placing 3 sc at the pointed tip and adjusting the base as needed. Make five large petals using the same method.
For the smaller petals of the 3D crochet Christmas flower, ch 12 with red yarn. Starting in the second chain from the hook, work 1 sc, 1 hdc, 2 dc, 3 tr, 2 dc, 1 hdc, and 1 sc. Work 3 sc into the last chain and continue along the opposite side with the same stitch sequence in reverse orientation. Join at the base and add a round of sc around the petal, placing 3 sc at the tip. Make five smaller petals. Arrange the large petals in a circular formation with their bases overlapping slightly, then position the smaller petals above them, offsetting the tips so they fill the spaces between the larger petals. This layered arrangement produces a full poinsettia with approximately ten visible red petals.
To give the crochet poinsettia petals additional texture, add raised central veins using surface slip stitches. Insert the hook near the base of a completed petal, pull up a loop of red yarn, and work a line of slip stitches toward the pointed tip. Keep the stitches relaxed so the petal does not curl excessively. You may also add short diagonal veins using a yarn needle and matching yarn. When all petals are completed, arrange them into two layers and secure their bases with small stitches. Avoid sewing through the entire length of each petal, because the slightly raised edges help create the dimensional effect visible in the reference design.
Next, crochet the dark green leaves that sit beneath the flower. For each crochet poinsettia leaf, ch 14 with green yarn. Beginning in the second chain from the hook, work 1 sc, 1 hdc, 2 dc, 5 tr, 2 dc, 1 hdc, and 1 sc. Work 3 sc into the final chain, then crochet along the opposite side using the same sequence. Join at the base and work an additional edging round with single crochet stitches. Add 3 sc at the leaf tip to create a pointed shape. Make five or six leaves and arrange them beneath the flower petals. For a more natural appearance, slightly vary their placement so some green leaves remain visible between the red petals.
The small red berries are an attractive feature of this Christmas holly crochet decoration. To make one berry, create a magic ring with red yarn and work 6 sc into the ring. For Round 2, work 2 sc in each stitch, producing 12 sc. For Rounds 3 and 4, work 1 sc into every stitch. Add a tiny amount of polyester stuffing or a small piece of matching yarn. For Round 5, repeat sc2tog six times to reduce the opening to 6 stitches. Fasten off, thread the yarn tail through the remaining front loops, and pull gently to close the sphere. Make approximately 16–20 berries, depending on the number of decorative clusters you wish to create around the outer lace border.
To complete the floral details, crochet seven small golden centers and several miniature green holly leaves. Each golden crochet flower center can be made by working 6 sc into a magic ring, increasing to 12 sc, completing one plain round, and then decreasing to close the shape with a small amount of stuffing. Sew the golden spheres into a compact cluster at the center of the red poinsettia. For the outer holly leaves, ch 9 with green yarn and work a combination of sc, hdc, dc, and small picot points along both sides of the chain. Make approximately 16–20 leaves and group them in pairs beside the red berries. Arrange the decorative clusters around the cream lace section, maintaining even spacing for a balanced Christmas design.
Assembling, Blocking, and Decorating Your Christmas Crochet Doily
Once all the crochet components are completed, begin assembling your handmade Christmas poinsettia doily on a clean, flat surface. Place the circular lace foundation with its right side facing upward. Position the large green leaves in the center, spreading them evenly so their pointed ends extend beyond the red petals. Arrange the five large red petals over the green leaves, allowing their bases to overlap slightly. Add the five smaller petals on top, rotating them so their tips appear between the larger petals. Finally, place the golden crochet spheres in the center. Before sewing, use removable stitch markers or rustproof pins to hold the arrangement in position and check that the design looks symmetrical.
Secure the crochet poinsettia appliqué to the doily using a yarn needle and matching yarn. Begin by stitching the green leaves into the central foundation, attaching each leaf at its base and at a few discreet points along its middle. Next, sew the large red petals in place, followed by the smaller petals. Use small stitches along the lower sections rather than flattening the entire flower. This technique preserves the dimensional appearance of the petals while keeping the centerpiece securely attached. Finish by sewing the golden spheres into a tight cluster. Check the reverse side of the doily and weave in any remaining yarn ends carefully.
After attaching the central flower, arrange the crochet holly leaves and berries around the outer cream lace section. The reference design features repeating green leaf clusters with small red berries placed near the scalloped border. To recreate this effect, position pairs of holly leaves at regular intervals around the circle, then place two berries beside each pair. If your border contains 36 scallops, you can arrange nine decorative clusters, spacing them approximately four scallops apart. Sew the leaves first, followed by the berries. Keep the attachments secure but flexible so the lace does not become distorted or pulled out of shape.
Blocking is an important finishing technique for a round crochet lace doily, especially when the design includes several decorative rounds and a scalloped border. Lightly dampen the completed doily with clean water and gently remove excess moisture using a towel. Place the doily on a foam blocking mat and carefully stretch the circular foundation into an even shape. Use rustproof pins to secure the outer scallops, ensuring that the distance from the center to the border remains consistent. Avoid pulling the raised flower petals or berries flat. Allow the project to dry completely before removing the pins. Proper blocking helps define the lace openings and creates a more polished finish.
There are many ways to display this Christmas crochet table decoration throughout the holiday season. Place it on a wooden coffee table to highlight the contrast between the colorful yarn and the natural surface, or use it as a decorative centerpiece on a dining table. It can also be displayed on a sideboard, dresser, or covered shelf. For a festive arrangement, position it beneath a lightweight decorative bowl or artificial Christmas greenery, making sure the raised poinsettia remains visible. Avoid placing hot cookware, burning candles, or objects with sharp edges directly on the crochet surface, since these can damage the yarn or create a safety hazard.
Caring for your crochet Christmas poinsettia motif will help preserve its appearance for future holiday celebrations. If the yarn label permits handwashing, use cool water and a mild detergent, gently pressing the fabric rather than rubbing or twisting it. Rinse carefully and remove excess water with a clean towel. Reshape the doily while damp and allow it to dry flat. For storage, place the finished piece in a clean cotton bag or acid-free tissue paper, keeping the dimensional petals supported so they do not become permanently flattened. With proper care, this handmade decoration can become a cherished part of your Christmas traditions and an enjoyable reminder of the time invested in creating it.
Frequently Asked Questions (FAQ) About the Crochet Doily with a Christmas Poinsettia Motif Pattern
1. Is this Christmas poinsettia crochet doily suitable for beginners?
This pattern is most suitable for confident beginners and intermediate crocheters. The circular foundation uses familiar stitches such as single crochet, double crochet, and chain spaces, while the dimensional petals and decorative border require additional attention. Beginners can practice the individual components separately before assembling the complete design. Understanding how to work in rounds and maintain consistent stitch counts will make the process considerably easier.
2. What is the best yarn for a Christmas crochet doily?
Cotton yarn is an excellent choice because it provides clear stitch definition and maintains its shape after blocking. Lightweight cotton yarn is particularly useful for intricate lace sections and decorative petals. Mercerized cotton can create a slightly polished appearance, while regular cotton produces a softer, more natural finish. Choose yarns with similar thicknesses for the different colors to maintain consistent proportions.
3. How large should the finished crochet poinsettia doily be?
Using lightweight cotton yarn and a 2.5–3.0 mm crochet hook, this reconstructed pattern is intended to produce a decorative doily approximately 38–42 cm in diameter. However, the final measurement may vary depending on stitch tension, yarn thickness, and blocking. If you prefer a smaller decoration, use finer yarn and a smaller hook. For a larger centerpiece, select thicker yarn and a corresponding hook size.
4. Can I change the colors of the Christmas poinsettia motif?
Absolutely. Although traditional Christmas poinsettias are commonly represented in red and green, you can create beautiful variations using white, burgundy, soft pink, or cream petals. Golden or silver accents can also add an elegant holiday appearance. For a winter-inspired design, try white petals, sage green leaves, and pale gold centers. Maintaining contrast between the flower and the lace foundation helps preserve the visual impact of the design.
5. How do I prevent my crochet doily from curling or becoming wavy?
Curling usually indicates that the fabric does not have enough room to expand, while excessive waviness may suggest too many stitches or loose tension. Check your stitch counts after each round and ensure that increases are distributed evenly. If the border begins to ripple significantly, adjust the stitch count before continuing. Gentle wet blocking can correct minor irregularities, but it cannot fully compensate for substantial stitch-count problems.
6. Can I make the poinsettia flower separately as a Christmas ornament?
Yes. The 3D crochet poinsettia flower can be used independently as a decorative appliqué for Christmas stockings, handmade bags, wreaths, gift wrapping, and holiday wall hangings. Simply crochet the petals, green leaves, and golden center, then assemble them without attaching the flower to the lace doily. You can also add a small hanging loop to the back if you wish to display the flower as a lightweight ornament.
7. How long does it take to crochet this Christmas doily?
The completion time depends on your crochet experience and the level of detail you include. An intermediate crocheter may need approximately 10–18 hours to complete the foundation, dimensional flower, decorative leaves, berries, assembly, and finishing. Beginners may require additional time, especially when learning the lace stitches and shaping the poinsettia petals. Working on the project over several days can make the process more relaxing and enjoyable.
8. Can I wash a crochet doily with dimensional flowers and berries?
Yes, provided the yarn and any stuffing materials are washable. Gentle handwashing is generally the safest option for preserving delicate lace and raised decorations. Use cool water, avoid harsh agitation, and dry the piece flat. Before washing, check that all decorative elements are securely attached. If the doily includes metallic yarn or specialty fibers, follow the specific care instructions provided by the yarn manufacturer.
9. Why does my crochet poinsettia flower look flat?
A flat appearance may result from overly tight assembly stitches or petals that have been sewn completely against the foundation. To create a dimensional flower, overlap the petals in layers and secure mainly their bases. You can also gently shape the petals with your fingers before attaching them. Adding surface crochet veins and arranging the smaller petals above the larger ones will create more texture and visual depth.
10. Can I use this pattern to make handmade Christmas gifts?
Certainly. A handmade crochet Christmas doily can be a thoughtful gift for family members, friends, teachers, and anyone who appreciates traditional needlework. You can personalize the colors to complement the recipient’s home decorations and include a small handmade gift tag with washing instructions. Because the project combines decorative lace with a festive poinsettia, it is particularly suitable for seasonal gift baskets and holiday home decor collections.
11. What is the difference between a crochet doily and a crochet placemat?
A crochet doily is generally designed as a decorative textile, often featuring open lace stitches, floral motifs, and ornamental borders. A crochet placemat is usually intended to protect a table surface while providing a setting for dishes and utensils. Although some patterns can serve both purposes, this poinsettia design is primarily decorative because of its raised petals, berries, and delicate lace construction.
12. Can I sell finished doilies made using this tutorial?
Handmade doilies can be offered as finished craft items, subject to any applicable pattern rights, marketplace rules, and local business requirements. If you plan to sell your work, calculate the cost of yarn, materials, packaging, and the time required to crochet each piece. Clear product photographs and accurate measurements can help customers understand the handmade nature of the decoration.
Conclusion: Create a Beautiful Handmade Christmas Poinsettia Doily
The Crochet Doily with a Christmas Poinsettia Motif Pattern combines elegant lace crochet, traditional holiday colors, and dimensional floral details into one memorable handmade decoration. Throughout this tutorial, you learned how to select suitable materials, understand essential US crochet abbreviations, construct a circular lace foundation, shape red poinsettia petals, crochet green leaves and berries, and assemble the different components into a festive centerpiece. You also discovered how blocking, careful stitching, and proper storage can help preserve the finished project.
One of the most rewarding aspects of this Christmas crochet doily pattern is the opportunity to customize every detail. You can experiment with different yarn colors, adjust the size of the foundation, create additional flower layers, or rearrange the decorative berries to develop your own interpretation. Whether you are making this project for your home or preparing a thoughtful handmade gift, the finished doily represents the creativity, patience, and care that make crochet such a meaningful craft.
EASILY FIND THE FREE PDF FOR THIS PATTERN HERE!
We would love to hear your sincere opinion! What do you think of this Christmas poinsettia crochet design? Would you prefer the traditional red and green combination, or would you create your own color variation? Please share your honest feedback, creative suggestions, and any questions you have about the tutorial in the comments. Your experiences and ideas can inspire other crochet enthusiasts to create beautiful handmade Christmas decorations!