
A Crochet Christmas Tree with Granny Squares – Crochet Pattern is one of the most creative and heartwarming ways to decorate your home for the holidays. Crochet lovers around the world are rediscovering the joy of turning classic granny squares into festive Christmas trees that bring warmth, tradition, and a handmade touch to seasonal décor. Whether you’re a beginner or an experienced crocheter, this project offers a perfect mix of simplicity, creativity, and elegance that fits beautifully in any Christmas setting.
Creating a Crochet Christmas Tree with Granny Squares is not just about making decorations; it’s about crafting memories. Each square tells a story, from the careful choice of yarn colors to the pattern’s assembly into a unique and stunning tree. With this crochet pattern, you can experiment with colors, textures, and designs, giving your tree a distinctive handmade charm that no store-bought ornament could ever replicate. It’s a wonderful way to express your creativity while bringing the holiday spirit to life.
In this guide, you’ll learn how to design your own Crochet Christmas Tree with Granny Squares, step by step. You’ll discover how to choose yarn types, the right hook sizes, color combinations, and different ways to join your granny squares. We’ll also explore how to embellish your tree with stars, beads, and festive ornaments that complement your crochet work. Whether you’re making it as a centerpiece, a wall hanging, or a tabletop tree, this tutorial will help you create something truly special that reflects your personality and love for crochet.
1. Understanding the Crochet Christmas Tree with Granny Squares
A Crochet Christmas Tree with Granny Squares – Crochet Pattern is built upon one of the most timeless motifs in the crochet world — the granny square. These simple yet versatile squares are traditionally made using a series of double crochets, chains, and slip stitches, forming a floral or geometric pattern. When arranged strategically, they can be assembled into a tree shape, making a delightful piece of holiday art.
What makes this design so appealing is its customizability. You can use a single color palette for a minimalist look or mix multiple shades of green, red, gold, and white to achieve a more festive style. The granny square technique allows endless creative freedom, letting you tailor your project to your own décor and taste.
Another wonderful aspect of this crochet pattern is its beginner-friendly structure. Even if you’re new to crochet, the granny square is one of the first patterns most people learn. It’s repetitive, meditative, and easy to adapt, making it the ideal starting point for anyone who wants to create a handmade Christmas decoration.
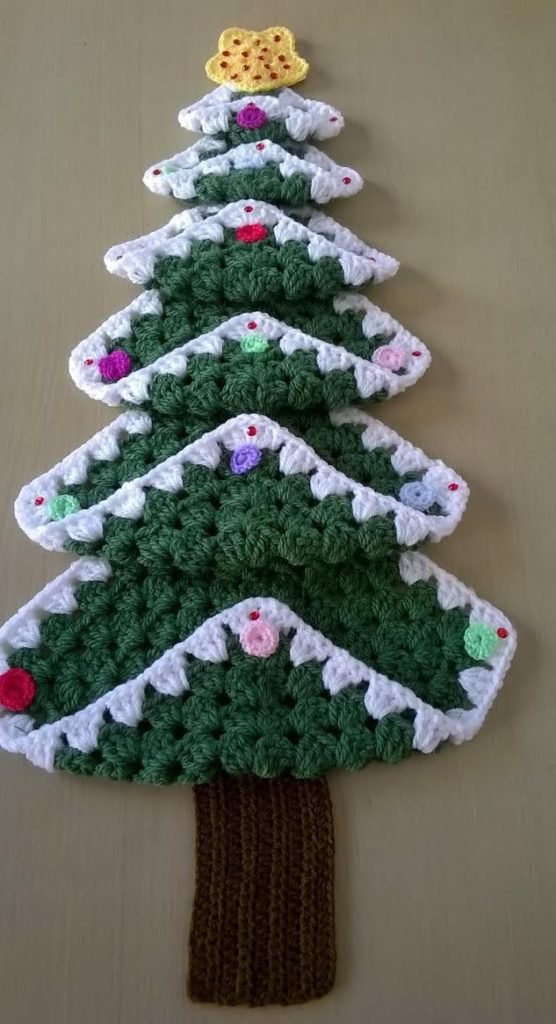
To make your Crochet Christmas Tree, start by crafting a collection of granny squares in varying sizes. The larger ones form the base of the tree, while smaller squares taper up to the top. You can even make a star-shaped motif to crown your tree. Each square is stitched together, either by sewing or joining as you go, to build the pyramid-like tree structure.
What truly sets this project apart is its sustainability and reusability. Instead of purchasing plastic trees or decorations, you’re creating an eco-friendly item that can be used year after year. Plus, the process of crocheting itself brings peace and mindfulness, adding even more meaning to your holiday crafting.
Lastly, this crochet pattern offers endless opportunities for personal expression. Some crafters like to incorporate metallic yarns for a touch of shimmer, while others prefer rustic tones of beige, forest green, and brown for a natural aesthetic. Every version tells a story — your story — woven through yarn and holiday cheer.
2. Materials and Tools You’ll Need
Before diving into your Crochet Christmas Tree with Granny Squares – Crochet Pattern, it’s essential to gather all the right tools and materials. The beauty of this project is that it doesn’t require anything fancy — just basic crochet supplies and your creative spirit.
You’ll need a crochet hook suited to your chosen yarn weight. Most crafters prefer using a 4.0mm to 5.0mm hook for medium-weight yarns, but you can adjust based on your desired texture and size. Using a slightly smaller hook can make your stitches tighter, giving your tree more structure.
When it comes to yarn, cotton or acrylic yarns are the most popular choices. Cotton gives your project a neat, defined look, while acrylic yarns add softness and flexibility. Choose a palette that represents your holiday style — classic greens and reds, snowy whites and silvers, or even unconventional colors like pink, navy, or gold for a modern twist.
You’ll also need scissors, a yarn needle, and stitch markers to help you manage your work. If you want to make your tree stand out, consider adding embellishments such as buttons, ribbons, small bells, or beads. These details will make your crochet Christmas tree sparkle with festive charm.
A crucial part of this process is blocking your granny squares before assembly. Blocking ensures each square maintains its shape, making it easier to join them neatly. You can do this by pinning your finished squares to a foam board and lightly steaming or spraying them with water until they dry in perfect shape.
Finally, decide on the structure of your tree. You can mount your squares on a cone-shaped base for a three-dimensional look or assemble them flat on a wooden or fabric backing for a beautiful wall hanging. Both styles have their charm and can be customized to suit your décor.
3. Step-by-Step Crochet Pattern Instructions
Now that you’ve prepared your materials, let’s move on to the fun part — making your Crochet Christmas Tree with Granny Squares. This step-by-step process will guide you through creating your squares and assembling your holiday masterpiece.
-
Start with the Classic Granny Square: Begin with a magic ring. Chain 3 (this counts as your first double crochet), then make two more double crochets. Chain 1, and repeat sets of three double crochets separated by chain 1 spaces until you have four clusters. Join with a slip stitch to the top of your starting chain.
-
Build the Square: For the second round, slip stitch to the next chain space, chain 3, and add two double crochets. Chain 1, then work three double crochets, chain 1, three double crochets into the same corner. Continue this pattern around, forming the square.
-
Expand for Size Variation: Continue adding rounds to make larger squares for the base of your tree. For the top sections, stop after fewer rounds to keep them smaller. You can make squares of 3, 4, or 5 rounds depending on your design.
-
Join Your Squares: Arrange your squares in a triangle formation — largest at the bottom, smallest at the top. Join them using your preferred method: slip stitch, whip stitch, or the join-as-you-go technique.
-
Add a Star: To top off your Crochet Christmas Tree, make a small star motif using yellow or gold yarn. Sew or attach it securely to the peak.
-
Decorate and Finish: Add embellishments like beads, sequins, or bows. You can even crochet miniature ornaments to attach to the squares, giving your project a complete Christmas feel.
Once done, your handmade tree will become a centerpiece that draws admiration and spreads holiday cheer wherever you display it.
4. Creative Variations and Display Ideas
One of the joys of making a Crochet Christmas Tree with Granny Squares is how customizable it is. You can easily adapt this pattern to create different styles, sizes, and purposes.
For a modern minimalist look, use neutral tones like ivory, gray, and forest green. The simplicity of these colors creates a stylish decoration that fits into contemporary homes. For a vintage aesthetic, use traditional reds, greens, and golds, combined with lace-like yarns for a nostalgic feel.
If you’re feeling adventurous, try making mini crochet Christmas trees using smaller granny squares. These can be turned into tree ornaments, garlands, or gift toppers. They make lovely handmade gifts and are sure to be cherished by friends and family.
Another creative idea is to turn your tree into a wall hanging advent calendar. Simply attach small tags or pouches behind each square and fill them with treats or notes for each day of December. It’s a fun and interactive way to count down to Christmas.
For those who enjoy interior design, a tabletop crochet tree can be an elegant addition to your décor. Mount your finished tree on a wooden base or cone and place it as a centerpiece on your dining or coffee table. Add fairy lights for an enchanting glow.
Finally, if you love sustainability, consider using scrap yarns from past projects. This not only adds a variety of textures and colors but also promotes eco-friendly crafting — making your Crochet Christmas Tree with Granny Squares both beautiful and responsible.
FAQ – Crochet Christmas Tree with Granny Squares
1. Is this project suitable for beginners?
Yes! The Crochet Christmas Tree with Granny Squares – Crochet Pattern is perfect for beginners because granny squares are easy to learn and repeat.
2. How long does it take to complete the tree?
Depending on your speed and size, it can take anywhere from a few hours to a weekend to finish.
3. Can I use leftover yarn?
Absolutely. This project is a great way to use leftover yarn and create a colorful, eco-friendly Christmas decoration.
4. Do I need a specific yarn type?
No, but medium-weight cotton or acrylic yarns work best for structure and durability.
5. How can I make the tree stand upright?
Mount it on a foam cone or wooden base to create a sturdy, three-dimensional display.
6. Can I wash my crochet Christmas tree?
Yes, gently hand wash it with mild detergent and air dry to maintain shape and texture.
Conclusion
Making a Crochet Christmas Tree with Granny Squares – Crochet Pattern is more than just a craft project — it’s an expression of creativity, tradition, and love. With simple materials and a bit of time, you can create a beautiful, lasting decoration that brings joy year after year. From choosing your yarn colors to assembling your tree and adding final touches, every stitch reflects your personal touch and festive spirit.
If you found this guide helpful, share your thoughts below! Leave a sincere opinion and tell us your favorite part of this pattern or any ideas you have for variations. Your feedback inspires more creative crochet guides and helps spread the handmade holiday cheer.