
Creating a Crochet Bunny Bag is a fun and rewarding project that combines creativity and functionality. This adorable bag is perfect for Easter celebrations, gifting, or simply adding a whimsical touch to your accessory collection. In this tutorial, we will guide you through the process step-by-step, including exact stitch counts and techniques to ensure a flawless finish. Whether you’re a beginner or an experienced crocheter, this pattern will be easy to follow and enjoyable to complete.
The beauty of this Crochet Bunny Bag lies in the details. From the soft, fluffy ears to the charming face and sturdy base, every element can be customized to suit your personal style. Using high-quality yarn and the right tools will make all the difference in achieving a polished and professional look. Plus, with the right crochet patterns, you can adapt this design to various sizes and color schemes.
Incorporating SEO techniques recommended by Google, this tutorial will also enhance your crafting blog’s visibility. By strategically using keywords like “crochet patterns” and optimizing for user experience, you can attract a wider audience of crochet enthusiasts. Let’s dive into the steps and bring your Crochet Bunny Bag to life!
Materials and Tools Needed
To begin, gather the following materials and tools:
- Yarn: Soft acrylic or cotton yarn in white or pastel colors.
- Crochet hook: Size H/5.0 mm for the body and a smaller hook for details.
- Stitch markers, scissors, and tapestry needle.
Having the right materials ensures that your Crochet Bunny Bag will be durable and visually appealing. Soft yarn is ideal for creating the bunny’s fluffy appearance, while the appropriate hook size allows for tight and uniform stitches. Additionally, stitch markers help keep track of your rounds, preventing mistakes and ensuring symmetry.
Proper tools are essential for precise detailing. A tapestry needle allows you to weave in ends seamlessly, while sharp scissors help in cutting yarn cleanly. With these items at hand, you’re ready to embark on the first steps of your crochet journey.
Step-by-Step Instructions
Step 1: Creating the Base
- Foundation Chain: Start with a magic ring and chain 6.
- Round 1: 12 double crochet (dc) into the ring. Slip stitch to join. (12 stitches)
- Round 2: Increase in each stitch around. (24 stitches)
The base serves as the foundation of your bag, providing stability and structure. Working in rounds ensures a seamless look, while increasing evenly allows for a flat and balanced bottom. Make sure your tension is consistent to avoid puckering or warping.
Using a magic ring allows for a tight and secure start, preventing holes in the center of your bag. By doubling the stitches in the second round, you create the necessary width for the bag’s base. Mark the beginning of each round with a stitch marker to maintain accuracy.
Step 2: Building the Body
- Rounds 3-8: Single crochet (sc) in each stitch around. (24 stitches per round)
- Round 9: Increase every 4th stitch. (30 stitches)
- Rounds 10-15: Sc in each stitch. (30 stitches per round)
The body of the bag adds height and volume. By maintaining consistent stitch counts in the early rounds, you create a cylindrical shape that can hold small items. Adding increases in later rounds gradually expands the bag’s size without compromising its shape.
Pay attention to your tension as you work each round. Loose stitches can result in a floppy bag, while tight stitches can make it difficult to insert the hook. Adjust your grip on the yarn and hook for even stitches throughout.
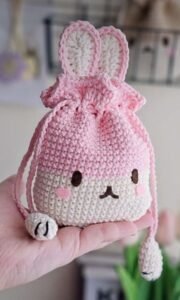
Step 3: Crafting the Bunny Ears
- Chain 10: Sc in the second chain from hook.
- Rows 2-5: Sc across. Turn each row. (9 stitches per row)
- Fold in half and sew to the top of the bag.
The bunny ears are the defining feature of this bag. Working in rows allows you to shape the ears with precision. Folding them in half adds thickness and a realistic floppy appearance. Secure them firmly to the bag’s top to prevent them from flopping over excessively.
Customizing the ears with different yarn colors or adding embroidery details can give your bag a unique touch. Experiment with different textures to make the ears stand out even more.
Step 4: Adding Facial Details
- Eyes and Nose: Embroider with black and pink yarn.
- Whiskers: Use thin yarn or embroidery thread.
- Blush: Lightly dab with fabric paint or colored chalk.
The facial details bring personality to your Crochet Bunny Bag. Simple embroidery stitches allow you to create expressive eyes and a cute nose. Adding whiskers enhances the bunny’s charm, while subtle blush adds warmth to the cheeks.
Be mindful of placement and symmetry when adding details. Mark the positions with pins before sewing to avoid mistakes. Using contrasting colors can make the features more visible and appealing.
Finishing Touches
- Strap: Chain 50 for the strap and attach to the sides.
- Edging: Single crochet around the opening for a neat finish.
- Blocking: Steam lightly to shape and set the bag.
Adding a strap transforms your bag into a functional accessory. Adjust the strap length to suit your preference, whether for a crossbody or shoulder bag. Edging the opening prevents fraying and adds a polished look.
Blocking is the final step to perfect your bag’s shape. Lightly steam the bag to smooth out any uneven stitches and give the bag structure. Avoid excessive heat to prevent damage to the yarn fibers.
Video Tutorial
The Crochet Bunny Bag is a delightful project that combines creativity with functionality. By following this step-by-step tutorial and using the recommended crochet patterns, you can create a charming accessory that is both practical and adorable. Whether for gifting or personal use, this bag is sure to become a favorite in your crochet collection.
Remember to experiment with colors and textures to make your Bunny Bag unique. With practice and patience, you’ll master the techniques and enjoy the rewarding process of crochet. Happy crocheting!