
Crochet Bear Basket: A Step-by-Step Guide – Pattern is the perfect project for crafters who love combining creativity with functionality. If you have been searching for a charming and practical crochet idea, this adorable basket design offers both decorative appeal and everyday usefulness. Whether you want to organize toys, store baby items, or simply add a cozy handmade touch to your home décor, this project delivers warmth and personality in every stitch. Throughout this detailed tutorial, you will discover how to create your own bear-themed basket using simple techniques and clear instructions.
The beauty of the Crochet Bear Basket: A Step-by-Step Guide – Pattern lies in its versatility. You can customize colors, yarn textures, and facial expressions to match different rooms or occasions. From neutral tones for minimalist nurseries to vibrant palettes for playful children’s spaces, the pattern adapts beautifully to your style. This project is beginner-friendly while still offering enough detail to keep intermediate crocheters engaged and inspired.
In this complete guide, we will explore materials, techniques, shaping methods, finishing touches, and helpful troubleshooting tips. By the end of this article, you will feel confident enough to create your own handmade basket from start to finish. If you are passionate about crochet, organization, and cute handmade accessories, this Crochet Bear Basket: A Step-by-Step Guide – Pattern will quickly become one of your favorite go-to projects.
Materials and Tools for the Crochet Bear Basket: A Step-by-Step Guide – Pattern
To begin your Crochet Bear Basket: A Step-by-Step Guide – Pattern, selecting the right materials is essential. Choosing sturdy yarn will ensure your basket holds its shape while remaining soft and visually appealing. Cotton yarn or cotton-blend yarn is often recommended because it offers durability and structure without excessive stretching.
A medium to bulky weight yarn works best for this project. Thicker yarn creates a firm basket base and reduces gaps between stitches. When following the Crochet Bear Basket: A Step-by-Step Guide – Pattern, always check your gauge to maintain consistent sizing and structure.
You will also need an appropriately sized crochet hook. Typically, a slightly smaller hook than recommended on the yarn label helps create tighter stitches. Tight stitches are important in basket projects because they provide strength and stability.
Additional tools include stitch markers, a yarn needle for weaving in ends, scissors, and optional stuffing material for the bear’s ears and facial elements. Safety eyes can be used for decorative purposes, but embroidered eyes are a great alternative for children’s spaces.
For added stability, some crafters choose to crochet over a reinforcement cord or use a double strand of yarn. This technique enhances durability, especially if the basket will hold heavier items like toys or books.
Finally, keep your workspace organized before starting. Preparing all tools in advance ensures a smooth and enjoyable crafting session as you follow this detailed Crochet Bear Basket: A Step-by-Step Guide – Pattern.
Step-by-Step Instructions to Create the Basket Base
The foundation of the Crochet Bear Basket: A Step-by-Step Guide – Pattern begins with a sturdy circular base. Most basket patterns start with a magic ring or chain circle, followed by evenly spaced increases in each round to maintain a flat shape.
When crocheting the base, consistency is key. Use single crochet stitches for a dense texture. Tight, uniform stitches prevent gaps and create a professional finish. Continue increasing evenly until the base reaches your desired diameter.
After completing the flat circle, the next step in the Crochet Bear Basket: A Step-by-Step Guide – Pattern involves building the sides. To achieve upright walls, crochet in the back loop only for one round. This technique creates a sharp edge that allows the basket to stand firmly.
Once the transition round is complete, continue working in continuous rounds without increasing. This will naturally form the basket walls. Keep your tension steady to maintain a straight and structured appearance.
If you want a taller basket, simply add more rounds. The beauty of the Crochet Bear Basket: A Step-by-Step Guide – Pattern is its adaptability. You control the final height depending on your storage needs.
Before finishing the main body, check the shape. If the walls appear to flare outward, your tension may be too loose. Adjusting your hook size slightly can help correct this issue and maintain structural integrity.
Creating the Bear Features and Assembling the Design
The defining charm of the Crochet Bear Basket: A Step-by-Step Guide – Pattern lies in the adorable bear face. The ears are typically crocheted separately using small circular rounds. Begin with a magic ring and increase gradually to create a rounded ear shape.
For extra dimension, lightly stuff the ears before attaching them to the basket. Position them symmetrically near the top edge to achieve a balanced look. Secure them tightly using a yarn needle and matching yarn.
Next comes the muzzle, which adds personality to your Crochet Bear Basket: A Step-by-Step Guide – Pattern. The muzzle is often crocheted as a small oval or circle and sewn onto the front center of the basket. Use a contrasting color to highlight the bear’s features.
Embroider the nose and mouth using black or dark brown yarn. Simple satin stitches work beautifully for the nose, while a small curved line creates a friendly expression. Keep facial details minimal for a clean and timeless look.
If using safety eyes, ensure they are securely fastened. For children’s rooms, embroidered eyes are safer and equally charming. The Crochet Bear Basket: A Step-by-Step Guide – Pattern allows flexibility in design choices while maintaining its signature appeal.
After attaching all features, review your work carefully. Reinforce any loose stitches and weave in ends neatly. Proper finishing ensures durability and long-lasting beauty.
Customization Tips, Care Instructions, and Styling Ideas
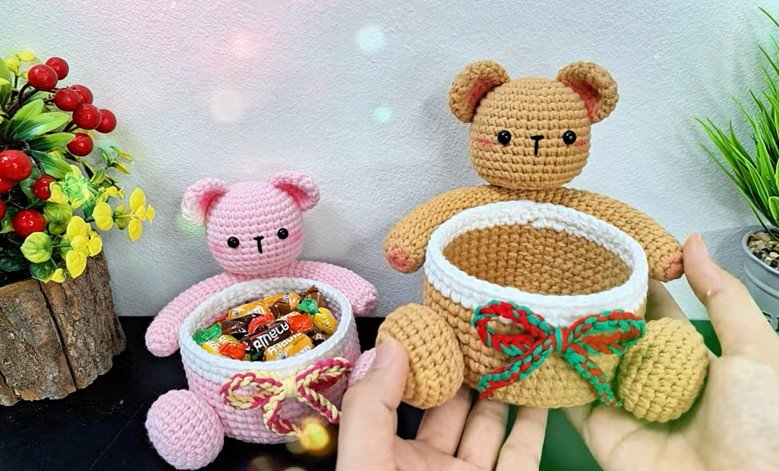
One of the most enjoyable aspects of the Crochet Bear Basket: A Step-by-Step Guide – Pattern is customization. You can experiment with pastel shades for nurseries or earthy tones for modern interiors. Adding a small bow, scarf, or textured stitches gives your basket unique character.
Consider incorporating different stitch patterns along the basket walls. While single crochet provides structure, combining it with half double crochet can create subtle texture. Always maintain firmness to preserve the basket’s shape.
This Crochet Bear Basket: A Step-by-Step Guide – Pattern also makes a thoughtful handmade gift. Fill the basket with baby essentials, craft supplies, or seasonal decorations. Its practical function combined with its adorable design makes it highly versatile.
For cleaning, spot cleaning is recommended, especially if the basket includes embroidered details. If the yarn label permits machine washing, use a gentle cycle and reshape the basket while damp. Air drying helps maintain structure.
To maintain shape over time, avoid overloading the basket with heavy items. Proper use ensures your handmade creation remains sturdy and attractive for years.
Finally, styling your finished piece in open shelving, nursery corners, or craft rooms will showcase your craftsmanship. The Crochet Bear Basket: A Step-by-Step Guide – Pattern blends functionality and décor effortlessly.
Frequently Asked Questions (FAQ)
What skill level is required for the Crochet Bear Basket: A Step-by-Step Guide – Pattern?
This pattern is suitable for beginners who are comfortable with basic stitches such as single crochet and working in the round. Intermediate crocheters will find it quick and satisfying.
How long does it take to complete the basket?
Completion time depends on experience and basket size. On average, it can take between 4 to 8 hours, spread over a few crafting sessions.
What type of yarn works best for a sturdy basket?
Cotton or cotton-blend yarn in medium to bulky weight is ideal. It provides structure, durability, and a clean stitch definition.
Can I resize the basket easily?
Yes. Simply adjust the diameter of the base and the height of the walls. The Crochet Bear Basket: A Step-by-Step Guide – Pattern is highly adaptable to different sizes.
Is the basket safe for children’s rooms?
Yes, especially if you use embroidered facial features instead of safety eyes. Always secure all attachments firmly.
How do I prevent my basket from collapsing?
Use tight stitches, a smaller hook, and sturdy yarn. Reinforcing with double strands can also increase stability.
Can I sell baskets made from this pattern?
Generally, handmade items can be sold, but always ensure your design remains original and avoid copying trademarked characters.
What if my base curls while crocheting?
Curling usually indicates insufficient increases. Ensure you follow consistent increase patterns to maintain a flat base.
Conclusion
In this comprehensive guide, we explored every essential detail of the Crochet Bear Basket: A Step-by-Step Guide – Pattern, from selecting materials to assembling adorable bear features and customizing your final piece. You learned how to create a sturdy base, shape structured walls, add charming facial elements, and maintain your basket for long-term use. This project beautifully combines creativity, organization, and handmade warmth in one delightful design.
Now it’s your turn to bring this Crochet Bear Basket: A Step-by-Step Guide – Pattern to life. Take your time, enjoy each stitch, and personalize your basket to reflect your unique style. If you found this tutorial helpful, please leave your honest opinion and share your suggestions. Your feedback helps inspire more creative and detailed guides for fellow crochet enthusiasts.