
Crochet Bag with Granny Squares Pattern is one of the most timeless and rewarding projects for crochet lovers who enjoy combining beauty, functionality, and creativity. Whether you are a beginner ready to expand your skills or an experienced crocheter looking for an elegant handmade accessory, this project offers the perfect balance between classic design and modern style. The combination of textured granny squares, sturdy construction, and practical handles creates a bag that is both fashionable and durable.
Creating a Crochet Bag with Granny Squares Pattern is much more than joining colorful crochet motifs together. Every stitch contributes to the structure, strength, and overall appearance of the finished bag. By understanding how each round of the granny square grows and how the panels are assembled, you can confidently complete a professional-looking crochet bag while improving your crochet techniques. This project also allows you to personalize colors, yarn choices, and finishing details to match your personal style.
One of the reasons the Crochet Bag with Granny Squares Pattern remains so popular is its versatility. It can be used as an everyday handbag, a beach tote, a shopping bag, or even a thoughtful handmade gift. Throughout this guide, you will learn every important step, from choosing the right materials to crocheting the central motif, expanding the square, assembling the bag, creating sturdy handles, and adding beautiful finishing touches that make your project stand out.
Materials, Crochet Stitches, and Preparation
Before beginning your Crochet Bag with Granny Squares Pattern, gather all the materials you will need. Using quality supplies helps produce a cleaner finish and a longer-lasting bag. Cotton yarn or recycled cotton cord is an excellent choice because it offers durability while maintaining beautiful stitch definition.
DISCOVER MORE FREE PATTERNS HERE!
Choose a crochet hook that matches your yarn weight. Most medium cotton yarns work well with a 4.5 mm to 5.5 mm hook, while thicker cotton cords may require hooks between 6 mm and 8 mm. Always check your yarn label for recommendations and make a small sample before starting the full project.
You will also need scissors, a yarn needle for weaving in ends, stitch markers if desired, and measuring tape. Having everything prepared before you begin makes the entire process smoother and more enjoyable.
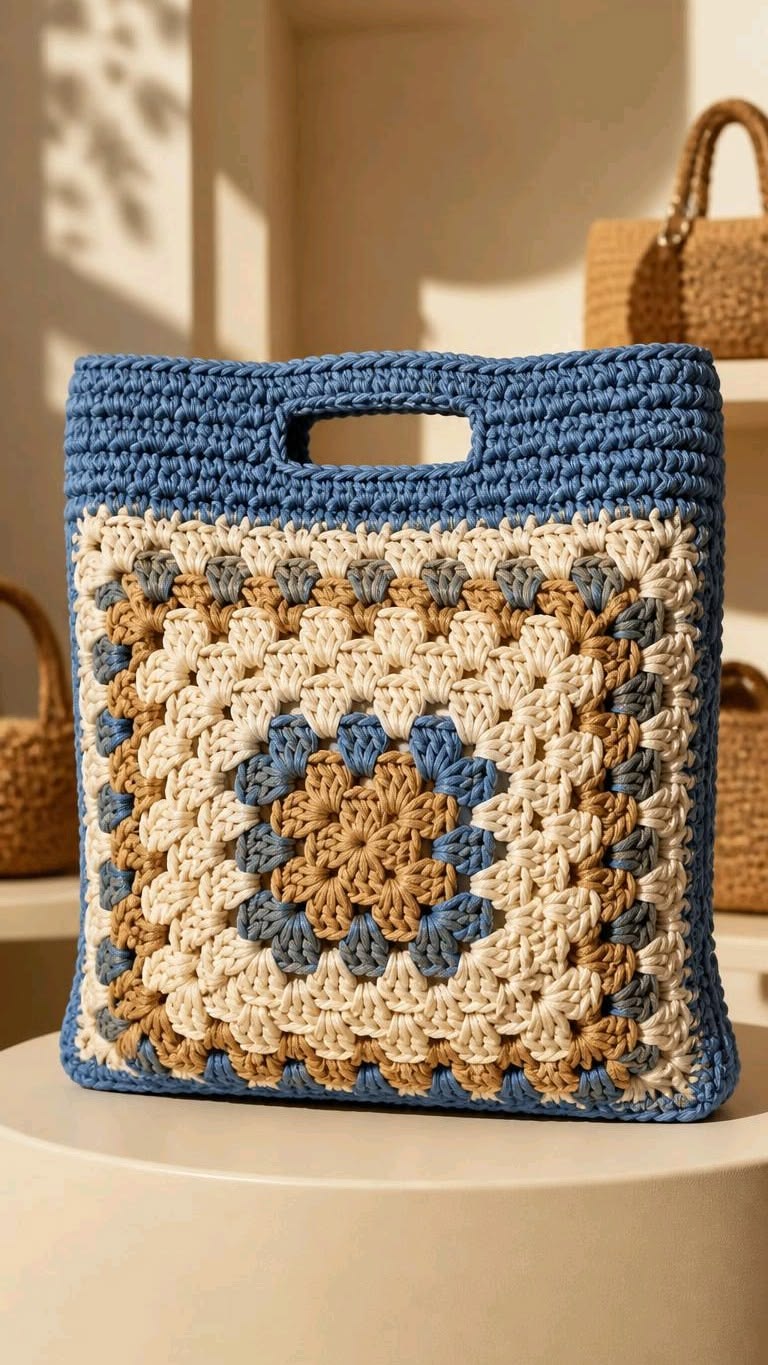
The bag shown in this design features a large decorative granny square panel with harmonious color transitions. Similar shades of blue, cream, and caramel create a classic, elegant appearance, although you may substitute any colors that complement your style.
The primary stitches used include the chain stitch (ch), slip stitch (sl st), single crochet (sc), double crochet (dc), and occasionally half double crochet (hdc) depending on your preferred edging. Mastering these basic stitches is enough to complete the entire project.
Before starting the main square, practice maintaining even tension. Consistent tension ensures the granny square remains flat, symmetrical, and easy to assemble into a structured crochet bag.
Step-by-Step Crochet Instructions for the Granny Square
Begin with a magic ring or create four chain stitches and join them with a slip stitch to form a small loop. This forms the center of your granny square and provides a secure foundation.
Round 1 begins by chaining three, which counts as your first double crochet. Work additional double crochets into the ring, separated according to your preferred flower or granny square center design. Finish the round with a slip stitch into the top of the beginning chain.
Round 2 introduces the first corners. Chain three, work groups of double crochets into the corner spaces, separated by chain stitches. Continue around the square while maintaining equal spacing between each corner to preserve the square shape.
Continue expanding the square by adding additional groups of three double crochets between the corners. Each new round increases the size while maintaining the traditional granny square structure. Always place two groups of double crochets separated by chain stitches in every corner space.
As your square grows, change yarn colors wherever desired. Weave the yarn ends securely into the back of the work after each color change to prevent unraveling. Smooth color transitions enhance the finished appearance and create beautiful visual contrast.
Continue crocheting until your granny square reaches the desired dimensions for the front and back panels of your bag. Both panels should be identical in size to simplify assembly and create a balanced final project.
Assembling the Crochet Bag
Once both large granny square panels are complete, lightly block them if necessary. Blocking helps straighten edges, improve stitch definition, and ensure both panels measure exactly the same.
Place the squares with their right sides facing outward. Align all corners carefully before beginning assembly. Proper alignment prevents twisting and helps the finished bag maintain a neat rectangular shape.
Join the side and bottom edges using either single crochet or slip stitches worked through both layers. Some crocheters prefer sewing with a yarn needle for a cleaner invisible seam, while others enjoy the decorative appearance of crocheted joins.
Leave the top edge completely open. This opening will later receive the decorative border and integrated handles. Check that all seams are secure before proceeding to the next step.
To give the bag additional stability, consider inserting a fabric lining after assembly. A lining prevents stretching, supports heavier items, and protects the crochet stitches from excessive wear over time.
Before continuing, inspect every seam carefully. Reinforce any loose stitches and weave in all remaining yarn ends securely. Taking extra time during this stage greatly improves the durability of the finished Crochet Bag with Granny Squares Pattern.
Creating the Handles and Finishing Touches
The integrated handle shown in this Crochet Bag with Granny Squares Pattern is both attractive and practical. Begin by marking the handle opening evenly across the top edge of each panel so both sides remain perfectly symmetrical.
Work several rounds of single crochet around the top opening of the bag. These rounds strengthen the edge and provide a firm foundation for the handles while giving the bag a polished appearance.
When reaching the marked handle opening, crochet chains across the opening and skip the stitches beneath. On the following round, work directly into those chain stitches to create the sturdy handle opening visible in the finished design.
Continue working additional rounds of single crochet around the entire top edge, including the handles. Multiple reinforcing rounds significantly increase durability, especially if the bag will be used daily.
If desired, add decorative details such as textured edging, crab stitch, reverse single crochet, or subtle picot edging. These optional embellishments provide a professional finish without overwhelming the elegant simplicity of the granny square design.
Finally, gently steam or block the completed bag to relax the stitches and improve its shape. Allow it to dry completely before use. Your beautiful handmade Crochet Bag with Granny Squares Pattern is now ready to accompany you wherever you go.
Frequently Asked Questions
Is this Crochet Bag with Granny Squares Pattern suitable for beginners?
Yes. Anyone familiar with chain stitches, single crochet, double crochet, and slip stitches can successfully complete this project with patience and careful attention to each round.
What yarn works best for this crochet bag?
Cotton yarn is generally the best choice because it offers durability, minimal stretching, excellent stitch definition, and easy maintenance.
How many granny squares are needed?
The design shown uses two large granny square panels rather than many small motifs. However, you can easily adapt the project using multiple smaller granny squares if you prefer.
Can I make the bag larger?
Absolutely. Continue adding additional rounds to each granny square until the desired dimensions are reached before assembling the panels.
Should I add a fabric lining?
While optional, adding a lining is highly recommended. It increases durability, prevents stretching, and helps the bag maintain its shape over years of use.
Can I use different colors?
Yes. One of the greatest advantages of the Crochet Bag with Granny Squares Pattern is its flexibility. You can create modern, vintage, monochromatic, seasonal, or colorful combinations according to your personal taste.
How do I wash the finished crochet bag?
Hand washing with mild detergent and laying the bag flat to dry is generally the safest method, especially when using cotton yarn.
Why does my granny square curl?
Curling usually results from tight tension or incorrect stitch counts. Double-check every round and maintain consistent tension throughout the project.
How can I make the handles stronger?
Work multiple reinforcing rounds around the handle openings or insert a hidden fabric reinforcement inside the handles for additional strength.
Can I sell bags made from this pattern?
Yes. Handmade bags created from your own crochet work can generally be sold. Always ensure that any specific written pattern you follow allows commercial use if applicable.
Conclusion
The Crochet Bag with Granny Squares Pattern is a beautiful combination of classic crochet tradition and everyday practicality. Throughout this guide, you learned how to prepare your materials, crochet a structured granny square, expand the pattern evenly, assemble the front and back panels, reinforce the seams, create comfortable integrated handles, and apply professional finishing techniques.
EASILY FIND THE PDF FOR THIS PATTERN HERE!
By practicing these steps carefully, you can confidently create a durable, stylish crochet bag that showcases your craftsmanship and creativity. Thank you for reading this complete guide. If you enjoyed this tutorial, please leave your honest opinion in the comments and share your suggestions for future crochet projects. Your feedback helps improve future patterns and inspires even more creative handmade designs.