
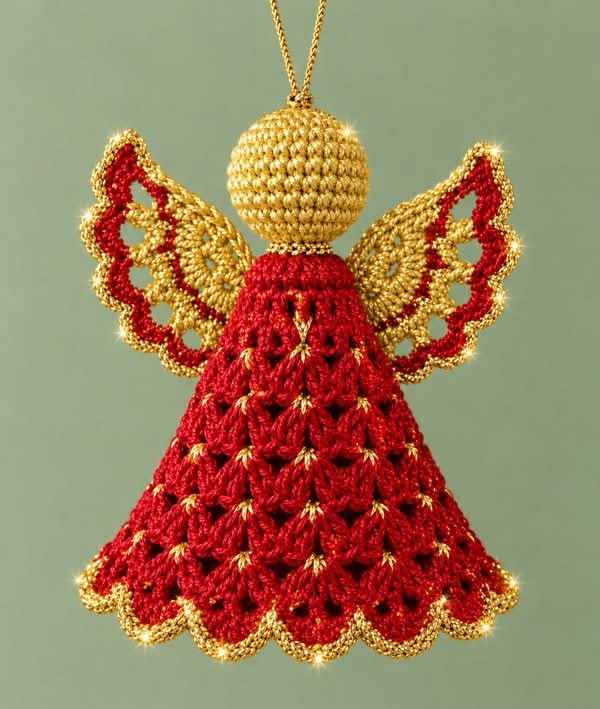
The Crochet Angel Ornament Pattern is a beautiful way to bring handmade elegance, warmth, and traditional Christmas charm into your holiday decorations. With its flowing red dress, delicate golden wings, rounded head, and decorative scalloped edges, this Crochet Angel Ornament combines simple crochet techniques with lovely finishing details. Whether you enjoy making Christmas ornaments for your own home or creating thoughtful handmade gifts, this project offers a rewarding opportunity to explore different crochet stitches and textures. The combination of red and gold yarn gives the angel a festive appearance, while the openwork wings add a graceful finishing touch. Although the completed ornament looks intricate, it can be recreated through a series of manageable steps using familiar US crochet terminology.
One of the most appealing features of this Crochet Angel Ornament Pattern is its versatility. You can hang the finished angel on a Christmas tree, display it as part of a holiday centerpiece, attach it to a decorative garland, or include it in a handmade gift package. The design is especially attractive because it combines a three-dimensional bell-shaped dress with lightweight lace-inspired wings. The rounded golden head provides balance, while the textured stitches throughout the dress create depth and movement. Small golden accents can be added between the red stitches to imitate the sparkling details visible in the inspiration photograph. By adjusting yarn thickness, hook size, and color combinations, you can create ornaments in several sizes without changing the overall construction method.
This detailed Crochet Angel Ornament Pattern tutorial explains how to create an angel inspired by the pictured design, from the first magic ring to the final hanging loop. You will learn how to crochet a rounded head, build a flared dress using decorative stitch groups, make two symmetrical wings, and finish the ornament with golden edging. The instructions use US crochet terms, including single crochet, double crochet, treble crochet, chain stitches, and slip stitches. The pattern is suitable for confident beginners who are comfortable working in rounds and for intermediate crocheters interested in decorative Christmas projects. Because the exact original stitch chart is not available, the instructions below provide a complete, original reconstruction designed to achieve a similar appearance while remaining practical and consistent from beginning to end.
Materials, Crochet Stitches, and Preparation for the Crochet Angel Ornament Pattern
Before beginning your Crochet Angel Ornament, gather the materials needed for the dress, head, wings, and finishing details. For an ornament resembling the photograph, choose red yarn for the dress and metallic gold yarn for the head, wings, borders, and hanging loop. Lightweight cotton crochet thread or fine cotton yarn works particularly well because it helps the decorative stitches maintain their shape. Metallic thread can be slightly more challenging to handle, so beginners may prefer a smooth cotton yarn with a subtle golden sheen. Using yarns of similar thickness will make the different sections easier to assemble and help the finished angel look balanced.
DISCOVER MORE FREE PATTERNS HERE!
For this version of the Pattern, use approximately 20–30 grams of red fingering-weight cotton yarn and 15–20 grams of gold yarn in a similar weight. A 2.5 mm crochet hook is a useful starting point, although you may need to adjust the hook size depending on your tension. You will also need a yarn needle, scissors, stitch markers, a small amount of polyester fiberfill for the head, and optional fabric stiffener for the wings. A small piece of cardboard or a lightweight plastic cone can be used temporarily to shape the dress while it dries. The finished ornament will measure approximately 13–16 cm tall, excluding the hanging loop, depending on your materials and gauge.
Understanding the stitch abbreviations is essential for following this Crochet Angel Ornament Pattern. All instructions use standard American crochet terminology. The main abbreviations are MR (magic ring), ch (chain), sl st (slip stitch), sc (single crochet), hdc (half double crochet), dc (double crochet), tr (treble crochet), st (stitch), sp (space), inc (increase), and dec (decrease). An increase means working two stitches into the same stitch, while a decrease combines stitches to reduce the total stitch count. The pattern also uses dc2tog, meaning two double crochet stitches joined together, and BLO, meaning back loop only. These techniques help create the rounded head, decorative dress, and openwork wings.
Several decorative stitch combinations give the angel its characteristic appearance. A shell stitch consists of multiple double crochet stitches worked into one stitch or chain space, creating a fan-shaped effect. A V-stitch is formed by working a double crochet, one chain, and another double crochet into the same space. A picot is a small decorative point made by chaining three stitches and joining them with a slip stitch into the first chain. These techniques are especially useful for the golden border and wing edges. The dress in this tutorial uses expanding shell groups, while the wings feature chains, double crochet stitches, and treble crochet stitches to create a delicate lace-like structure.
Maintaining consistent tension is important when making a crochet Christmas angel ornament. If the stitches are too loose, the dress may collapse and the wings may lose their shape. If they are too tight, the decorative openings may become difficult to see, and the metallic yarn may be harder to work with. Crochet a small practice swatch before starting, especially if you are unfamiliar with the yarn. For the dress, aim for stitches that are firm enough to hold a bell shape without becoming stiff or bulky. The head should be worked more tightly so that the fiberfill remains hidden. If necessary, use a slightly smaller hook for the head than for the decorative dress.
Prepare your workspace by separating the yarn colors and keeping the stitch markers within reach. Since this Crochet Angel Ornament Pattern contains several small components, organizing the pieces as you work will make assembly easier. It is also helpful to leave a long yarn tail on the head and wings for sewing them securely into place. Before beginning, decide whether the angel will be used as a hanging ornament or a freestanding decoration. A hanging version can remain relatively lightweight, while a freestanding angel may benefit from additional shaping and stiffening. Once the materials are ready, begin with the golden head, which serves as the central feature of the design.
Step-by-Step Instructions for Crocheting the Golden Angel Head and Red Dress
The rounded golden head is the first component of this Crochet Angel Ornament Pattern. Using gold yarn and a 2.5 mm hook, create a magic ring and work six single crochet stitches into the center. Pull the ring closed and continue working in continuous spiral rounds, using a stitch marker to identify the beginning of each round. For Round 2, work two single crochet stitches into every stitch for a total of 12 stitches. In Round 3, repeat one single crochet followed by an increase six times, producing 18 stitches. For Round 4, repeat two single crochet stitches followed by an increase six times, producing 24 stitches. These increases create the foundation of the spherical head.
Continue shaping the head with evenly spaced increases. For Round 5, repeat three single crochet stitches and one increase six times to reach 30 stitches. In Round 6, repeat four single crochet stitches and one increase six times to reach 36 stitches. Work one single crochet in each stitch for Rounds 7 through 12, maintaining 36 stitches per round. This straight section creates the middle of the sphere. Begin decreasing in Round 13 by repeating four single crochet stitches and one decrease six times, leaving 30 stitches. Round 14 uses three single crochet stitches and one decrease repeated six times, leaving 24 stitches. Begin adding fiberfill at this stage, distributing it evenly so the head maintains a smooth rounded appearance.
Complete the golden head by continuing the decreases. In Round 15, repeat two single crochet stitches and one decrease six times, leaving 18 stitches. Round 16 consists of one single crochet followed by one decrease, repeated six times, leaving 12 stitches. Add a little more fiberfill if necessary, but avoid overstuffing. In Round 17, work six decreases to close the opening. Fasten off and use the yarn needle to weave the remaining tail through the front loops of the final stitches, pulling gently to close the hole. Leave a separate long gold yarn tail if you plan to sew the head to the dress later. The finished head should be firm, symmetrical, and approximately 3–4 cm in diameter.
Next, begin the red dress, which forms the most decorative part of the Crochet Angel Ornament. Work from the neckline downward, expanding the fabric gradually into a bell shape. With red yarn, chain 24 and join with a slip stitch to form a ring, making sure the chain is not twisted. For Round 1, chain three, counting as the first double crochet, then work one double crochet into each remaining chain. Join with a slip stitch to the top of the beginning chain three. You should have 24 double crochet stitches. For Round 2, chain three and work one double crochet in the same stitch, then one double crochet in the next stitch. Repeat two double crochet stitches in the following stitch and one double crochet in the next stitch around. Join to complete the round with 36 stitches.
To create the first decorative shell row, work Round 3 as follows: chain three, work two additional double crochet stitches in the same stitch, chain one, skip two stitches, and work three double crochet stitches into the next stitch. Continue repeating the sequence of three double crochet stitches, chain one, and skip two stitches around the circle. Join with a slip stitch to the top of the beginning chain three. You should have 12 shell groups. For Round 4, slip stitch into the center double crochet of the first shell. Chain three, work three additional double crochet stitches into that center stitch, chain one, and work four double crochet stitches into the center stitch of each following shell, separated by one chain. Join the round, keeping 12 shell groups.
Continue expanding the dress to create its flowing silhouette. For Round 5, work five double crochet stitches into the center of each previous shell, followed by two chain stitches between shell groups. In Round 6, increase each shell to six double crochet stitches and maintain two chain stitches between groups. Round 7 uses seven double crochet stitches in each shell with two chain stitches between groups. Round 8 uses eight double crochet stitches in each shell, separated by three chain stitches. Round 9 uses nine double crochet stitches in each shell, separated by three chain stitches. Round 10 uses ten double crochet stitches in each shell, separated by three chain stitches. Slip stitch to the center of the next shell before beginning each new round. The result should be a gradually widening dress with pronounced textured fans and decorative openings.
Finish the red dress with a scalloped border inspired by the photograph. In Round 11, work one single crochet into the center of each shell, chain three, then work five double crochet stitches into the next chain-three space. Chain three and repeat around the dress. Join with a slip stitch and fasten off the red yarn. Attach gold yarn to the edge and work one single crochet into each available stitch, adding three single crochet stitches at the rounded center of each scallop to keep the border smooth. For extra decoration, add a small picot at the center of each scallop. Weave in the ends carefully. If desired, use a short strand of gold yarn to embroider tiny V-shaped accents between the red shell groups, imitating the sparkling gold highlights in the original design. The dress should now resemble a small decorative bell with a fitted neckline and a wide, scalloped lower edge.
How to Crochet the Decorative Golden Wings and Assemble the Angel Ornament
The wings are among the most distinctive features of this Crochet Angel Ornament Pattern. Their openwork construction adds a delicate, airy appearance that contrasts beautifully with the textured red dress. Each wing is crocheted separately using gold yarn, with red accents added afterward. Begin the first wing by chaining 16 stitches. Work one single crochet into the second chain from the hook, followed by one half double crochet in the next stitch, one double crochet in each of the next four stitches, one treble crochet in each of the next five stitches, and one double crochet in each of the final four stitches. This creates a gently curved foundation with a taller center section. Chain three and turn your work.
For the second wing row, work one double crochet into the first stitch, chain two, skip one stitch, and work two double crochet stitches into the next stitch. Continue repeating the sequence of chain two, skip one stitch, and two double crochet stitches into the next stitch across the row, adjusting the final group as needed to finish at the edge. This creates a series of open spaces that will form the lace pattern. For Row 3, chain four and turn. Work three double crochet stitches into the first chain-two space, chain two, and repeat across the remaining spaces. At the final space, work three double crochet stitches followed by one treble crochet to extend the outer tip of the wing. The openwork structure should begin to resemble a decorative fan.
Add a scalloped outer edge to the wing using the same gold yarn. Chain one and turn the work so you can crochet along the outer curved edge. Work one single crochet into the first available space, then five double crochet stitches into the next chain space, followed by one single crochet into the following space. Repeat this combination along the curved edge to create small decorative scallops. At the upper wing tip, work seven double crochet stitches into the corner space to emphasize the pointed shape. Continue with single crochet stitches along the inner edge until you reach the base. Fasten off, leaving a long yarn tail for assembly. Make the second wing using the same instructions, then turn it over before attaching it so that the two wings appear symmetrical.
To reproduce the red-and-gold effect visible in the inspiration image, add a contrasting red border to the outer portion of each wing. Attach red yarn near the upper tip and work a row of slip stitches or single crochet stitches along the scalloped edge. For a more elaborate finish, alternate three red chain stitches with one slip stitch into the next available gold stitch. This produces small red loops that follow the golden scallops. Add a final narrow gold border if you prefer a brighter metallic outline. The exact appearance will depend on the yarn thickness and stitch tension. When both wings are complete, gently stretch them into matching shapes and pin them onto a foam blocking mat. Lightly dampen the wings or apply a suitable fabric stiffener, then allow them to dry completely.
Assembling the Crochet Angel Ornament requires careful positioning to keep the finished decoration balanced. Place the red dress on a flat surface and identify the front and back. Position the golden head directly above the neckline, centering it over the dress opening. Using a yarn needle and the remaining gold yarn tail, sew the bottom of the head securely to the neckline. Pass the needle through several stitches around the neck rather than attaching the head at only one point. This distributes the weight and prevents the head from leaning forward. Next, position the wings behind the upper section of the dress, with the widest parts extending outward and slightly upward. Sew each wing to the back of the neckline using several firm stitches.
The final assembly step is creating the hanging loop and refining the ornament’s shape. Cut a 20–25 cm length of gold yarn or metallic cord, fold it in half, and pass both ends through the top of the head with a yarn needle. Tie the ends securely inside or beneath the head, leaving a loop approximately 7–9 cm long. Check that the angel hangs vertically before tightening the knot. If the dress appears too soft, place it over a small cone-shaped form and apply a light coating of fabric stiffener. Allow it to dry fully before removing the form. Adjust the wings so that they extend evenly on both sides. The finished Crochet Angel Ornament Pattern should now have a rounded golden head, an elegant red bell-shaped dress, delicate openwork wings, and a decorative hanging loop.
Finishing Techniques, Creative Variations, and Care Tips for Your Crochet Angel Ornament
A well-finished Crochet Angel Ornament can become a cherished part of your Christmas decorations for many years. After completing the main construction, inspect the ornament for loose yarn ends, uneven stitches, or areas that need additional shaping. Use a yarn needle to weave each loose end through several stitches on the inside of the fabric, changing direction at least once to secure it. Trim the excess yarn carefully without cutting into the crochet stitches. If metallic yarn is used, take extra care because some varieties can fray when handled repeatedly. A small amount of clear, flexible fabric adhesive may help secure difficult metallic ends, but it should be tested on a hidden area first.
Blocking is particularly useful for the wings and scalloped dress border. To block the wings, place them on a padded surface and gently arrange the openwork sections into their intended shape. Pin the outer scallops so they form smooth curves, then lightly mist the yarn with water if the fiber allows it. Cotton yarn generally responds well to wet blocking, while synthetic fibers may require a different approach. If the angel is intended to stand upright, fabric stiffener can be applied to the dress to help maintain its bell-shaped structure. Avoid applying too much product because excessive stiffening can make the fabric appear rigid or cause the metallic yarn to lose some of its natural shine.
Color customization is an enjoyable way to make the Crochet Angel Ornament Pattern unique. The red and gold combination is especially suitable for traditional Christmas decorations, but other colors can produce equally attractive results. A white dress with silver wings creates a soft winter-inspired ornament, while a cream dress with champagne-gold accents offers a more understated appearance. Deep green and gold can complement classic Christmas trees, and pastel pink with ivory wings creates a delicate decorative gift. You can also use two shades of the same color for the dress, alternating them between shell rows. When changing colors, complete the final yarn-over of the last stitch with the new color to create a cleaner transition.
The size of the ornament can be adjusted by changing the yarn and hook combination. Fine crochet thread and a smaller hook produce a miniature angel suitable for small Christmas trees, gift wrapping, or decorative garlands. Medium-weight yarn and a larger hook create a more substantial ornament that can be displayed on a mantel or holiday centerpiece. Keep in mind that increasing yarn thickness also changes the firmness and weight of the finished project. For larger angels, additional support may be necessary to prevent the dress from collapsing. If you want a taller dress, repeat the final shell round before adding the scalloped border, maintaining the same number of shell groups.
Decorative embellishments can make your Crochet Angel Ornament even more special. Tiny gold beads can be sewn onto the center of selected shell stitches to create subtle highlights. A narrow metallic ribbon may be tied around the neckline, provided it does not obscure the stitch pattern. Some crocheters enjoy adding a small halo above the head using a crocheted chain ring or a piece of decorative gold cord. A halo can be made by chaining 24 stitches, joining them into a circle, and working one round of single crochet around the chain. Attach the finished ring behind the top of the head using a few secure stitches. For ornaments intended for homes with young children or pets, embroidered details are generally preferable to loose beads or detachable decorations.
Proper storage will help preserve the shape and appearance of your handmade crochet Christmas decorations. When the holiday season ends, place the angel in a clean, dry storage container away from direct sunlight and excessive humidity. Avoid pressing heavy decorations against the wings because the delicate openwork may become distorted. A small piece of acid-free tissue paper placed inside the dress can help maintain its shape during storage. If the ornament becomes dusty, gently brush it with a soft, clean brush or follow the care instructions for the yarn used. Avoid machine washing ornaments that contain metallic thread, stiffener, or glued embellishments. With thoughtful care, this handmade angel can remain a meaningful Christmas keepsake for many seasons.
Frequently Asked Questions About the Crochet Angel Ornament Pattern
Is the Crochet Angel Ornament Pattern suitable for beginners?
This pattern is most suitable for confident beginners and intermediate crocheters. The rounded head uses basic single crochet increases and decreases, while the dress introduces shell stitches and decorative edging. The wings require a little more attention because they combine several stitch heights and openwork spaces. Beginners can complete the project successfully by working slowly, counting stitches after each round, and practicing unfamiliar techniques before beginning the final ornament.
What type of yarn is best for a Crochet Angel Ornament?
Fine cotton yarn or crochet thread is an excellent choice because it produces clear stitch definition and helps the angel maintain its shape. Mercerized cotton is particularly attractive for decorative ornaments because of its smooth finish and gentle sheen. Metallic yarn can be used for the head, wings, and edging, although it may be less flexible than regular cotton. Choosing yarns of similar thickness will make the finished design more consistent.
How much yarn is needed to make one crochet angel?
For an ornament approximately 13–16 cm tall, about 20–30 grams of red yarn and 15–20 grams of gold yarn should be sufficient. The exact amount depends on the yarn thickness, hook size, tension, and decorative details. If you plan to make several angels, purchasing additional yarn from the same dye lot can help maintain consistent colors throughout the collection.
How do I keep the crochet angel’s dress from collapsing?
A firm stitch tension and suitable yarn are the first steps toward creating a stable dress. If the dress remains too soft, place it over a cone-shaped form and apply a small amount of fabric stiffener. Allow it to dry completely before removing the support. For larger ornaments, a lightweight internal cone can provide additional structure, especially when the angel is intended to stand on a flat surface.
Can I make the Crochet Angel Ornament without metallic yarn?
Yes. Metallic yarn is optional and can be replaced with regular cotton yarn in gold, mustard yellow, cream, silver, or another complementary shade. Smooth cotton is often easier to crochet with and can provide excellent stitch definition. If you want a subtle sparkling effect without metallic yarn, consider adding a few embroidered accents using a decorative thread.
How long does it take to complete one crochet angel ornament?
The time required depends on your crochet experience and the complexity of the finishing details. An experienced crocheter may complete the main pieces in approximately three to five hours, while a beginner may need additional time to practice the decorative stitches and assemble the ornament. Blocking, stiffening, and drying can extend the total project time.
Can I make the angel ornament in different sizes?
Yes. Changing the yarn thickness and hook size is the simplest way to adjust the finished dimensions. Fine thread creates smaller ornaments, while thicker yarn produces larger decorations. You can also extend the dress by repeating the lower shell rows before working the scalloped border. Remember that larger angels may need extra support to maintain their shape.
Why are the wings curling instead of lying flat?
Curling usually occurs because of uneven tension, a tight foundation chain, or insufficient space between the decorative stitches. Try working the foundation chain with a slightly larger hook or loosening your tension when making the openwork rows. Gentle blocking can also help correct the shape. Pin both wings into matching positions and allow them to dry completely before assembly.
How can I make both crochet wings symmetrical?
Use the same stitch counts and row instructions for both wings, then mirror their orientation during assembly. It is helpful to place the completed wings side by side before attaching them to the dress. If one wing is slightly larger, gentle blocking may improve the symmetry. Attach both wings at the same height on the back of the neckline for a balanced appearance.
Can I add a halo to the Crochet Angel Ornament Pattern?
Absolutely. A simple crocheted halo can be created using a chain ring finished with single crochet stitches. Gold or silver yarn works especially well for this detail. The halo can be sewn behind the head so that it appears to float above the angel. Keep the halo lightweight to avoid pulling the ornament out of balance.
Is this Crochet Angel Ornament suitable for handmade Christmas gifts?
Yes. Handmade crochet angels make thoughtful gifts for friends, relatives, teachers, and anyone who appreciates traditional holiday crafts. They can be presented individually in a small gift box or included in a coordinated set of Christmas ornaments. Adding a handwritten care note can make the gift more personal and help the recipient preserve the decoration.
How should I clean and store a finished crochet angel?
Light dusting with a soft brush is usually sufficient for decorative ornaments. If deeper cleaning is necessary, check the yarn manufacturer’s care instructions and consider whether the ornament contains stiffener or delicate embellishments. Store the angel in a dry container with enough space to protect the wings and scalloped border from being crushed.
Can I sell finished ornaments made using this pattern?
You can generally sell physical ornaments that you personally make using these instructions. If you plan to sell handmade decorations, focus on neat construction, secure finishing, accurate product descriptions, and appropriate packaging. Be sure to follow any applicable local business and product safety requirements, especially when adding small decorative components.
Conclusion: Create a Beautiful Handmade Crochet Angel Ornament
The Crochet Angel Ornament Pattern is a rewarding Christmas project that brings together traditional crochet techniques, elegant decorative stitches, and creative finishing details. Throughout this tutorial, you learned how to prepare the materials, understand essential US crochet abbreviations, create a rounded golden head, crochet a textured red dress, make delicate openwork wings, and assemble the pieces into a complete hanging decoration. You also explored methods for shaping the ornament, adding scalloped borders, incorporating golden accents, and maintaining the finished project over time.
One of the greatest advantages of this Crochet Angel Ornament is the freedom to personalize it. Whether you follow the classic red-and-gold color combination or experiment with softer shades, the finished angel can reflect your own style and holiday traditions. Each handmade ornament carries the character of the person who created it, making it a meaningful addition to Christmas decorations and gift collections.
EASILY FIND THE FREE PDF FOR THIS PATTERN HERE!
If you enjoyed this Crochet Angel Ornament Pattern, please share your sincere opinion about the tutorial. Which part of the project did you enjoy most: the textured dress, the golden wings, or the decorative finishing touches? Your honest feedback and suggestions for future patterns are always welcome. Sharing your experience, creative ideas, and any improvements you discovered can help make future crochet tutorials even more useful and enjoyable for everyone who loves handmade Christmas crafts.