
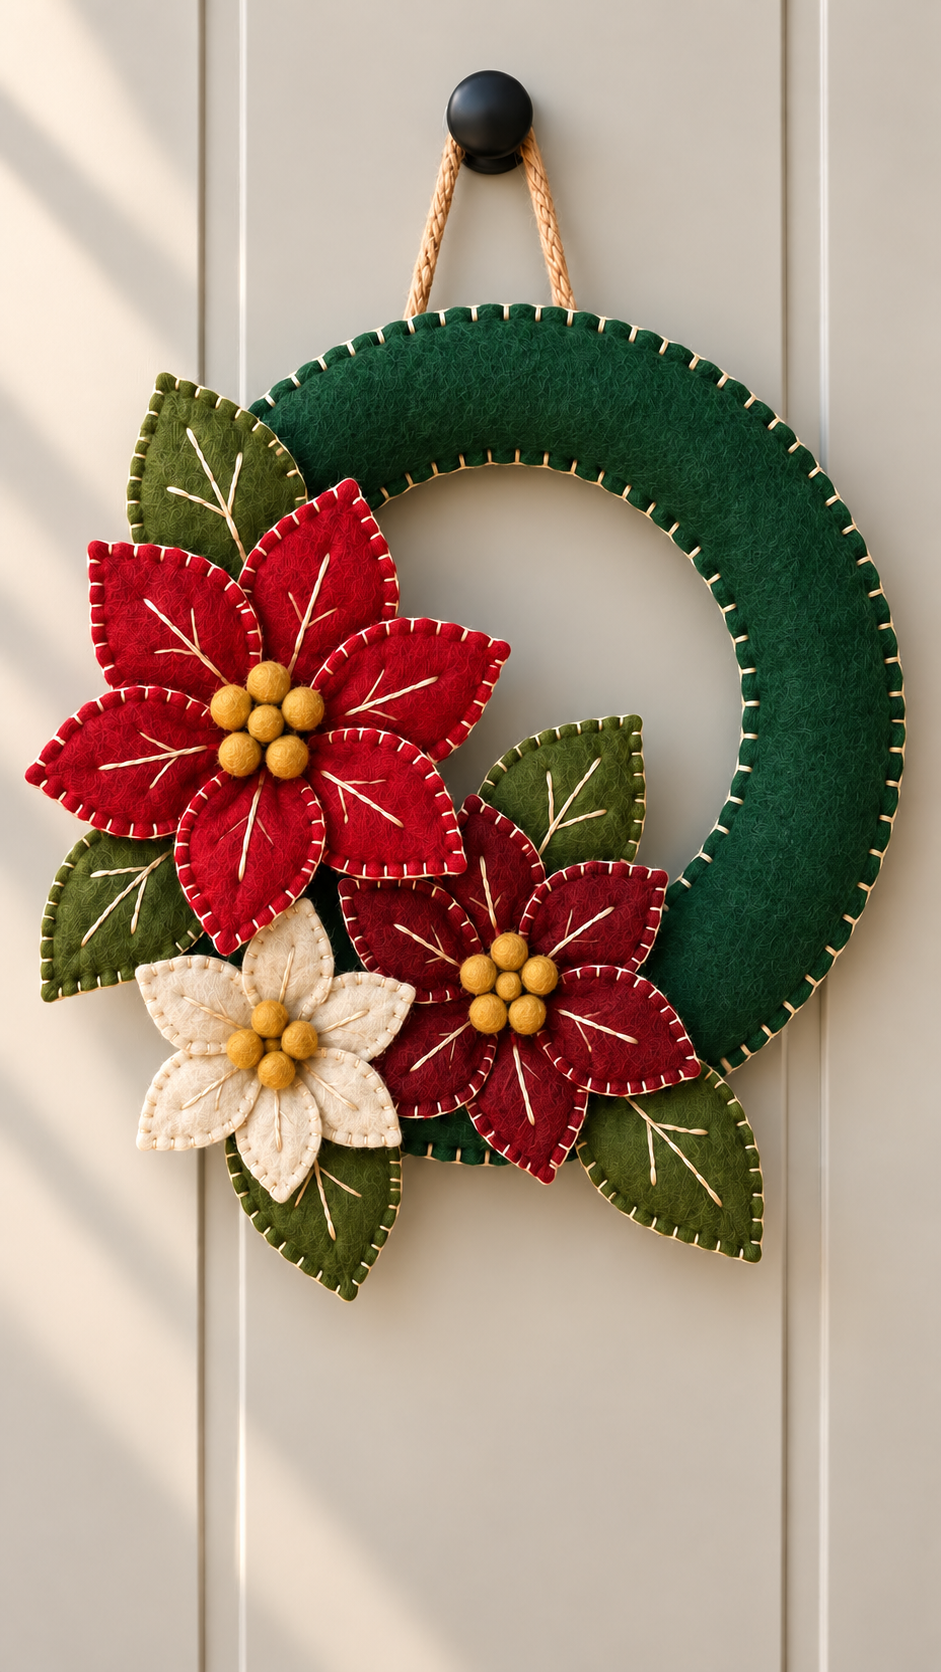
The Felt Poinsettia Christmas Wreath Pattern is a charming holiday sewing project that combines traditional Christmas colors with the soft, welcoming texture of felt. Inspired by the wreath shown in the reference image, this design features a large dark green circular base decorated with layered poinsettia flowers, embroidered leaves, and small golden-yellow centers. The visible blanket stitching around the edges gives the project a handmade character while also helping define every individual shape. It is an approachable project for anyone who enjoys felt crafts, Christmas sewing, handmade ornaments, and seasonal home décor.
One of the most attractive features of this Felt Poinsettia Christmas Wreath Pattern is that it does not require complicated construction. Instead, the visual impact comes from layering simple shapes thoughtfully. The main wreath can be made from sturdy green felt, while red, burgundy, cream, olive green, and mustard yellow felt create the floral arrangement. Decorative embroidery adds another layer of texture. Even small differences in stitch length or petal placement can add personality, which makes this an especially enjoyable project for handmade holiday decorating.
Before beginning, it is useful to look carefully at the overall composition. The wreath has an open circular center and a broad green ring, with the floral cluster concentrated mainly along the lower-left portion. Large red poinsettia petals establish the focal point, a smaller burgundy flower balances the composition, and a cream flower brightens the lower section. Olive leaves extend outward between the flowers, while golden centers provide warm contrast. By following this arrangement while allowing small handmade variations, you can create a finished felt Christmas wreath that captures the character of the inspiration without requiring every piece to be perfectly identical.
Materials, Measurements, and Preparing the Felt Wreath Pattern
Begin by gathering your materials. For a medium-sized wreath, you will need dark green felt for the base, red and burgundy felt for the poinsettias, cream or ivory felt for the smaller flower, olive green felt for the leaves, and mustard or golden-yellow felt for the flower centers. You will also need embroidery floss, a hand-sewing needle, fabric scissors, pins or clips, paper for creating templates, polyester stuffing if you want slightly dimensional pieces, and approximately 35–45 cm of cord for the hanging loop.
DISCOVER MORE FREE PATTERNS HERE!
A practical finished size for this Felt Poinsettia Christmas Wreath Pattern is approximately 30–35 cm in outside diameter. Draw an outer circle on paper and then draw a smaller centered circle measuring approximately 17–20 cm in diameter. The space between these circles becomes the wreath ring. These measurements can be adjusted depending on where you intend to display the finished decoration.
For a sturdier wreath, cut two identical dark green felt rings. Place one directly over the other and check that both outer and inner curves align. Two layers give the wreath enough body to hang neatly without requiring a heavy internal structure. If your felt is particularly thin, an additional layer of interfacing or lightweight batting can be placed between them.
The visible edge treatment is an important part of this project. A blanket stitch worked around both the outside and inside edges produces the attractive handmade outline seen in the design. Cream, beige, or natural-colored embroidery floss creates strong contrast against dark green felt. Keep the stitches approximately 0.5–0.8 cm apart, adjusting slightly around the curves so the spacing remains visually consistent.
Next, prepare paper templates for the flowers and leaves. A large poinsettia can use petals approximately 7–9 cm long, while the smaller flowers can use petals around 5–7 cm long. Leaves may range from 7–11 cm, depending on their position. Rather than making every piece exactly the same size, create two or three slightly different templates. This produces the organic appearance that makes the arrangement interesting.
Before cutting your best felt, arrange the paper templates over the wreath base. Position the largest flower toward the left side, a second flower lower and slightly toward the center, and a small cream flower near the bottom-left area. Place leaves behind and between them. This dry-layout stage is extremely useful because it allows you to adjust proportions before committing to stitching.
Cutting, Stitching, and Building the Poinsettia Flowers
The large red poinsettia is the primary focal point of the Felt Poinsettia Christmas Wreath Pattern. Cut approximately five or six pointed petals from red felt. The petals should have softly curved sides and pointed ends rather than perfectly geometric shapes. Slight variations are welcome because real leaves and flowers are naturally irregular.
For a dimensional result, each petal can be made from two matching pieces of felt. Place the pieces together and work blanket stitch embroidery around the perimeter using cream thread. If desired, insert a tiny amount of polyester filling before completing the final section. Use only enough filling to create a gentle raised effect; heavily stuffed petals may look bulky when assembled.
Add the decorative vein lines after forming the petals. Using cream embroidery floss, sew a long central line beginning near the base and extending toward the point. Add one or two shorter diagonal stitches on each side. These simple embroidered details make plain felt look more refined and visually connect the petals with the decorative leaves.
Arrange five or six completed petals into a flower before attaching them permanently. Allow the bases to overlap slightly so there are no obvious gaps around the center. Secure the petals together with strong hand stitches through the hidden lower sections. The flower should feel stable but still retain the individual shape of each petal.
Create the second poinsettia using burgundy or deep red felt. Making this flower slightly smaller helps establish visual hierarchy. Follow the same process of cutting, edge stitching, optional light stuffing, and adding embroidered veins. Place it toward the lower-right portion of the main floral cluster so it overlaps some leaves while remaining distinct from the larger red flower.
For the cream poinsettia, use five smaller petals and cream or ivory felt. Because light felt can show markings easily, use a removable fabric marker very lightly or pin the paper template directly to the felt before cutting. Edge stitching can be done with beige, tan, or slightly darker cream floss. The subtle contrast keeps the details visible without overpowering the soft color.
Making the Leaves, Flower Centers, and Final Floral Arrangement
The leaves play an important structural role because they visually connect the individual flowers with the dark green wreath. Cut approximately six to eight leaves from olive or moss-green felt. Create a combination of medium and large leaves so that some can appear behind the flowers while others extend outward from the arrangement.
As with the petals, two layers of felt can be used for each leaf. Blanket stitch around the edges with cream embroidery floss. Add a central embroidered vein and two or three smaller branches. These stitches do not need to imitate botanical anatomy exactly; their purpose is to create recognizable leaf details and echo the hand-stitched border around the wreath.
The golden flower centers are another characteristic element of this Felt Poinsettia Christmas Wreath Pattern. You can make them from tiny felt balls or small circles of yellow felt. For handmade felt balls, cut small circles approximately 2.5–3 cm across, sew a running stitch around the perimeter, add a tiny amount of filling, and pull the thread tightly to create a rounded form.
Create approximately five to seven golden centers for the largest flower and slightly fewer for each smaller flower. Sew them closely together in the middle of each poinsettia. Varying their size very slightly can make the cluster appear more natural. Make sure every center is securely attached, particularly if the wreath will be stored and reused for several holiday seasons.
Now arrange all of the components on the finished green ring. Start with the leaves because they form the background layer. Allow several leaves to extend beyond the outside edge of the wreath, and let one or two point inward toward the circular opening. Next, place the largest red flower over the leaves, followed by the burgundy and cream flowers.
Take a photo of your arrangement before sewing everything permanently. This simple trick gives you a reference in case pieces shift during assembly. Attach the leaves first with small concealed stitches, then sew the flowers in place through their centers and lower petal layers. Check the front frequently to make sure the arrangement remains balanced and that unwanted stitches are not visible.
Finishing and Displaying Your Felt Poinsettia Christmas Wreath
Once the floral arrangement is attached, inspect the complete felt poinsettia wreath from several angles. Look for empty areas that seem accidental rather than intentional. A small additional leaf can fill an awkward gap, but avoid covering the entire green ring. Leaving a substantial amount of the dark green base visible creates the clean circular silhouette seen in the inspiration.
Prepare the hanging loop from braided cord, cotton rope, ribbon, or a handmade fabric loop. A finished loop of approximately 15–20 cm above the wreath generally works well. Secure both ends firmly to the back of the green base using several reinforced stitches. The attachment should support the entire weight of the wreath without distorting its circular shape.
If the wreath does not hang perfectly straight at first, adjust the location of the cord attachment points rather than adding unnecessary weight. The floral cluster makes one side heavier, so the hanging loop may need to be positioned slightly differently to compensate. Test the wreath on a hook before completing the final reinforcement stitches.
Carefully trim loose threads and remove any visible temporary markings. Gently shape the petals with your fingers so their pointed ends and curves remain visible. If you used light stuffing, distribute it evenly within each element. Felt generally holds its shape well, so extensive pressing is usually unnecessary and excessive heat should be avoided.
For storage after the holiday season, place the wreath flat in a clean container rather than folding it. A sheet of tissue paper can be placed over the floral surface to prevent other decorations from pressing against the petals. Keeping the piece dry and protected from excessive dust will help preserve the hand-stitched felt details.
The completed project works beautifully on an interior door, wall, cabinet, or other protected indoor location. The combination of dark green, traditional reds, warm cream, olive leaves, and golden centers gives the wreath a recognizable Christmas palette while the embroidery makes it feel distinctly handmade. It can also become a meaningful seasonal gift because every petal, leaf, and stitch reflects time spent creating something by hand.
FAQ – Felt Poinsettia Christmas Wreath Pattern
What type of felt is best for a Christmas wreath?
A medium-weight craft felt or wool-blend felt works well for this project. Wool-blend felt generally has a refined texture and good durability, while quality craft felt is an accessible option for beginners. The most important factor is choosing felt that holds its shape after cutting.
How large should the Felt Poinsettia Christmas Wreath Pattern be?
A finished diameter of approximately 30–35 cm creates a versatile decoration for many interior doors and walls. However, the pattern can easily be enlarged or reduced. Remember to resize the flowers and leaves proportionally so the composition remains balanced.
What stitch is used around the felt pieces?
The most visible technique is the blanket stitch, sometimes called an edge stitch in casual crafting terminology. It creates decorative loops along the edge while simultaneously joining layers of felt. A running stitch can also be useful when creating the small rounded flower centers.
Do I need a sewing machine for this project?
No. This Felt Poinsettia Christmas Wreath Pattern is particularly suitable for hand sewing. In fact, visible hand stitching is one of the main decorative characteristics of the design. A sewing machine may be used for certain construction steps if preferred, but it is not necessary.
Can I make the flowers without stuffing them?
Absolutely. Flat double-layer felt flowers can look beautiful and are easier for beginners to assemble. Stuffing simply provides extra dimension. If you want a flatter wreath that is easier to store, leaving the petals and leaves unstuffed is a practical choice.
How can I keep the blanket stitches evenly spaced?
Use tiny removable marks along the felt edge before sewing, or visually aim for spacing of approximately 0.5–0.8 cm. Consistency matters more than absolute perfection. Around tight curves and pointed tips, slightly adjust the spacing to keep the stitches looking balanced.
How many poinsettia flowers should I make?
The design shown here works particularly well with three flowers: one large red poinsettia, one medium burgundy poinsettia, and one smaller cream poinsettia. You can add more flowers for a fuller wreath, but three allows plenty of the green base and embroidered leaves to remain visible.
Can I change the Christmas colors?
Yes. Although dark green, red, burgundy, cream, olive, and gold create a traditional holiday appearance, the same pattern can be adapted to white and gold, red and white, pastel colors, or other coordinated palettes. Maintaining sufficient contrast between the wreath, flowers, leaves, and embroidery will help preserve the visual definition.
How should the poinsettias be attached to the wreath?
Strong hand stitches are a good choice. Stitch through the hidden bases of several petals and reinforce the flower through its center. Leaves should usually be attached first, followed by the flowers, so most attachment stitches remain concealed underneath overlapping elements.
Is this pattern suitable for beginners?
Yes. Beginners can practice several useful felt sewing techniques, including template tracing, cutting curved shapes, blanket stitching, simple embroidery, layering, light stuffing, and hand assembly. Working slowly and preparing the entire arrangement before permanent attachment makes the process much easier.
Can this wreath be used outdoors?
Standard craft felt is generally better suited to protected indoor spaces because prolonged moisture, strong sunlight, and changing weather conditions can affect its appearance. If you want to display it near an entrance, a sheltered location away from rain is preferable.
How can I make the wreath look more professional?
Focus on clean cutting, consistent blanket stitches, secure hidden attachments, balanced layering, and coordinated colors. Also avoid overcrowding the floral arrangement. The contrast between decorated areas and the exposed dark green ring is an important part of the finished design.
Conclusion
The Felt Poinsettia Christmas Wreath Pattern combines simple felt construction with decorative hand sewing to create a warm and timeless Christmas decoration. Starting with a sturdy dark green ring, you learned how to prepare the basic wreath shape, cut layered poinsettia petals, create embroidered leaves, form golden flower centers, and arrange all of these components into a balanced floral composition.
The project also introduces useful techniques that can be applied to many other felt Christmas crafts, especially blanket stitching, hand embroidery, layered appliqué, template cutting, dimensional felt work, and decorative assembly. Because the individual shapes are relatively simple, you can concentrate on neat stitching and thoughtful placement rather than complicated sewing techniques.
EASILY FIND THE FREE PDF FOR THIS PATTERN HERE!
Most importantly, this pattern leaves plenty of room for personalization. You can change the flower colors, adjust the wreath diameter, make the petals flat or lightly padded, experiment with embroidery thread, or alter the number of leaves. These small creative decisions can transform the same basic Felt Poinsettia Christmas Wreath Pattern into a decoration that feels completely personal. If you make your own version, leave your sincere opinion about the project and share any suggestions you have for colors, stitches, flower arrangements, or other creative variations. Your ideas can inspire new ways to turn this handmade Christmas wreath into an even more beautiful seasonal project.