
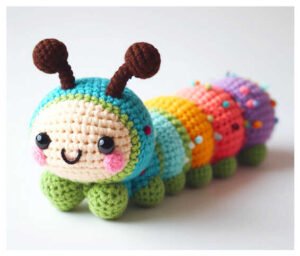
If you’re a fan of crochet patterns and amigurumi, you’ve likely come across adorable little creatures like The Little Caterpillar Pattern.
This crochet pattern is perfect for beginners and experts alike. With simple stitches and a fun, customizable design, it’s a wonderful addition to any amigurumi collection.
In this article, we’ll walk through the steps to create your very own little caterpillar, provide some tips on working with amigurumi, and explore the techniques that make this pattern so enjoyable.
What is The Little Caterpillar Pattern?
The Little Caterpillar Pattern is a crochet design used to make a cute and tiny caterpillar using the popular amigurumi technique. Amigurumi is the Japanese art of crocheting or knitting small stuffed creatures, and it has become a beloved hobby worldwide. This particular pattern is loved for its simplicity, making it a great project for those new to crochet or for experienced crafters looking for a quick and easy project.
The pattern typically involves using basic crochet stitches like single crochet, and it can be customized in terms of size, color, and details like eyes and antennae. Many crocheters enjoy making a whole family of caterpillars, each one with its unique color scheme or personality.
One of the best things about The Little Caterpillar Pattern is its versatility. Whether you want to use it as a toy, a decoration, or even a keychain, the possibilities are endless. By mastering this pattern, you’ll also strengthen your amigurumi skills and set the foundation for more complex crochet patterns in the future.
Materials and Tools for The Little Caterpillar
Before you start crocheting, it’s important to gather all the necessary materials and tools. The Little Caterpillar Pattern doesn’t require many supplies, which is part of what makes it so accessible for beginners. Here’s what you’ll need:
- Yarn: For this project, you’ll need worsted weight yarn in multiple colors. Typically, crocheters use green for the body and additional colors for stripes and facial details, but feel free to get creative.
- Crochet Hook: A 3.5mm (E/4) crochet hook is ideal for this pattern, but you can adjust based on your yarn choice.
- Stuffing: Polyester fiberfill stuffing is essential to give your caterpillar its shape.
- Safety Eyes or Yarn for Eyes: You can either use small safety eyes or embroider eyes using black yarn.
- Tapestry Needle: A tapestry needle will help you sew on the caterpillar’s face, antennae, and other parts.
- Stitch Marker: If you’re new to working in the round, a stitch marker will be helpful to keep track of your rows.
Once you’ve gathered your materials, you’re ready to begin the exciting process of bringing your little caterpillar to life. Remember to choose high-quality yarn and tools for the best results in your amigurumi creations.
Step-by-Step Guide to Crocheting The Little Caterpillar Pattern
Now that you have your supplies ready, let’s dive into the actual crochet pattern. Below is a detailed step-by-step guide on how to make The Little Caterpillar using simple amigurumi techniques. This pattern is worked in continuous rounds, so you won’t need to join at the end of each round.
1. Head
- Start with a magic ring.
- Round 1: 6 single crochets (sc) into the magic ring.
- Round 2: Increase (2 sc in each stitch) around – 12 stitches.
- Round 3: 1 sc, increase around – 18 stitches.
- Round 4: 2 sc, increase around – 24 stitches.
- Rounds 5-7: Sc in each stitch around.
- Round 8: 2 sc, decrease around – 18 stitches.
- Round 9: 1 sc, decrease around – 12 stitches.
- Insert safety eyes between rounds 5 and 6, about 4 stitches apart.
- Round 10: Decrease around – 6 stitches.
- Fasten off, leaving a long tail for sewing.
2. Body (Repeat this section for each segment of the caterpillar’s body)
- Round 1: Make a magic ring and sc 6 times into the ring.
- Round 2: 2 sc in each stitch around – 12 stitches.
- Round 3: 1 sc, increase around – 18 stitches.
- Rounds 4-7: Sc in each stitch around.
- Round 8: 1 sc, decrease around – 12 stitches.
- Round 9: Decrease around – 6 stitches.
- Stuff the body with fiberfill before closing. Fasten off and leave a long tail for sewing.
3. Antennae
- Using black yarn, chain 6.
- Slip stitch into the second chain from the hook and fasten off.
- Attach the antennae to the top of the caterpillar’s head.
Assembling The Little Caterpillar
Once you’ve crocheted all the parts (head, body segments, and antennae), it’s time to assemble your caterpillar. The key to a successful amigurumi project is precise sewing and secure attachment. Here’s how to assemble your caterpillar:
- Sew the body segments together: Using the long tails you left after finishing each segment, sew the body pieces together in a straight line. Be sure to stuff each segment as you go to give the caterpillar its plump, rounded shape.
- Attach the head: Sew the head onto the first body segment using a whip stitch. Ensure that the head is securely attached so that it doesn’t wobble or come loose over time.
- Add the antennae: Sew the antennae onto the top of the head, positioning them to give your caterpillar a playful expression.
- Embroider the mouth (optional): If you’d like, you can embroider a small smile using black yarn. This will add personality to your caterpillar and make it even more adorable.
Customizing Your Little Caterpillar
One of the best aspects of The Little Caterpillar Pattern is that it’s highly customizable. You can create a caterpillar that’s as unique as you are by experimenting with different colors, yarn textures, and additional details.
For example, you could create a striped caterpillar by alternating colors in the body segments. You could also add tiny feet or legs by crocheting small chains and attaching them to the body. If you’re feeling particularly creative, you could even turn your caterpillar into a butterfly by adding wings at the end of the body.
If you’re making this caterpillar as a gift, consider personalizing it to match the recipient’s favorite colors or adding initials embroidered on one of the body segments. The possibilities are endless, and the more you practice, the more ideas you’ll come up with for customizing your crochet patterns.
Tips for Perfecting Your Amigurumi Technique
If you’re new to crochet or amigurumi, you might find some parts of The Little Caterpillar Pattern challenging. However, with practice and patience, you’ll soon be able to master this and other crochet patterns. Here are some tips to help improve your technique:
- Use a stitch marker: When working in continuous rounds, it’s easy to lose track of your stitches. A stitch marker will help you keep track of the beginning of each round and prevent mistakes.
- Keep your tension consistent: Amigurumi works best when your stitches are tight and even. This will help prevent gaps in your fabric and ensure that your caterpillar holds its shape.
- Stuff as you go: Don’t wait until the very end to stuff your caterpillar. Stuff each body segment as you finish it, ensuring that the stuffing is evenly distributed throughout the piece.
The Joy of Crocheting The Little Caterpillar
Creating The Little Caterpillar using crochet patterns and the amigurumi technique is not only rewarding but also a great way to build your crochet skills. Whether you’re a seasoned crocheter or just starting, this pattern is fun, easy to follow, and endlessly customizable.
By following the step-by-step guide outlined above, you’ll have a completed caterpillar in no time, ready to be displayed or gifted to a loved one. With the right materials, tools, and a little bit of creativity, you can bring your own little caterpillar to life and continue exploring the wonderful world of amigurumi.