
Creating a rooster amigurumi is a delightful crochet project for enthusiasts of all skill levels. Whether you’re a seasoned crocheter or a beginner exploring amigurumi, this tutorial will guide you through the process. Follow along to craft a charming rooster that’s perfect as a gift or a decorative piece. Let’s dive into this step-by-step guide, complete with stitch counts and essential tips.
Crocheting amigurumi involves creating 3D shapes using basic and intermediate crochet techniques. For this rooster pattern, you will work in rounds, increasing and decreasing stitches to form the body, head, wings, and other features. Each component of the rooster is crafted separately and then assembled to create the final piece.
This method not only makes the process manageable but also allows you to customize colors and details. The tutorial below includes detailed instructions for each part of the rooster, ensuring even beginners can follow along.
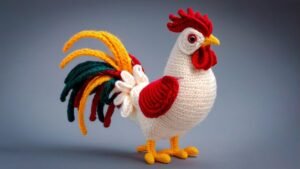
One of the joys of making amigurumi is the creative freedom it provides. While this tutorial gives a classic rooster look with white, red, yellow, and orange yarn, feel free to experiment with your color palette. Pastel shades can create a whimsical rooster, while bold, bright colors make it playful and eye-catching.
Additionally, the texture of the yarn you choose can influence the rooster’s final appearance—opt for smooth cotton yarn for a sleek finish or fluffy acrylic for a softer feel. With your materials ready and a willingness to learn, you’re all set to bring your rooster amigurumi to life.
Materials Needed for Your Rooster Amigurumi
Essential Tools and Supplies
- Yarn: Use medium-weight yarn in colors like white, red, yellow, and orange for a classic rooster look. Choose high-quality acrylic or cotton yarn for durability.
- Crochet Hook: A 3.5mm (E/4) hook works well with medium-weight yarn.
- Stuffing: Polyfill or another soft stuffing material to shape your rooster.
Additional Items
- Stitch markers to keep track of your rounds.
- Scissors and a yarn needle for finishing.
- Safety eyes (8mm) or black yarn for embroidered eyes.
Preparing Your Workstation
Before starting, ensure your workspace is clean, organized, and well-lit. Having all materials within reach will make the process smoother.
Starting the Body: The Foundation of Your Rooster
Round-by-Round Instructions
- Begin with a magic ring and crochet 6 single crochets (sc) into the ring. Pull tight to close. (6 stitches)
- Round 2: Increase in each stitch around by crocheting 2 sc in each. (12 stitches)
- Round 3: 1 sc, increase around. Repeat 6 times. (18 stitches)
Shaping the Body
- Continue increasing by 6 stitches per round until you reach 42 stitches in total.
- Rounds 8-15: Work 1 sc in each stitch around to build height.
- Begin decreasing to close the body: 5 sc, decrease around. Repeat until 6 stitches remain.
Finishing the Body
Stuff the body firmly with polyfill as you decrease. Secure and fasten off, leaving a long tail for sewing.
Crafting the Head: A Distinctive Feature
Head Formation
- Start with a magic ring and crochet 6 sc into the ring. (6 stitches)
- Increase each round similarly to the body until you reach 30 stitches.
- Work 5 rounds of 1 sc in each stitch to shape the head.
Adding Details
- Attach safety eyes between rounds 4 and 5, approximately 6 stitches apart.
- Stuff the head and sew it securely onto the body.
Enhancing the Head
Embroider a small beak using yellow yarn and create a red comb with tiny chain stitches on top.
Creating the Wings: A Symbol of Balance
Wing Instructions
- Chain 6 with your chosen yarn color.
- Turn and work 1 sc in each chain, then chain 1 and turn.
- Repeat for 4 rows to create a small rectangular wing.
Shaping the Wing
- Single crochet around the edge of the rectangle for a polished look.
- Make two wings and sew them symmetrically onto the body.
Final Touches
Ensure the wings are firmly attached and slightly angled for a realistic appearance.
Designing the Tail Feathers
Tail Feather Basics
- Use three colors for the tail: red, yellow, and orange.
- Chain 15, then work single crochets back along the chain.
- Repeat this process to create 3-5 feathers.
Attaching the Feathers
- Sew the feathers onto the back of the body, layering them for fullness.
- Secure the stitches tightly to ensure durability.
Adding Flair
Consider using variegated yarn for a colorful, eye-catching tail.
Crafting the Feet and Legs
Feet Instructions
- Start with orange yarn and make a magic ring with 6 sc. (6 stitches)
- Work 1 sc, increase around for 2 rounds. (12 stitches)
- Create toes by chaining 4, slip stitching back to the base, and repeating twice.
Legs
- Chain 8, then slip stitch back to create a sturdy leg.
- Attach the legs to the bottom of the body.
Ensuring Stability
Stuff the feet lightly before sewing to help the rooster stand upright.
Assembling Your Rooster Amigurumi
Bringing It All Together
- Attach the head to the body using a yarn needle and whip stitches.
- Sew the wings symmetrically on each side.
- Secure the tail feathers at the back.
Final Adjustments
Check for loose ends and weave them in neatly. Adjust stuffing as needed for a well-shaped rooster.
Adding Personality
Consider adding embellishments like a small bow or embroidered details to personalize your rooster.
Caring for Your Rooster Amigurumi
Maintenance Tips
- Spot clean with a damp cloth when needed.
- Keep away from direct sunlight to prevent color fading.
- Store in a dry place to avoid moisture damage.
Display Ideas
Use your rooster amigurumi as a centerpiece, a gift, or part of a themed collection.
Sharing Your Creation
Don’t forget to share your finished rooster on social media with the hashtag #CrochetPatterns to inspire others!
VIDEO TUTORIAL ROOSTE AMIGURUMI 👈🏻
Creating a rooster amigurumi is a rewarding project that combines creativity with skill. By following this step-by-step tutorial, you’ll craft a delightful piece that showcases your crochet talents. Whether you’re making it for yourself or as a gift, this rooster is sure to bring joy and charm to any setting.