
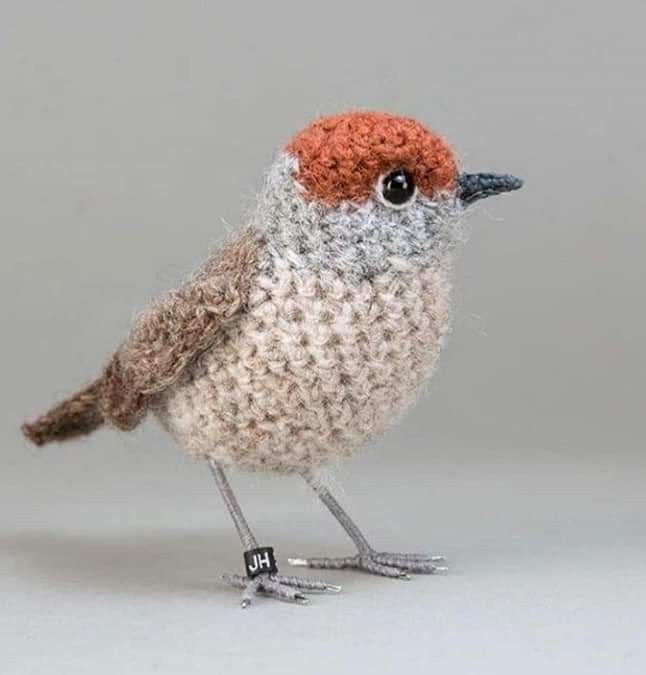
Creating an amigurumi bird is a delightful crochet project that combines creativity with skill. In this tutorial, we’ll take you through the step-by-step process of making your own cute bird using amigurumi techniques.
Whether you’re a beginner or an experienced crocheter, this guide provides everything you need, including exact stitch counts, to complete your crochet project.
The main keywords to focus on are crochet patterns and amigurumi, which are integrated throughout the article to enhance SEO and ensure it’s easy for readers to find.
Materials You’ll Need
Before diving into the pattern, gather the following materials to ensure your amigurumi bird turns out perfect:
- Yarn (in colors of your choice)
- Crochet hook (appropriate size for your yarn)
- Stitch marker
- Fiberfill for stuffing
- Yarn needle
- Scissors
- Safety eyes or small beads for the eyes (optional)
Choosing the right yarn is essential for your project. Thicker yarn will create a larger bird, while thinner yarn will result in a smaller, more delicate one. Ensure that your crochet hook matches the yarn weight to keep your stitches consistent. Additionally, fiberfill is necessary to stuff the bird and give it a solid, plushy shape.
Step 1: Creating the Bird’s Body
To begin your amigurumi bird, you’ll need to crochet the main body, which forms the core structure.
- Round 1: Begin with a magic ring and work 6 single crochets (SC) into the ring. This method creates a tight, invisible center, which is ideal for amigurumi patterns.
- Round 2: Increase in every stitch around (12 SC). Here, an increase means you will make two single crochets into each stitch from the previous round.
- Round 3: SC in the next stitch, increase – repeat around (18 SC). This round adds gradual increases to shape the body.
Continue building up the bird’s body by repeating similar increases every few rounds until you reach the desired width. For a smaller bird, stop after reaching 36 SC, while for a larger bird, continue increasing as needed.
Step 2: Shaping the Bird’s Head
After completing the body, the next step is to form the head, which should seamlessly connect to the body.
- Round 1: After the last round of the body, work 1 SC in each stitch around (continue the same stitch count as the last body round). This ensures that the head maintains the body’s width.
- Round 2: Begin decreasing. SC in the next 2 stitches, decrease – repeat around (reduced by 6 stitches).
- Round 3: Continue decreasing until the opening is small enough to close (usually 6-8 stitches remaining).
Decreases are vital for shaping the bird’s head and making it rounder. Remember to stuff the bird’s body and head firmly with fiberfill before fully closing the top.
Step 3: Crafting the Bird’s Wings
No bird is complete without wings! In this step, you’ll create two small wings to attach to the sides of the body.
- Round 1: Make a magic ring and crochet 6 SC into it.
- Round 2: Increase in every stitch (12 SC).
- Round 3: SC in the next stitch, increase – repeat around (18 SC).
Once the wings are at the size you want, fasten off and leave a long tail for sewing. Attach them symmetrically to the sides of the body using your yarn needle.
Step 4: Adding the Beak and Tail
Now, it’s time to give your amigurumi bird its personality by adding a beak and a tail.
Beak:
- Using orange or yellow yarn, chain 4 stitches.
- SC into the second chain from the hook, and work across (3 SC).
- Fasten off, leaving a tail for sewing. Attach the beak to the center of the bird’s face.
Tail:
- Round 1: Make a magic ring and crochet 6 SC into it.
- Round 2: Increase in every stitch around (12 SC).
- Continue increasing for two more rounds if you want a wider tail.
Sew the tail to the back of the bird’s body. You can make the tail larger by adding extra rounds if desired.
Step 5: Sewing on the Eyes
For the eyes, you have two options: safety eyes or embroidered eyes.
- Safety Eyes: If you are using safety eyes, insert them before closing the head completely. Place them evenly spaced above the beak.
- Embroidered Eyes: If you prefer to embroider, use black yarn to create small circular eyes, stitching them above the beak.
For a cute touch, you can also add small white dots to the eyes to make them sparkle.
Step 6: Finishing Touches and Assembly
The final step involves assembling all the pieces and ensuring your bird looks perfect.
- Attach the wings, beak, and tail securely to the body using your yarn needle and the yarn tails left from each part. Make sure to place the wings slightly higher on the sides for a more natural look.
- Once all parts are attached, check the bird for any loose stitches or uneven parts and make adjustments if needed. If using safety eyes, confirm they are securely fastened.
- Give the bird one last squeeze to fluff the fiberfill and adjust its shape.
Tips for Personalizing Your Amigurumi Bird
Now that you’ve completed the basic pattern, consider adding your unique touches to personalize your bird.
- Color Variety: Use different yarn colors to create multicolored or patterned birds. You can add stripes by changing colors every few rounds.
- Accessories: Make small hats, scarves, or other accessories for your bird to give it extra personality.
- Expressions: Play around with the positioning of the eyes and beak to create different expressions, such as a curious or sleepy bird.
This amigurumi bird pattern is a fun and easy project that allows you to practice essential crochet techniques while creating an adorable toy. By following this step-by-step tutorial, you’ll have a cute, handmade bird ready to display or gift. Don’t forget to use crochet patterns and amigurumi as your go-to resources for more ideas and inspirations in future projects!
With the right materials, attention to stitch counts, and a bit of creativity, you’ll soon have a collection of birds in all shapes and sizes. So grab your hook, start stitching, and enjoy the art of amigurumi!