
Amigurumi has taken the world by storm with its charming designs and versatility, making it a favorite among crochet enthusiasts.
One of the most beloved crochet patterns is the Penguin Amigurumi, thanks to its adorable features and easy-to-follow steps. If you’re new to crocheting or just looking for your next amigurumi project, this tutorial will walk you through everything you need to know to crochet a cute penguin amigurumi.
In this detailed tutorial, we’ll guide you through the materials, basic stitches, and the entire process to create your own penguin. We’ll also use key SEO terms like crochet patterns and amigurumi to help you find the best techniques for your project.
Materials You Will Need
Before diving into the actual pattern, it’s essential to gather all the materials you’ll need for your penguin amigurumi. Having the right tools and yarn will make the process smoother and more enjoyable. Below is a list of items to get started.
- Yarn: You’ll need different colors of yarn for the body, belly, beak, and feet. Usually, black, white, orange, and gray are the most commonly used for penguins. Ensure the yarn is 100% cotton or acrylic, which is easy to work with and gives a neat finish.
- Crochet Hook: A 2.5 mm or 3.0 mm crochet hook is recommended for amigurumi projects. This size is ideal for ensuring tight stitches that won’t leave gaps in your work, especially with smaller amigurumi designs like the penguin.
- Additional Supplies: Have scissors, stuffing (polyfill), stitch markers, safety eyes, and a darning needle handy. Safety eyes give the penguin a cute look, while polyfill stuffing is essential for creating a plump and cuddly final product.
Basic Stitches for Amigurumi Penguin
Amigurumi crochet patterns generally use a few key stitches. If you’re new to crochet or need a refresher, these are the stitches you will need to create your penguin amigurumi. Each one is easy to master and forms the foundation for most amigurumi designs.
- Magic Circle (Magic Ring): This stitch is used to start the penguin’s body, belly, and head. The magic circle is crucial because it allows you to crochet in the round without leaving a hole at the center. Tighten the loop well after you make the first few stitches to secure the circle.
- Single Crochet (sc): This is the primary stitch used in almost every amigurumi pattern. The single crochet stitch gives the figure its solid, seamless appearance. Insert your hook into the stitch, yarn over, and pull through both loops on the hook.
- Increase (inc) and Decrease (dec): Increasing and decreasing stitches help shape your penguin’s body. To increase, simply crochet two single crochets in the same stitch. To decrease, use an invisible decrease by inserting your hook into the front loops of the next two stitches, yarn over, and pull through.
Penguin Amigurumi Crochet Pattern: Step-by-Step
Now that you have your materials and know the essential stitches, it’s time to start crocheting your penguin amigurumi. Below is a step-by-step breakdown of the pattern. Be sure to follow each part carefully to ensure the best results.
Head and Body (Make as One Piece)
- Round 1: Make a magic ring, and crochet 6 single crochets (sc) into the ring. (6 sts)
- Round 2: Increase in every stitch around (inc). (12 sts)
- Round 3: 1 sc, inc repeat around. (18 sts)
- Round 4: 2 sc, inc repeat around. (24 sts)
- Round 5: 3 sc, inc repeat around. (30 sts)
- Rounds 6-10: Work 1 sc in each stitch around for 5 rounds. This will create the rounded top of the head. (30 sts)
- Round 11: 3 sc, dec repeat around. (24 sts)
- Round 12: 2 sc, dec repeat around. (18 sts)
- Round 13: 1 sc, dec repeat around. (12 sts)
- Round 14: Begin to stuff the head, and then continue working dec around until the hole is closed. Fasten off and weave in the ends.
Belly
- Round 1: Make a magic ring, and work 6 sc into the ring. (6 sts)
- Round 2: Increase in every stitch around (inc). (12 sts)
- Round 3: 1 sc, inc repeat around. (18 sts)
- Round 4: 2 sc, inc repeat around. (24 sts)
- Rounds 5-7: Work 1 sc in each stitch around for 3 rounds. Fasten off, leaving a long tail for sewing. (24 sts)
Beak and Feet
Beak:
- Round 1: With orange yarn, make a magic ring and work 4 sc into the ring. (4 sts)
- Round 2: 1 sc, inc repeat around. (6 sts)
- Round 3: 1 sc, inc repeat around. (9 sts)
- Round 4: Work 1 sc in each stitch around. Fasten off, leaving a long tail for sewing.
Feet (Make 2):
- Round 1: With orange yarn, make a magic ring, and work 6 sc into the ring. (6 sts)
- Round 2: Work 1 sc in each stitch around. Fasten off, leaving a long tail for sewing.
Sewing and Finishing
Once you have crocheted all the necessary pieces, it’s time to assemble your penguin. This part of the process requires patience, but the end result is worth it! Use the long tails you left from crocheting to sew the parts together.
- Sew the Belly: Position the belly onto the front of the body, ensuring it’s centered. Use a darning needle to sew it onto the body, making sure the stitches are tight and secure.
- Attach the Beak and Feet: Sew the beak onto the face, just below the eyes. Attach the feet to the bottom of the body, ensuring they are evenly spaced.
- Add Safety Eyes: Insert the safety eyes into the head, making sure they are aligned symmetrically. Secure the backs of the safety eyes inside the head before closing the piece completely.
Stuffing and Final Touches
Now that your penguin is assembled, it’s time to stuff the body and make any final adjustments. Stuff the body generously with polyfill, ensuring the penguin is plump but not overly firm. Too much stuffing may stretch the stitches, while too little will leave the penguin looking flat.
- Shape the Body: As you stuff the body, shape it into a smooth oval. Be sure to distribute the stuffing evenly to avoid lumps or irregularities in the body.
- Close the Bottom: Once the penguin is fully stuffed, finish closing the bottom using invisible decreases. Weave in any loose ends and make sure the stitches are neat.
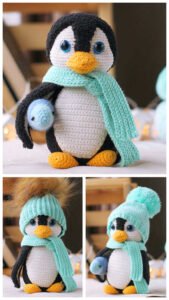
- Personalize Your Penguin: Add any extra touches you want, like a tiny scarf or hat. Customizing your amigurumi with little accessories can make your penguin even more adorable!
Creating a penguin amigurumi is a rewarding project, whether you’re a beginner or an experienced crocheter. With a few simple stitches and a step-by-step approach, you can crochet a cute, cuddly penguin that makes a perfect gift or keepsake. Follow this tutorial carefully, and don’t forget to customize your penguin with your choice of colors and accessories.
Using the right crochet patterns and materials will ensure your penguin amigurumi turns out just as charming as you envision. Happy crocheting!