
Patchwork Pumpkin Fabric Pattern is a timeless quilting and fabric art project that beautifully captures the warmth, comfort, and rustic charm of the autumn season. Whether you are a beginner learning fabric appliqué or an experienced quilter looking for a relaxing decorative project, this design offers an excellent opportunity to combine creativity with practical sewing techniques. The finished pumpkin can be used to decorate quilts, table runners, wall hangings, pillows, tote bags, and seasonal home décor while showcasing beautiful fabric combinations and handcrafted details.
One of the greatest advantages of creating a Patchwork Pumpkin Fabric Pattern is its flexibility. Every maker can personalize the project by selecting different fabric prints, textures, embroidery stitches, and decorative embellishments. Neutral colors create a farmhouse-inspired look, while vibrant oranges, greens, reds, and golds produce a more traditional fall decoration. Since no two pumpkins have to be identical, every finished project becomes a unique piece of textile art that reflects the personality and creativity of its maker.
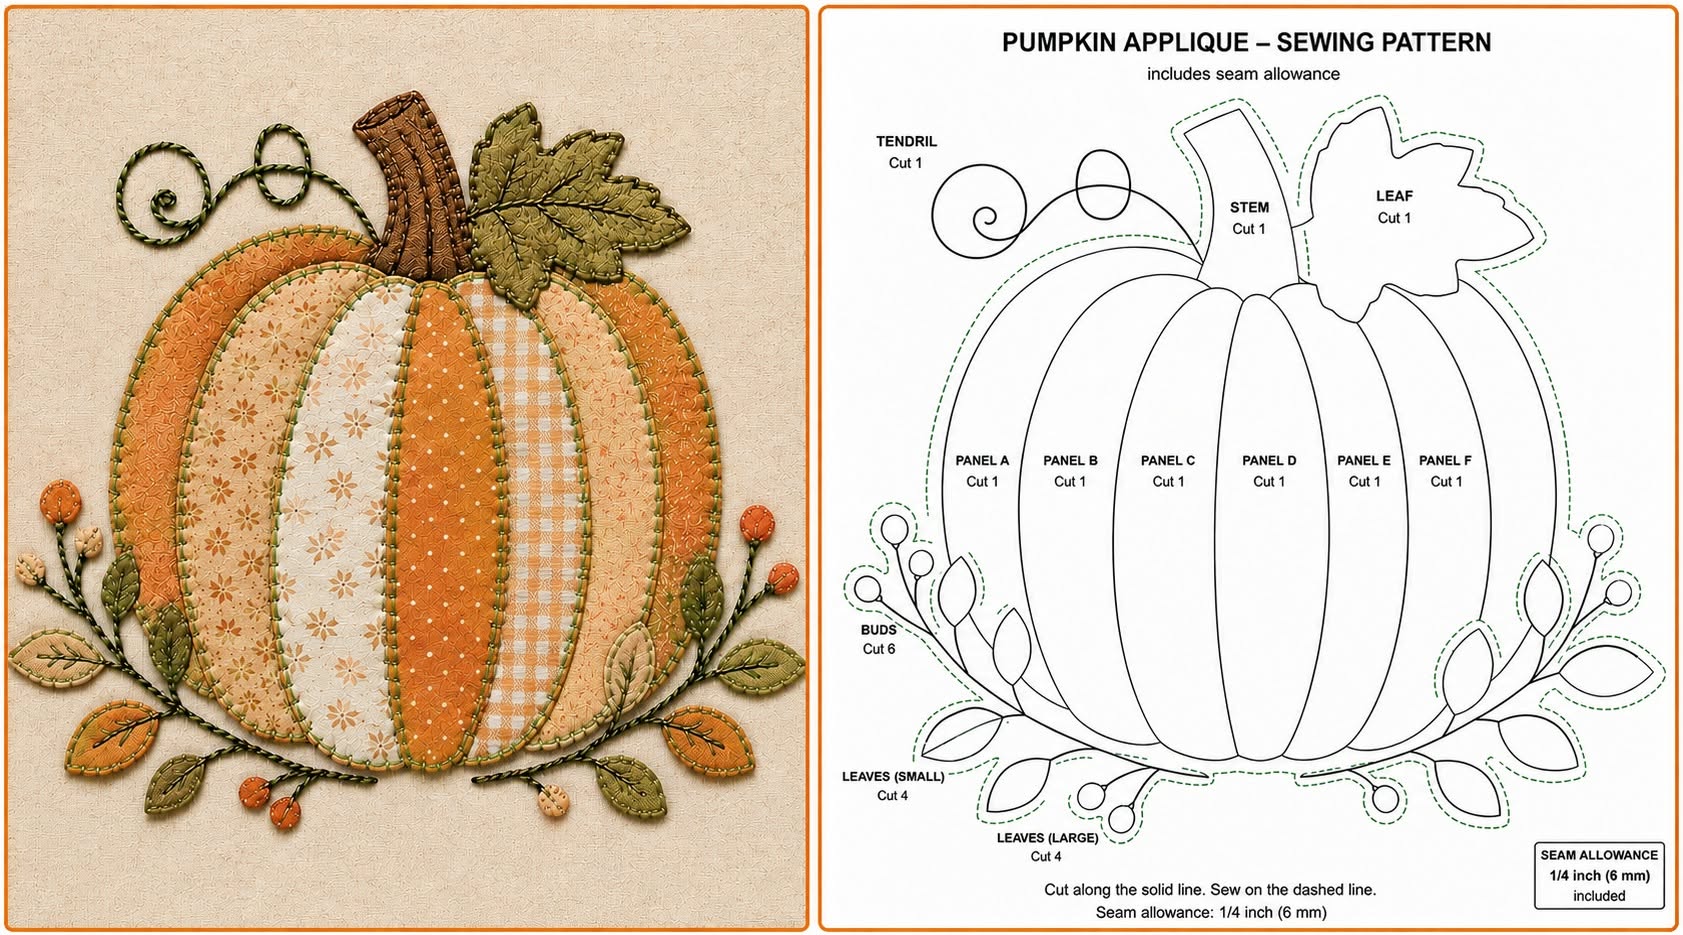
This complete guide explains every step needed to create the pumpkin shown in the reference image. Instead of simply providing measurements, this article teaches the logic behind the construction process so you can confidently recreate the design or adapt it to your own ideas. Throughout the tutorial, you will discover useful sewing tips, fabric preparation techniques, appliqué recommendations, stitching advice, finishing methods, and practical suggestions that will help you achieve a professional-looking Patchwork Pumpkin Fabric Pattern while improving your quilting skills.
Choosing Fabrics and Preparing Your Materials
Selecting the right fabrics is the foundation of every successful Patchwork Pumpkin Fabric Pattern. Cotton quilting fabrics are usually the best choice because they are easy to sew, press beautifully, and hold their shape over time. Mixing solid fabrics with subtle prints adds texture without overwhelming the overall composition.
DISCOVER MORE FREE PATTERNS HERE!
The sample pumpkin uses warm neutral shades including cream, beige, tan, light brown, soft orange, and muted rust. These colors work together naturally, creating depth while maintaining a harmonious appearance. Small floral prints, delicate dots, and gingham fabrics provide visual interest without distracting from the pumpkin shape.
Before cutting any fabric, wash and press your materials if desired. Although many quilters choose not to prewash quilting cotton, doing so can reduce future shrinkage. Whichever method you prefer, make sure every piece is smooth and wrinkle-free before tracing the templates.
Gather all necessary sewing supplies before beginning the project. You will typically need fabric scissors, paper scissors, pins or fabric clips, embroidery needles, coordinating sewing thread, fusible web (optional), fabric marking tools, an iron, and stabilizer or batting if your project requires extra support.
Study the overall composition of the pumpkin before tracing the pattern. Notice how each vertical segment has a slightly different width and fabric print. This intentional variation creates a realistic, dimensional appearance instead of making every section look identical.
Finally, organize all fabric pieces according to color value before sewing. Arrange darker shades toward the outside and lighter fabrics near the center if you want to imitate the soft shading seen in many classic Patchwork Pumpkin Fabric Pattern designs.
Creating the Pumpkin Shape Step by Step
Begin by tracing the full pumpkin outline onto paper or template plastic. Then separate the design into individual vertical sections. Number every piece carefully to avoid confusion during assembly.
Add seam allowances to every fabric piece if you are piecing the pumpkin together traditionally. If you prefer appliqué, prepare the pieces according to the fusible web manufacturer’s instructions before cutting them accurately.
Cut each pumpkin segment from a different coordinating fabric. Mixing floral prints, gingham, textured solids, tiny dots, and subtle geometric patterns creates the layered appearance visible in the finished design. Keep neighboring fabrics visually different to make each section stand out.
Arrange all pieces on a flat surface before stitching. This preview allows you to adjust colors, swap fabrics, and balance the composition until the pumpkin looks visually pleasing. Taking time during this stage often produces a much stronger finished project.
Sew the pumpkin segments together slowly using an accurate quarter-inch seam allowance. Press every seam after stitching. Consistent pressing keeps the pumpkin smooth while reducing unnecessary bulk where several pieces meet near the top and bottom.
Once the pumpkin body has been assembled, trim the edges if necessary and place the completed pumpkin onto your background fabric. Carefully center the design before securing it with pins, temporary adhesive spray, or fusible web, depending on your preferred appliqué technique.
Adding Decorative Details and Embroidery
The stem gives the Patchwork Pumpkin Fabric Pattern much of its character. Choose a darker brown fabric with subtle texture or woodgrain-inspired prints. A slightly curved stem appears more natural than a perfectly straight one.
Create one or two leaves using muted green fabrics. Leaf embroidery adds beautiful texture by stitching the center vein first and then working outward with smaller angled stitches. These simple embroidered details make the leaf appear more realistic.
Blanket stitch, whip stitch, or machine satin stitch can all be used to secure the appliqué pieces. Select the method that best matches your experience level and the style of your overall quilting project.
Decorative embroidery around the pumpkin enhances the handcrafted appearance. In the reference design, simple hand stitches outline every pumpkin segment, emphasizing each fabric panel while creating a cozy, handmade aesthetic. Matching thread colors blend softly into the fabric without becoming distracting.
Small vines, berries, branches, and leaves surrounding the pumpkin complete the composition. These embellishments can be stitched directly onto the background using embroidery floss, fabric strips, or narrow bias tape. Keeping these decorative elements balanced on both sides creates visual harmony.
After all appliqué work has been completed, give the entire project one final pressing from the back whenever possible. Proper pressing helps flatten seams, secure adhesive if used, and prepare the design for quilting or final assembly.
Finishing Your Patchwork Pumpkin Project
The completed Patchwork Pumpkin Fabric Pattern can be incorporated into many different sewing projects. Wall hangings remain one of the most popular options because they beautifully display the seasonal artwork throughout autumn.
Another wonderful idea is transforming the pumpkin into a decorative pillow. Simply quilt the front panel, add backing fabric, and finish with an envelope or zipper closure for an elegant seasonal cushion.
Table runners featuring multiple pumpkins create a warm centerpiece for dining rooms during the fall season. By repeating the same pattern in different sizes or colors, you can create an attractive coordinated design without making every pumpkin identical.
Quilters may also incorporate the pumpkin block into larger quilts. Combining pumpkins with leaves, acorns, flowers, baskets, and autumn borders results in beautiful seasonal quilt layouts suitable for display or everyday use.
If gifting your project, consider adding a personalized label to the back. Recording your name, completion date, and project title preserves the history of your handmade work and creates a meaningful keepsake for family members or friends.
Most importantly, enjoy the creative process. Every finished Patchwork Pumpkin Fabric Pattern reflects individual fabric choices, stitching style, and artistic interpretation. Small variations are not mistakes—they are part of what makes handmade quilting so special.
FAQ
What is a Patchwork Pumpkin Fabric Pattern?
A Patchwork Pumpkin Fabric Pattern is a sewing and appliqué design that uses multiple fabric pieces to create a decorative pumpkin. It is commonly used in quilting, seasonal home décor, pillows, wall hangings, table runners, and other fabric crafts.
Is this project suitable for beginners?
Yes. Beginners can successfully complete this project by working carefully, choosing simple fabrics, and taking time to accurately cut and arrange the pumpkin sections before sewing.
Which fabrics work best?
High-quality quilting cotton is the most recommended fabric because it is easy to cut, press, sew, and maintain. Mixing solids with small-scale prints creates attractive visual texture.
Can I sew the pumpkin by machine?
Absolutely. Both machine appliqué and hand appliqué work well. Many makers also combine machine construction with hand embroidery for decorative finishing details.
What colors should I choose?
Traditional autumn colors such as cream, beige, tan, rust, orange, brown, olive green, and soft gold create a classic appearance. However, modern color palettes can also produce beautiful results.
How can I make my pumpkin look more realistic?
Using different fabric prints, varying the widths of the pumpkin sections, adding embroidered outlines, creating a curved stem, and incorporating shaded fabric values all contribute to a more dimensional appearance.
Can I resize the pattern?
Yes. Simply enlarge or reduce the template while maintaining the proportions of each pumpkin segment. Larger versions work well for pillows, while smaller ones are ideal for quilt blocks.
Do I need fusible web?
No. Fusible web is optional. Many quilters prefer traditional hand appliqué or machine appliqué without adhesive. The choice depends on your preferred sewing technique.
Conclusion
Creating a Patchwork Pumpkin Fabric Pattern is an enjoyable project that combines quilting, appliqué, embroidery, and creative fabric selection into one beautiful seasonal design. Throughout this guide, you learned how to choose coordinating fabrics, prepare templates, assemble the pumpkin sections, add decorative embroidery, create natural-looking stems and leaves, and finish the project for use in quilts, pillows, table runners, or wall décor. By following these techniques carefully and taking your time with each step, you can confidently create a handcrafted pumpkin that reflects your own style while celebrating the beauty of autumn.
EASILY FIND THE PDF FOR THIS PATTERN HERE!
If you found this tutorial helpful, please leave your honest opinion about the article and share your suggestions or ideas for future patchwork and quilting projects. Your feedback helps improve future tutorials and inspires even more creative sewing ideas for everyone.