
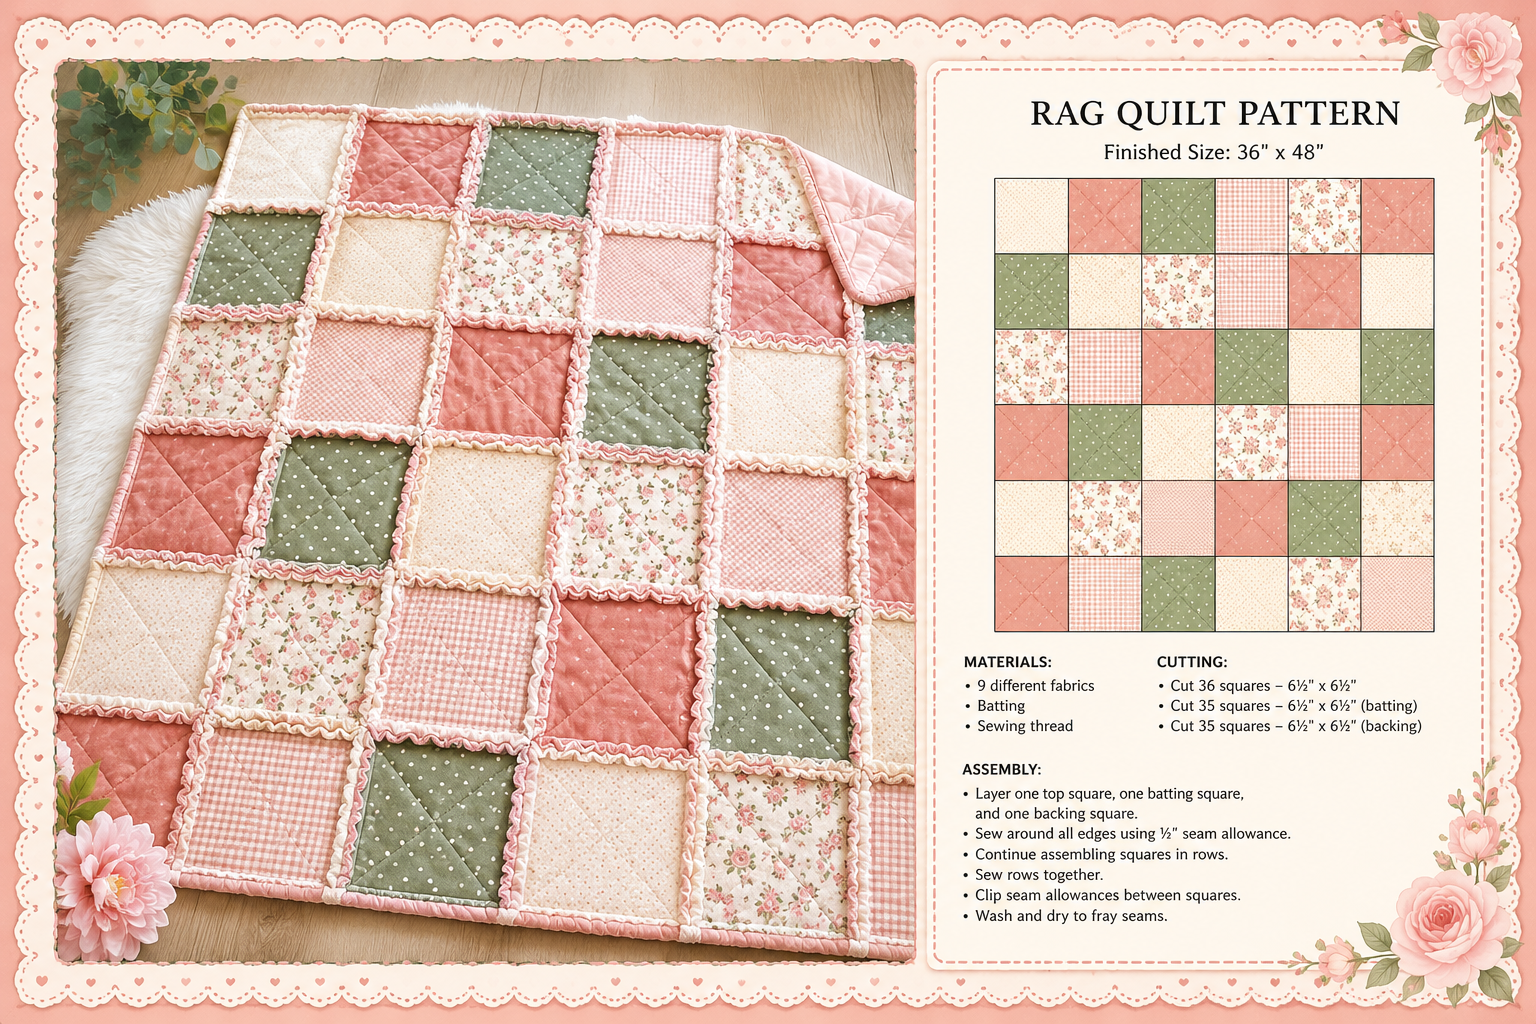
Patchwork Quilt Tutorial – Quilt Pattern is one of the most beloved ways to explore creativity in quilting while learning the foundations of fabric design, color harmony, and sewing techniques. Whether you are completely new to quilting or already familiar with basic sewing skills, a Patchwork Quilt Tutorial offers a structured and inspiring path to create beautiful handmade quilts. By following a clear Quilt Pattern, anyone can transform simple fabric pieces into a meaningful textile that carries warmth, personality, and artistic value.
Quilting has been practiced for centuries and continues to grow in popularity because it blends tradition with creativity. A well-designed Patchwork Quilt Tutorial not only teaches the step-by-step process of assembling quilt blocks but also explains how each Quilt Pattern contributes to the final composition. From selecting fabrics to stitching the final seams, every stage of the quilting process builds skills and confidence. For many people, quilting becomes more than a hobby—it becomes a relaxing and rewarding form of artistic expression.
Another reason why the Patchwork Quilt Tutorial – Quilt Pattern approach is so popular is its accessibility. You don’t need expensive equipment or years of experience to start. With basic tools, some fabric scraps, and a thoughtful Quilt Pattern, beginners can create stunning patchwork quilts. As skills grow, quilters often experiment with more advanced patterns, colors, and textures, making each project a unique and personal creation.
Understanding the Basics of a Patchwork Quilt Tutorial
A Patchwork Quilt Tutorial begins with understanding what patchwork actually means. Patchwork refers to sewing together small pieces of fabric to create a larger design. These pieces, often called quilt blocks, follow a specific Quilt Pattern that determines how the finished quilt will look. The beauty of patchwork lies in the ability to combine different fabrics while maintaining balance and harmony.
DISCOVER MORE FREE PATTERNS HERE!
One of the first steps in any Patchwork Quilt Tutorial – Quilt Pattern project is selecting the right fabrics. Cotton fabric is often recommended because it is durable, easy to sew, and widely available in countless colors and prints. Choosing fabrics that complement each other will help the final quilt look cohesive and visually appealing.
The Quilt Pattern acts as the blueprint for the entire project. It guides the placement of fabric pieces and ensures that the patchwork blocks align correctly. Beginners often start with simple patterns such as squares or basic geometric shapes because they are easier to cut and assemble.
Cutting fabric accurately is another essential step in a Patchwork Quilt Tutorial. Precision ensures that each piece fits perfectly into the overall Quilt Pattern. Quilters typically use tools such as rotary cutters, cutting mats, and quilting rulers to achieve clean and consistent shapes.
Once the fabric pieces are cut, they are sewn together to form quilt blocks. These blocks are the building units of the quilt and follow the structure defined by the Quilt Pattern. Careful stitching and pressing the seams help maintain accuracy throughout the project.
After several blocks are completed, they are arranged and joined together to create the quilt top. At this stage of the Patchwork Quilt Tutorial – Quilt Pattern, the design truly begins to come to life as the colors and shapes combine into a larger visual composition.
Essential Tools and Materials for Patchwork Quilting
Every Patchwork Quilt Tutorial requires a few basic tools that make the quilting process easier and more precise. While quilting can start with simple sewing supplies, having the right tools improves both efficiency and accuracy when following a Quilt Pattern.
A reliable sewing machine is often the most important tool. While some quilters enjoy sewing by hand, most Patchwork Quilt Tutorial – Quilt Pattern projects are completed with a sewing machine because it allows for faster and stronger seams. Even a basic sewing machine can handle quilting tasks effectively.
Rotary cutters are another essential item in any Patchwork Quilt Tutorial. These tools allow quilters to cut fabric quickly and precisely, ensuring that each piece fits the intended Quilt Pattern. When paired with a self-healing cutting mat and quilting ruler, rotary cutters make fabric preparation much more efficient.
Thread and needles are equally important materials. High-quality cotton thread is usually recommended for patchwork quilting because it provides durability while blending well with most fabrics. Choosing the correct needle size also helps prevent fabric damage and ensures smooth stitching.
Fabric selection is one of the most enjoyable parts of following a Patchwork Quilt Tutorial – Quilt Pattern. Quilters often combine prints, solids, and textures to create visual interest. The right combination of fabrics can highlight the geometry of the Quilt Pattern and make the quilt more dynamic.
Batting is the layer placed between the quilt top and the backing fabric. It provides warmth and softness to the finished quilt. Different types of batting—such as cotton, polyester, or blended fibers—can influence the final texture of the quilt.
Finally, quilting rulers and measuring tools ensure that all pieces follow the exact measurements specified in the Quilt Pattern. Precision at this stage helps avoid alignment issues and guarantees that the finished quilt looks polished and professional.
Step-by-Step Process to Follow a Quilt Pattern
Following a Patchwork Quilt Tutorial – Quilt Pattern step by step helps beginners avoid confusion and achieve better results. Each stage of the process builds on the previous one, gradually transforming individual fabric pieces into a complete quilt.
The first step in most Patchwork Quilt Tutorial projects is preparing and washing the fabric. Prewashing helps prevent shrinkage and color bleeding after the quilt is finished. This simple step ensures that the quilt maintains its shape and color over time.
Next comes fabric cutting, which must follow the measurements specified in the Quilt Pattern. Accuracy during this stage is extremely important because even small errors can affect how the quilt blocks fit together later in the process.
After cutting the pieces, the quilter begins sewing them into blocks. Each block represents a portion of the larger Quilt Pattern design. Carefully stitching the seams and pressing them flat helps maintain clean lines and consistent shapes.
Once several blocks are completed, they are arranged according to the Patchwork Quilt Tutorial layout. This stage allows the quilter to experiment with placement and ensure that the overall design flows well before permanently sewing the blocks together.
The blocks are then sewn into rows and joined to form the quilt top. At this point in the Patchwork Quilt Tutorial – Quilt Pattern, the project begins to resemble the finished quilt, revealing the beauty of the chosen pattern.
The final steps involve layering the quilt top, batting, and backing fabric together before quilting them with decorative stitching. This process secures the layers and adds texture, completing the transformation from fabric pieces into a finished quilt.
Tips for Creating a Beautiful Patchwork Quilt
One helpful tip in any Patchwork Quilt Tutorial is to start with a simple Quilt Pattern. Beginners often benefit from straightforward designs that focus on squares or rectangles, allowing them to practice cutting and sewing techniques before attempting more complex patterns.
Color coordination also plays a significant role in quilting. Choosing a balanced palette helps highlight the structure of the Patchwork Quilt Tutorial – Quilt Pattern design. Some quilters prefer harmonious colors, while others enjoy bold contrasts that create striking visual effects.
Consistency in seam allowances is another key factor in achieving professional results. Most Patchwork Quilt Tutorial instructions recommend a quarter-inch seam allowance. Maintaining this measurement throughout the project ensures that quilt blocks align properly.
Pressing seams carefully after each step improves the overall accuracy of the quilt. In many Quilt Pattern instructions, pressing seams to one side or open is recommended depending on the block design.
Patience is essential when working through a Patchwork Quilt Tutorial – Quilt Pattern. Quilting is both a craft and an art, and taking time to measure, cut, and sew carefully leads to better outcomes.
Finally, enjoy the creative journey. Every quilt tells a story, and the process of following a Patchwork Quilt Tutorial allows quilters to express personal style while creating something meaningful and lasting.
FAQ About Patchwork Quilt Tutorial – Quilt Pattern
What is a Patchwork Quilt Tutorial?
A Patchwork Quilt Tutorial is a step-by-step guide that teaches how to create a quilt by sewing together small pieces of fabric. It explains cutting, assembling blocks, and following a Quilt Pattern to achieve the final design.
Is patchwork quilting suitable for beginners?
Yes. Many Patchwork Quilt Tutorial – Quilt Pattern guides are designed specifically for beginners and use simple geometric shapes that are easy to sew.
What fabric is best for patchwork quilts?
Cotton fabric is the most common choice because it is durable, easy to handle, and works well with most Quilt Pattern designs.
How long does it take to complete a patchwork quilt?
The time required depends on the complexity of the Patchwork Quilt Tutorial and the size of the quilt. A simple project may take a few days, while more detailed patterns may take several weeks.
Do I need a sewing machine for quilting?
A sewing machine is helpful for most Patchwork Quilt Tutorial – Quilt Pattern projects, but some quilters prefer hand sewing, especially for smaller quilts.
What is the difference between patchwork and quilting?
Patchwork refers to sewing fabric pieces together to create the quilt top, while quilting refers to stitching the layers together to complete the quilt.
Conclusion
The Patchwork Quilt Tutorial – Quilt Pattern approach provides a clear and inspiring way to learn the art of quilting. Throughout this article, we explored the fundamentals of patchwork, essential tools and materials, the step-by-step process of following a Quilt Pattern, and practical tips for creating beautiful quilts. By understanding these concepts and practicing each stage carefully, anyone can develop the skills needed to produce stunning handmade quilts.
Quilting is more than just sewing fabric together—it is a creative journey that combines tradition, craftsmanship, and personal expression. A well-structured Patchwork Quilt Tutorial helps beginners gain confidence while also offering experienced quilters new ideas for exploring different patterns and styles. If you found this guide helpful, consider sharing your thoughts and experiences with patchwork quilting. Your honest opinion, suggestions, and creative ideas can inspire others who are just beginning their journey into the world of quilting.