
The Basic crochet finish with braid – Pattern is a simple yet elegant technique that transforms an ordinary crochet project into a polished handmade masterpiece. Whether you are finishing a blanket, scarf, shawl, or even a decorative home accessory, this method offers a refined edge that enhances both structure and beauty. Many crafters look for clean and professional ways to complete their work, and this braided finish delivers exactly that with minimal complexity.
In the world of handmade crafts, details make all the difference. A thoughtfully executed Basic crochet finish with braid – Pattern not only strengthens the borders of your piece but also adds a subtle decorative touch that elevates the overall design. It works beautifully with various yarn weights and stitch patterns, making it a versatile addition to any crocheter’s skill set. The braid effect creates texture without overwhelming the main body of the project.
If you are looking to improve your finishing techniques while keeping your creations elegant and timeless, learning the Basic crochet finish with braid – Pattern is an excellent step forward. This guide will walk you through the concept, materials, step-by-step instructions, creative variations, and frequently asked questions. By the end, you will feel confident incorporating this technique into your future crochet projects.
Understanding the Basic Crochet Finish With Braid – Pattern
The Basic crochet finish with braid – Pattern is essentially a decorative border that mimics the look of a braided strand along the edge of a crochet piece. Instead of leaving a plain single crochet or slip stitch border, this technique introduces a layered texture that appears intertwined and structured. The result is a refined and intentional finish.
This pattern is ideal for beginners who want to experiment with more advanced-looking edges without diving into complicated stitch combinations. Even though it appears intricate, the braid effect is usually created using simple stitches arranged strategically. The beauty lies in the placement and tension control.
One of the main advantages of the Basic crochet finish with braid – Pattern is its adaptability. It can be applied to straight edges, corners, and even circular projects. With small adjustments, you can maintain the braided appearance regardless of the shape of your work.
From an aesthetic perspective, the braid border frames your crochet piece. It provides a visual boundary that highlights the main stitch pattern. This is especially useful for textured blankets, baby garments, and accessories where you want the central design to stand out.
Functionally, the braided finish also reinforces the edges. Projects like throws and shawls often experience wear along the borders. Adding this structured edge increases durability and helps prevent curling or stretching over time.
Understanding the purpose and structure of the Basic crochet finish with braid – Pattern is the first step toward mastering it. Once you recognize how the braid effect is formed, the execution becomes intuitive and enjoyable.
Materials and Preparation for a Perfect Braided Crochet Finish
Before starting the Basic crochet finish with braid – Pattern, it is important to gather the right materials. You will need yarn that complements your project, a crochet hook that matches your yarn weight, scissors, and a yarn needle for weaving in ends. Choosing the correct hook size ensures consistent tension in the braided border.
Yarn selection plays a crucial role in the final appearance. Smooth yarns tend to showcase the braid definition more clearly, while fluffy or highly textured yarns create a softer braided look. Both can work beautifully, depending on the aesthetic you want to achieve.
Proper tension is essential when working on a braided finish. If your stitches are too tight, the border may pull inward and cause the edges to curl. If they are too loose, the braid may look uneven. Practicing on a small swatch before applying the Basic crochet finish with braid – Pattern to your main project can help you find the right balance.
Blocking your project before adding the braided edge can also improve results. A well-shaped base ensures that the braid sits evenly around the entire piece. This step is especially helpful for garments and blankets that require symmetry.
Counting stitches along the edge is another important preparation step. Even distribution ensures that the braided border remains consistent. Skipping or adding too many stitches may distort the pattern and affect the braid’s visual alignment.
By taking time to prepare carefully, you set yourself up for success. A well-planned foundation allows the Basic crochet finish with braid – Pattern to shine and enhances the professional quality of your finished crochet item.
Step-by-Step Guide to Creating the Basic Crochet Finish With Braid – Pattern
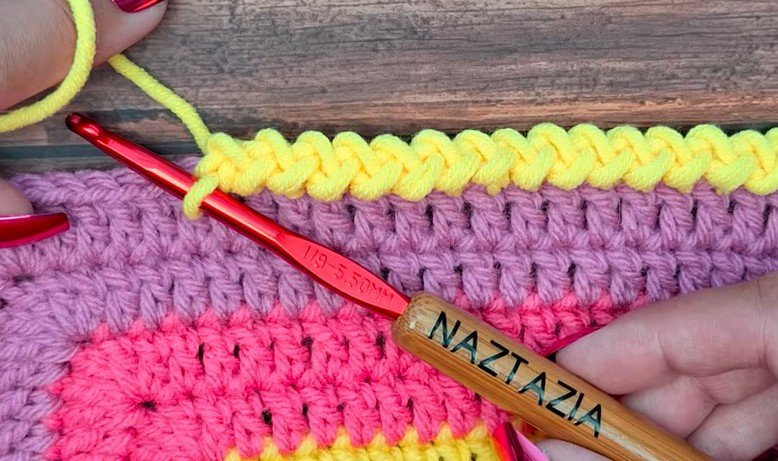
To begin the Basic crochet finish with braid – Pattern, attach your yarn to any corner or edge using a slip knot. Work a round of single crochet evenly around the entire project. This creates a stable base for the braid effect.
Next, chain a small number of stitches, typically between three and five, depending on how pronounced you want the braid to appear. These chains form the loops that will later create the braided illusion. Keep your tension consistent to ensure uniform loops.
Skip a stitch on the base row and slip stitch into the next stitch. This anchoring method creates the structured spacing needed for the braid pattern. Repeat the sequence of chaining and slip stitching along the edge.
As you continue, you will notice the loops forming a decorative ridge. To enhance the braid effect, you may gently adjust the loops with your fingers to align them in a consistent direction. This small detail makes the Basic crochet finish with braid – Pattern look intentional and refined.
When reaching corners, add extra stitches or chains to maintain a smooth turn. Corners require slightly more flexibility to prevent puckering. Adjusting here ensures the braid remains symmetrical around the entire piece.
Finally, fasten off securely and weave in all ends neatly. Take a moment to examine your border and make minor adjustments if needed. With practice, this step-by-step process becomes second nature and transforms your crochet projects beautifully.
Creative Variations and Styling Ideas for the Braided Finish
The Basic crochet finish with braid – Pattern can be customized in numerous ways to match different styles and preferences. For a bold look, use a contrasting yarn color for the braid. This highlights the border and creates a striking frame around your project.
For a more subtle appearance, choose a yarn shade that closely matches the base piece. This creates texture without overwhelming the design. The braided detail becomes an understated enhancement rather than a focal point.
You can also experiment with thicker yarn for the braid while keeping the main body lighter. This adds depth and dimension to blankets and scarves. Mixing textures within the same project creates visual interest and sophistication.
Another creative approach is adding beads or decorative elements into the braided loops. While keeping the structure of the Basic crochet finish with braid – Pattern, these additions can personalize gifts or special occasion pieces.
Layering multiple rounds of braided edging can produce a more dramatic finish. Although the basic pattern is simple, repeating it strategically adds complexity and a luxurious appearance to the final piece.
Ultimately, the versatility of this pattern allows you to adapt it to modern, rustic, classic, or playful styles. The more you experiment, the more confident you become in using the braided finish as a signature detail in your crochet creations.
FAQ About Basic Crochet Finish With Braid – Pattern
What is the purpose of the Basic crochet finish with braid – Pattern?
The main purpose is to create a decorative and durable edge for crochet projects. It enhances appearance while reinforcing borders against wear.
Is the braided crochet finish suitable for beginners?
Yes, the Basic crochet finish with braid – Pattern is beginner-friendly. It uses simple stitches arranged in a strategic way to produce an elegant braided look.
Can I use this pattern on circular projects?
Absolutely. With slight adjustments in stitch placement, the braided finish works well on round items like hats, coasters, and mandalas.
How do I prevent my braided border from curling?
Maintain consistent tension and ensure proper stitch spacing. Adding extra stitches at corners and blocking the piece can also help prevent curling.
What type of yarn works best for this pattern?
Smooth, medium-weight yarns often highlight the braid definition most clearly. However, textured yarns can create a softer, decorative effect.
Can I wash projects with a braided crochet border?
Yes, as long as the yarn is washable. The braided finish is secure when properly fastened and woven in, making it durable for everyday use.
How do I make the braid more pronounced?
Increase the number of chain stitches in each loop or use thicker yarn. Both adjustments make the braid stand out more visibly.
Is this pattern suitable for baby blankets?
Yes, it is an excellent choice for baby blankets because it creates a soft yet structured edge without sharp or uncomfortable elements.
Conclusion
Throughout this article, we explored how the Basic crochet finish with braid – Pattern can elevate your crochet projects with elegance and durability. From understanding its structure to preparing materials, following step-by-step instructions, and experimenting with creative variations, you now have a comprehensive guide to mastering this versatile finishing technique.
The braided edge not only enhances the beauty of your handmade items but also strengthens their borders for long-lasting use. If you found this guide helpful, please leave your honest opinion and share your suggestions. Your feedback helps inspire more detailed and creative crochet tutorials in the future.