
The 3D Hexagon Project – Quilt Pattern is a captivating quilting design that blends geometry, creativity, and visual illusion into one stunning handmade masterpiece. From the very first stitch, the 3D Hexagon Project invites quilters to explore depth, dimension, and color harmony in ways that traditional flat patterns simply cannot achieve. This unique quilt pattern transforms simple hexagonal shapes into a striking three-dimensional effect, making it a favorite among beginners who want a challenge and experienced quilters looking to expand their artistic repertoire. With its bold structure and endless customization possibilities, this pattern continues to gain popularity in the quilting community.
One of the most appealing aspects of the 3D Hexagon Project – Quilt Pattern is its ability to create the illusion of cubes or raised blocks using carefully selected fabric colors and strategic placement. While the design may look complex at first glance, it is built on repeating hexagon units that are both manageable and adaptable. By combining light, medium, and dark tones, quilters can craft a powerful visual contrast that gives life to each hexagon cluster. The result is a quilt that feels dynamic, modern, and timeless all at once.
In addition to its visual appeal, the 3D Hexagon Project also offers a rewarding creative process. Quilters can experiment with fabric scraps, coordinated palettes, or bold statement prints to personalize their project. Whether you are creating a wall hanging, a full-sized bed quilt, or a decorative throw, the flexibility of this quilt pattern makes it suitable for various purposes. Throughout this article, we will explore the structure, materials, techniques, and finishing steps needed to bring this design to life, ensuring that your quilting journey is both enjoyable and successful.
Understanding the Structure of the 3D Hexagon Project – Quilt Pattern
The foundation of the 3D Hexagon Project – Quilt Pattern lies in the classic hexagon shape. Hexagons fit together seamlessly without gaps, making them ideal for intricate quilt designs. When arranged strategically, these shapes can create the illusion of three-dimensional cubes that appear to pop off the surface of the quilt. This optical effect is achieved through consistent layout and thoughtful color placement.
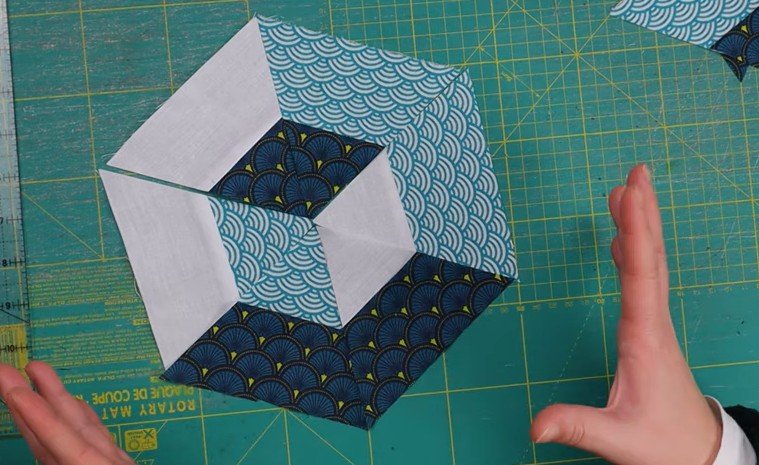
Each cube illusion typically consists of three diamond-like sections formed by hexagon units. By assigning a light fabric to one side, a medium tone to another, and a darker fabric to the third, you replicate the way light naturally hits an object. This clever use of shading is what gives the 3D Hexagon Project its distinctive dimensional appearance. Without proper color contrast, the 3D effect may appear flat or less defined.
Precision in cutting is essential for this quilt pattern. Because hexagons have angled sides, even slight measurement errors can affect alignment. Many quilters prefer using templates or rotary cutting tools specifically designed for hexagon shapes. Accurate cutting ensures that the pieces fit together smoothly, reducing frustration during assembly.
Another structural element to consider is layout planning. Before stitching, it is highly recommended to arrange your hexagons on a design wall or large flat surface. This allows you to preview how the 3D illusion forms across the quilt top. Adjusting placement at this stage saves time and helps maintain consistency throughout the project.
Seam allowance plays a critical role in achieving clean intersections. Most quilters use a quarter-inch seam allowance, but consistency matters more than the exact measurement. Uniform seams ensure that points align properly, preserving the crisp geometric look that defines the 3D Hexagon Project – Quilt Pattern.
Finally, repetition creates rhythm within the design. By repeating cube formations across the quilt top, you build a cohesive visual flow. Whether you opt for a symmetrical layout or a more organic arrangement, understanding the structural basics sets the stage for a polished and professional finish.
Choosing Fabrics and Colors for Maximum 3D Effect
Selecting the right fabrics is one of the most exciting steps in the 3D Hexagon Project – Quilt Pattern process. Because this design relies heavily on light and shadow, your fabric choices directly influence the depth illusion. A well-balanced combination of light, medium, and dark tones is essential for achieving a convincing 3D appearance.
Solid fabrics often work beautifully in this quilt pattern because they emphasize the geometric shapes without visual distractions. However, subtle prints can also add texture and personality if chosen carefully. The key is maintaining clear contrast between the three tones that form each cube illusion.
Color temperature is another important factor. Warm colors like reds, oranges, and yellows can create a bold, energetic effect, while cool tones such as blues and greens offer a calming aesthetic. Mixing warm and cool tones can produce striking results, but balance is crucial to prevent the design from appearing chaotic.
Scrap quilting enthusiasts will appreciate how adaptable the 3D Hexagon Project is for using leftover fabric pieces. By sorting scraps into light, medium, and dark categories, you can create a vibrant, scrappy version of this classic design. This approach adds charm and uniqueness to every finished quilt.
When planning your color scheme, consider the room where the quilt will be displayed. Neutral palettes work well in minimalist spaces, while high-contrast combinations make a dramatic statement. The versatility of the 3D Hexagon Project – Quilt Pattern allows you to tailor your design to any interior style.
Before finalizing your selection, test your fabrics by placing them together under natural light. Sometimes colors that seem contrasting in isolation may blend when combined. Taking the time to evaluate fabric interaction ensures your finished quilt pattern truly showcases its three-dimensional beauty.
Step-by-Step Assembly Techniques
Assembling the 3D Hexagon Project – Quilt Pattern requires patience and organization. Start by grouping your hexagon pieces according to their intended cube sections. Keeping light, medium, and dark fabrics sorted will streamline the sewing process and minimize errors.
Many quilters choose English Paper Piecing (EPP) for hexagon projects because it allows for precise shaping. This method involves wrapping fabric around paper templates before hand stitching the pieces together. Although time-consuming, EPP offers excellent control and accuracy for intricate quilt pattern designs.
Alternatively, machine piecing can significantly speed up the construction process. Using carefully cut hexagons and consistent seam allowances, you can stitch rows or clusters together efficiently. Some quilters prefer assembling diamonds first and then combining them into larger hexagon units.
Pressing seams correctly is essential for a flat and polished quilt top. Press seams consistently in one direction or open, depending on your preference and bulk considerations. Proper pressing enhances the sharp angles that define the 3D Hexagon Project structure.
As the quilt top grows, periodically check alignment and cube formation. Small distortions can accumulate over time, affecting the overall pattern. Taking a moment to lay the quilt flat ensures that the three-dimensional illusion remains consistent across the entire surface.
Once all hexagon units are assembled, square off the edges if needed. Because hexagon quilts often have angled borders, some quilters add background triangles to create straight edges. This step makes adding borders and binding easier while preserving the integrity of the 3D Hexagon Project – Quilt Pattern.
Finishing, Quilting, and Care Tips
After completing the quilt top, the next step in the 3D Hexagon Project – Quilt Pattern journey is layering. Combine your quilt top with batting and backing fabric, ensuring everything is smooth and properly aligned. Basting securely prevents shifting during quilting.
When choosing quilting designs, consider patterns that complement the geometric theme. Straight-line quilting enhances the modern feel of the cubes, while echo quilting around hexagons emphasizes depth. Avoid overly busy stitching that might distract from the 3D illusion.
Thread color selection can subtly impact the final appearance. Neutral threads blend seamlessly, while contrasting threads highlight quilting lines. The choice depends on whether you want the quilting stitches to stand out or remain understated within the quilt pattern.
Binding is the finishing touch that frames your quilt. You can opt for a matching fabric to maintain cohesion or choose a contrasting color for added definition. Carefully applied binding gives the 3D Hexagon Project a clean and professional edge.
Proper care extends the life of your quilt. Wash gently using mild detergent and cold water to preserve color vibrancy. Air drying or tumble drying on low heat helps prevent shrinkage and distortion, especially important for detailed geometric designs.
Storing your quilt correctly also matters. Avoid prolonged exposure to direct sunlight, which can fade fabrics over time. Fold loosely or roll the quilt to prevent permanent creases, ensuring your 3D Hexagon Project – Quilt Pattern remains beautiful for years to come.
FAQ About 3D Hexagon Project – Quilt Pattern
What makes the 3D Hexagon Project – Quilt Pattern look three-dimensional?
The three-dimensional effect comes from strategic color placement using light, medium, and dark fabrics. When arranged properly, these tones mimic shadows and highlights, creating the illusion of cubes.
Is the 3D Hexagon Project suitable for beginners?
Yes, beginners can attempt this quilt pattern, especially if they start with a smaller project. While precision is required, the repetitive structure makes it manageable with patience.
How much fabric do I need for a full-size quilt?
Fabric requirements depend on quilt dimensions and layout complexity. Calculating the number of hexagons needed and grouping them by color category helps estimate yardage accurately.
Can I use patterned fabrics instead of solids?
Absolutely. Subtle prints can add texture and personality, but ensure there is enough contrast between light, medium, and dark fabrics to maintain the 3D illusion.
What is the best method for piecing hexagons?
Both English Paper Piecing and machine piecing work well. Your choice depends on your comfort level, time availability, and desired precision.
How do I maintain accurate hexagon shapes?
Use reliable templates, measure carefully, and maintain consistent seam allowances. Pressing seams properly also helps preserve shape and alignment.
Conclusion
The 3D Hexagon Project – Quilt Pattern offers a perfect blend of geometry, creativity, and craftsmanship. Throughout this article, we explored its structural foundations, fabric selection strategies, assembly techniques, and finishing tips. By mastering light, medium, and dark color placement, you can create stunning three-dimensional illusions that transform simple hexagons into captivating cube designs.
Whether you are a beginner eager to learn or an experienced quilter seeking a fresh challenge, this quilt pattern provides endless opportunities for personalization and artistic expression. If you found this guide helpful, please share your honest opinion and suggestions. Your feedback helps inspire even more creative quilting ideas for the future.