
The Brick Checkerboard Pattern – Patchwork Quilt Template is one of the most timeless and versatile designs in the quilting world. It blends the simplicity of rectangular “brick” units with the rhythmic appeal of a classic checkerboard layout, resulting in a quilt that is both modern and traditional. Because the structure is easy to follow, beginners appreciate it, while experienced quilters enjoy the many opportunities for creative expression. This template has remained popular over the years due to its ability to adapt to any color palette, theme, or fabric style.
Using a Brick Checkerboard Pattern – Patchwork Quilt Template allows crafters to design quilts that are visually balanced yet full of character. The “brick” layout helps reduce fabric waste and offers a forgiving structure that hides small imperfections, making it an excellent choice for quilters who want consistent results. At the same time, the checkerboard effect gives the quilt energy, movement, and depth, ensuring that the final piece looks thoughtful and professionally designed. With careful color selection, the pattern can look rustic, contemporary, playful, or elegant.
For anyone exploring patchwork techniques, the Brick Checkerboard Pattern – Patchwork Quilt Template stands out as a great starting point for mastering alignment, seam accuracy, and color coordination. Because the pattern is both structured and flexible, it opens the door to countless variations—such as offset designs, alternating color schemes, or textured fabrics. Whether you are creating a quilt for home decor, gifting, or selling at craft fairs, this timeless pattern offers reliability, creativity, and visual charm.
Understanding the Brick Checkerboard Patchwork Technique
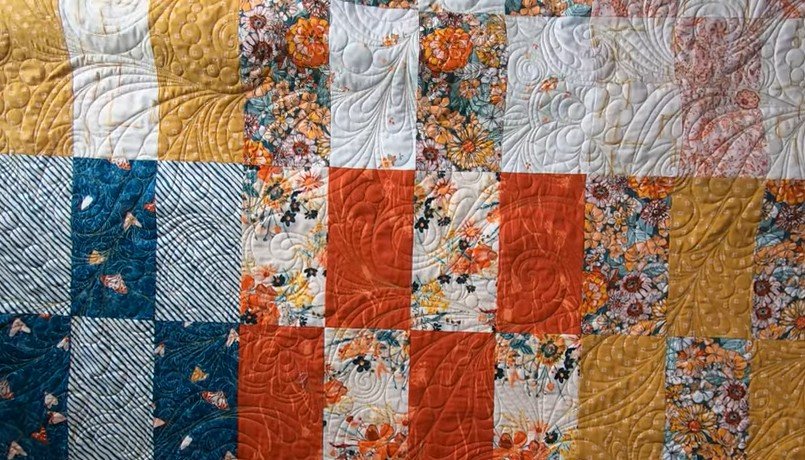
The Brick Checkerboard Pattern – Patchwork Quilt Template is built on a simple grid made of brick-shaped patches arranged in alternating tones. This creates a rhythmic, checker-like motion that naturally draws the eye. The brick units are usually twice as wide as they are tall, producing a stable, balanced layout that feels easy to assemble.
This structure is ideal for beginners because it uses straightforward cutting and sewing techniques. You can work with pre-cut fabrics or cut your own strips and sub-cut them into uniform bricks. The consistency of the units reduces layout complexity and speeds up the assembly process.
The checkerboard effect comes from alternating colors or values. High contrast produces a bold, graphic look, while soft contrast creates a more subtle pattern. This kind of versatility gives quilters freedom to adapt the design to any intended style.
Another advantage is that the brick layout helps distribute seams more evenly. This reduces bulk and makes pressing easier, especially when working with thicker fabrics or recycled materials. It also ensures the quilt lays smoothly without raised or uneven edges.
Many quilters appreciate that the technique works well for scrap quilting. Small leftover pieces can be transformed into bricks that blend beautifully in a checkerboard arrangement. This makes the pattern economical and environmentally friendly.
Because the technique is repeatable and forgiving, it gives beginners confidence while still offering room for creativity. For advanced quilters, it can serve as a foundation for exploring complex color gradients or secondary patterns.
Choosing Fabrics and Colors for a Stunning Layout
Selecting the right fabrics is essential when working with a Brick Checkerboard Pattern – Patchwork Quilt Template. The balance between colors and textures determines how strong or subtle the checkerboard effect will appear. Thoughtful fabric selection enhances the visual movement and rhythm of the quilt.
High-contrast pairs such as light and dark, warm and cool, or saturated and neutral can make the checkerboard pop. If your goal is a quilt that stands out, bold contrast is the best choice. For a softer, more delicate look, choose colors that differ slightly in tone.
Prints can be used effectively if they vary in scale. Small prints blend like solids, while large prints create playful variation. Mixing both adds depth and character without overwhelming the pattern. Too many busy prints may obscure the checkerboard effect, so balance is key.
Texture can also enhance the quilt. Cotton remains the most popular option due to its stability and ease of use. However, mixing in textured fabrics such as linen, chambray, or flannel can give your quilt additional warmth and personality.
For themed quilts, colors can reflect seasons, events, or gift recipients. For example, earthy tones create a cozy autumn feeling, while bright primary colors are perfect for children’s quilts. Holiday-themed palettes are also popular choices.
Above all, test your fabric pairings by placing your brick units side by side before sewing. This preview ensures your chosen colors deliver the desired effect once arranged into the full checkerboard layout.
Constructing the Brick Checkerboard Quilt Top
Building the quilt top begins with cutting consistent brick pieces, usually maintaining a 2:1 ratio such as 4″ × 8″ or 3″ × 6″. Precision is important because even small differences can disrupt the checkerboard alignment. Using a rotary cutter, ruler, and cutting mat helps achieve clean, accurate pieces.
After cutting, sort your bricks by color or value. This will simplify the assembly process, especially if you are working with multiple tones. Laying out all pieces before sewing allows you to visualize the full pattern and make adjustments as needed.
Chain piecing is a time-saving method that works wonderfully with this pattern. By sewing one pair of bricks after another in a continuous chain, you streamline the stitching process and maintain consistent seams.
Pressing seams correctly is essential. Press toward the darker fabric or alternate directions to create nesting seams. This reduces bulk and allows the bricks to align more smoothly when joining rows.
Once the individual rows are completed, begin joining them together. Work slowly and check alignment frequently. Because the pattern is geometric, small adjustments can make a big difference in the overall appearance.
Finally, give the completed quilt top a thorough pressing. A smooth, flat quilt top ensures easier layering, quilting, and binding in the later stages.
Finishing Your Patchwork Quilt With Professional Flair
With the quilt top complete, it’s time to prepare the backing and batting. The backing should extend beyond the quilt top by at least a few inches on all sides. This extra space helps when securing the layers during quilting.
Select batting based on the desired softness and thickness. Cotton batting offers a classic feel with minimal loft, while polyester or blended batting creates a fluffier finish. Each has its own advantages depending on how warm or lightweight you want the quilt to be.
Layering, also known as “sandwiching,” involves placing the backing right-side down, positioning the batting on top, and then centering the quilt top right-side up. Smooth each layer carefully to prevent wrinkles or shifting.
Quilting can be done by hand, by machine, or with decorative stitches. Straight-line quilting enhances the structured feel of the Brick Checkerboard Pattern – Patchwork Quilt Template, while free-motion designs add texture and personalization.
After quilting, trim the edges to remove any excess materials. This creates an even surface for attaching the binding. Binding frames the quilt and provides a polished, professional look when sewn neatly.
Finish by giving the quilt a final press and inspection. At this point, your patchwork brick checkerboard quilt is ready to enjoy, gift, or display proudly.
FAQ – Brick Checkerboard Pattern and Patchwork Quilting
1. What is the Brick Checkerboard Pattern in quilting?
It is a patchwork layout using brick-shaped pieces arranged in alternating tones to create a checkerboard effect. The bricks are typically rectangular and aligned in offset rows.
2. Is the Brick Checkerboard Pattern suitable for beginners?
Yes, it is one of the most beginner-friendly templates because it uses simple shapes, consistent cutting, and easy assembly.
3. What size should the brick pieces be?
While the ratio is usually 2:1, the size is flexible. Common dimensions include 3″ × 6″, 4″ × 8″, or any size that maintains proportionality.
4. Can I use printed fabrics for this pattern?
Absolutely. Just balance small and large prints to maintain the checkerboard effect without overwhelming the layout.
5. Do I need high-contrast colors?
High contrast makes the checkerboard stand out, but low contrast can create a soft, subtle design. Both styles work beautifully.
6. How do I keep seams aligned in this pattern?
Pressing seams properly and sewing with consistent seam allowances helps keep the bricks aligned across the quilt.
7. Can this design be made with scraps?
Yes, it is excellent for scrap quilting since brick-sized pieces can be cut from leftover fabrics of various colors.
8. What quilting method works best for this pattern?
Straight-line quilting emphasizes the grid, while decorative quilting adds texture. Either method suits this pattern well.
Conclusion
The Brick Checkerboard Pattern – Patchwork Quilt Template remains a favorite among quilters for its balance of simplicity and visual appeal. This article explored how to choose fabrics, construct the quilt top, and finish your project with confidence. Whether you are a beginner or an experienced quilter, this pattern offers endless creative possibilities while remaining structured and easy to follow.
If you found this guide helpful, please leave your sincere opinion and share suggestions for future topics—I would love to help you continue your quilting journey.