
The Butterfly Mini – Quilt Pattern is more than just a charming craft project—it’s a creative expression of artistry and precision that captures the delicate beauty of butterflies in fabric form. This mini quilt pattern appeals to both beginners and seasoned quilters who love detailed, meaningful projects that are manageable in size yet rich in visual impact. The concept combines the intricate nature of patchwork with the lightness and elegance of butterfly designs, making it a favorite for home décor, gifts, and creative displays.
Creating a Butterfly Mini – Quilt Pattern allows crafters to explore color, texture, and pattern harmony. Each piece of fabric becomes a part of a larger story, with every wing and stitch representing creativity and patience. Quilters often enjoy the meditative rhythm of sewing, as each step brings them closer to seeing their butterfly emerge from the fabric pieces. The process is not just about creating a decorative quilt—it’s about crafting a piece of art that reflects personal style and inspiration.
One of the best features of the Butterfly Mini – Quilt Pattern is its versatility. You can adjust colors, fabric types, and layouts to fit your preferences or home design. Some choose bright, vibrant fabrics for a playful look, while others select soft pastels or earthy tones for a more subtle aesthetic. Whether you’re creating a wall hanging, a pillow cover, or a framed mini quilt, this pattern offers endless opportunities to experiment. Before we dive deeper, let’s explore how this beautiful project can be planned and brought to life.
Understanding the Butterfly Mini – Quilt Pattern
The Butterfly Mini – Quilt Pattern follows the traditional quilting concept but in a smaller, more focused format. Unlike full-size quilts, mini quilts allow you to test patterns, improve your piecing skills, and experiment with new designs without committing to a large project. The butterfly design adds a sense of motion and grace, making it perfect for spring or nature-themed collections.
When you start working on your Butterfly Mini – Quilt Pattern, it’s important to begin with a clear plan. Decide on your color scheme, choose high-quality cotton fabric, and prepare the necessary tools like rotary cutters, rulers, and a sewing machine. Proper preparation will ensure precision and a clean finish. Many quilters also pre-wash their fabrics to avoid shrinkage later.
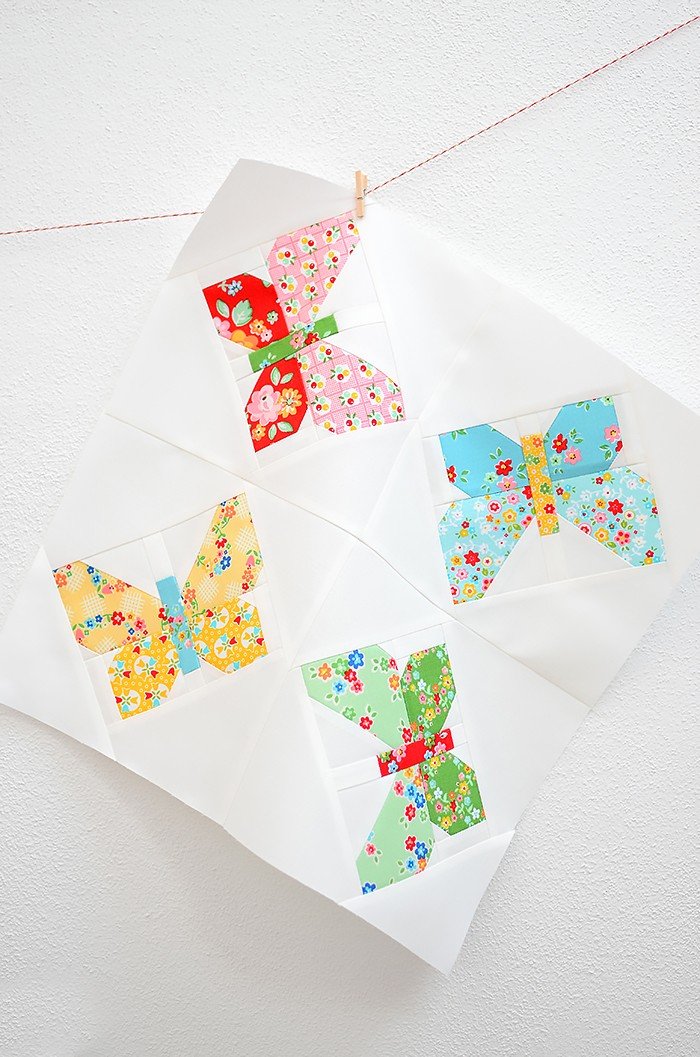
The layout of a butterfly quilt block usually involves symmetrical wings divided by a center body strip. This symmetry is both satisfying and challenging to achieve. Accurate cutting and careful alignment are key to ensuring the wings mirror each other perfectly. If you’re new to quilting, this pattern serves as an excellent introduction to piecing and pressing techniques.
Another beautiful aspect of the Butterfly Mini – Quilt Pattern is the freedom to personalize it. You can make each butterfly unique by changing fabric prints or adding decorative stitching. Some crafters even incorporate embroidery, beads, or appliqué for added dimension. The result is a miniature quilt that tells its own colorful story.
This pattern can be finished in various ways. You might add a simple binding for a clean look or opt for a raw-edge finish for a more rustic charm. You can also quilt by hand or machine, depending on your style and comfort. Both methods bring a different character to the finished piece.
Finally, remember that the Butterfly Mini – Quilt Pattern can be scaled up or down. Once you master the mini version, you can use the same template to create larger quilts, giving you flexibility for future projects.
Choosing the Right Materials for Your Butterfly Mini Quilt
Selecting the right materials is crucial for achieving a beautiful Butterfly Mini – Quilt Pattern. The fabric choice defines the overall tone and character of the piece. Cotton remains the top choice for quilting due to its durability and ease of handling. For beginners, pre-cut fabric bundles, often called “fat quarters,” are a convenient option.
When selecting fabrics, think about color contrast. A butterfly’s wings naturally feature gradients and patterns, so try blending solids with prints to mimic that organic effect. Using complementary colors or analogous tones can enhance the design’s harmony. If your background fabric is light, choose darker shades for the butterfly to make it stand out.
Thread selection also plays an important role. A fine, high-quality thread ensures clean seams and helps avoid bulk at intersections. Some quilters use contrasting thread for decorative stitches to highlight the butterfly’s wings, while others prefer blending tones for a subtle finish. Either choice works depending on your artistic vision.
The batting, or inner layer, adds structure and softness. For a mini quilt, a lightweight cotton or polyester batting works best. It gives the quilt a neat appearance without making it bulky. Make sure your batting size exceeds the quilt top by at least an inch on each side to allow room for trimming after quilting.
Tools can make or break your quilting experience. Invest in a sharp rotary cutter, a clear acrylic ruler, and quality pins or clips. A reliable sewing machine with a quarter-inch foot helps achieve precise seams—a must for small quilt blocks. Don’t forget to press your fabric often during assembly; crisp seams make a noticeable difference in the final look.
Lastly, prepare your workspace. Good lighting, a clean surface, and organized materials make quilting smoother and more enjoyable. A calm and inviting workspace can also help you stay motivated and creative as you bring your Butterfly Mini – Quilt Pattern to life.
Step-by-Step Guide to Sewing Your Butterfly Mini Quilt
Creating your Butterfly Mini – Quilt Pattern begins with cutting. Measure and cut fabric pieces carefully according to your chosen pattern template. Precision in cutting is vital, as even small inaccuracies can affect alignment. For beginners, labeling pieces with small sticky notes can help keep track of each part.
Once your pieces are ready, start by assembling the butterfly wings. Sew small sections together, pressing seams after each step. This ensures a flat, neat surface and reduces bulk. Repeat the same for the opposite wing, ensuring that both sides are symmetrical.
Next, attach the center strip representing the butterfly’s body. Take your time aligning the wings evenly on both sides of this strip. This part of the Butterfly Mini – Quilt Pattern defines the balance and symmetry of the overall design. Once attached, your butterfly block will begin to take shape beautifully.
After assembling the blocks, join them together if you’re creating multiple butterflies. If it’s a single butterfly mini quilt, add a border fabric around it for framing. Borders not only enhance the appearance but also help in trimming the edges neatly before binding.
When it comes to quilting, choose a style that complements your butterfly design. Straight-line quilting emphasizes structure, while free-motion quilting adds a whimsical touch. Both techniques work beautifully for this pattern. Always start quilting from the center outward to prevent fabric distortion.
Finally, bind your quilt using a double-fold binding method. This technique creates a durable edge and gives your mini quilt a polished finish. Hand-stitching the final binding adds a touch of craftsmanship that many quilters love. With your Butterfly Mini – Quilt Pattern complete, admire your work—it’s a small masterpiece made with love and patience.
Creative Variations and Display Ideas
One of the joys of working on a Butterfly Mini – Quilt Pattern is the endless potential for creativity. You can modify colors, fabrics, and sizes to suit your personal taste or the season. Bright yellows and blues work well for summer themes, while deep purples and oranges add warmth for autumn décor.
Another variation is mixing techniques. Try combining patchwork with appliqué or embroidery to give your butterfly wings extra texture and depth. Metallic threads or hand-stitched accents can add a shimmering effect that mimics real butterfly wings.
You can also create themed collections. For instance, make a series of Butterfly Mini – Quilt Pattern blocks representing different butterfly species. Display them together as a cohesive art piece in a living room or hallway. This transforms a small project into a meaningful decorative feature.
If you prefer functional crafts, turn your butterfly mini quilt into a pillow cover, tote bag panel, or even a table centerpiece. These adaptations showcase your quilting skills while giving your handmade piece a practical use.
For gifting, a butterfly mini quilt makes a heartfelt present. It symbolizes transformation, growth, and beauty—perfect for birthdays, weddings, or housewarming occasions. Handcrafted gifts like these hold sentimental value and are always appreciated.
Lastly, consider displaying your finished Butterfly Mini – Quilt Pattern in a frame or embroidery hoop. It protects the fabric while highlighting your artistic achievement. Add a simple tag or signature to mark your creation as part of your personal craft journey.
FAQ About the Butterfly Mini – Quilt Pattern
1. What size is a typical Butterfly Mini – Quilt Pattern?
A mini quilt usually ranges from 12×12 to 24×24 inches, but you can adjust it depending on your design and purpose.
2. Is this pattern suitable for beginners?
Yes! The Butterfly Mini – Quilt Pattern is ideal for beginners because it teaches essential quilting skills like piecing, pressing, and binding.
3. What fabrics work best for this project?
High-quality quilting cotton is recommended for its durability, smooth texture, and ease of cutting.
4. Can I hand quilt a Butterfly Mini Quilt?
Absolutely. Hand quilting adds a traditional charm and allows for more personalized stitches and details.
5. How can I make my butterfly stand out more?
Use contrasting fabrics and consider outlining the wings with darker stitching or subtle embroidery for definition.
6. Can I wash a mini quilt?
Yes, but use gentle cycles and mild detergent. Air-drying is best to maintain the quilt’s texture and shape.
7. How long does it take to complete one?
Depending on skill level, it can take anywhere from a few hours to a weekend to finish your Butterfly Mini – Quilt Pattern.
Conclusion
The Butterfly Mini – Quilt Pattern beautifully blends creativity, skill, and artistry. Through its design, you can explore colors, techniques, and patterns while creating something meaningful and visually delightful. Whether displayed on a wall, given as a gift, or added to a personal collection, this mini quilt embodies both craftsmanship and imagination.
If you’ve followed this guide, you now have all the tools to begin your own butterfly-themed project. Remember, every stitch tells a story—so let your quilt reflect your personality and creativity. We’d love to hear your thoughts! Share your honest opinions, experiences, and suggestions about the Butterfly Mini – Quilt Pattern to inspire others in their quilting journey.