
Looking for a cute and practical sewing project? This Heart Zipper Pouch tutorial is a perfect beginner-friendly project that also allows you to showcase your favorite quilt patterns.
Whether you’re sewing for Valentine’s Day, birthdays, or just want to brighten someone’s day, this small pouch shaped like a heart is both functional and adorable.
In this tutorial, you’ll learn how to sew a Heart Zipper Pouch step by step. We’ll go over the required materials, fabric measurements, and sewing techniques to help you complete this project with ease. Best of all, it’s a fantastic way to use up those leftover fabric scraps from previous quilt projects!
Materials You’ll Need
Before we begin sewing, gather all the necessary materials. This Heart Zipper Pouch can be made with small pieces of fabric, which makes it ideal for scrap quilting. Make sure to choose fabrics that complement each other and fit your theme or color scheme.
Here’s a list of what you’ll need:
-
Two fabric pieces for the outer heart (5.5″ x 6″)
-
Two lining pieces (5.5″ x 6″)
-
One piece of batting or fusible fleece (5.5″ x 6″)
-
7″ zipper
-
Optional: decorative pull or ribbon
For quilters, this project is a great way to feature small sections of your favorite quilt patterns. You can even create a patchwork heart by combining different scraps from past quilt projects, adding a unique and personal touch to each pouch.
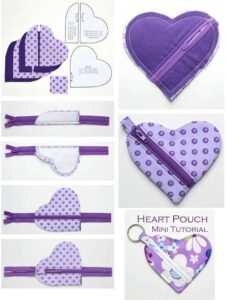
Cutting the Fabric
Start by cutting all your fabric pieces. You’ll need to cut the outer fabric, lining, and batting into a symmetrical heart shape. To do this, you can use a heart template approximately 5.5″ wide and 6″ tall. Fold the fabric in half lengthwise, place the heart template on the fold, and cut around it.
Repeat this process for your outer fabric, lining fabric, and batting. You should end up with two outer hearts, two lining hearts, and one batting heart. You can also quilt the outer fabric with the batting before assembling the pouch to give it structure and a quilted look.
Using this method, the fabric cuts are simple, and you’ll be working with manageable sizes. This makes the Heart Zipper Pouch a great starter project for those new to quilt work or looking for creative ways to repurpose small remnants of quilt patterns.
Quilting the Outer Fabric
Take the two outer heart fabric pieces and sandwich the batting or fusible fleece between them. If using fusible fleece, iron it to the back of one outer piece. You can quilt the fabric by sewing simple lines or free-motion quilting, depending on your preference and skill level.
Use coordinating or contrasting thread to make your quilting stand out. This step not only adds texture but also ensures the fabric layers stay together. Stitch lines across the heart in straight or diagonal patterns or follow the curves of the heart for a more decorative look.
This is your chance to showcase your favorite quilt patterns in miniature form. Whether you prefer geometric lines or floral free-motion quilting, the stitching adds personality and ties the pouch to your larger quilt projects.
Attaching the Zipper
Place one outer heart fabric face up. Align the zipper face down on the top edge. Then place a lining heart on top, face down, aligning all top edges. Pin or clip in place. Sew along the top edge with a zipper foot, using a 1/4″ seam allowance.
Open the fabric and press the layers away from the zipper. Topstitch close to the zipper edge to give your pouch a clean, finished look. Repeat this process with the other side of the zipper, attaching the remaining outer and lining hearts in the same way.
Working with curved edges may feel tricky at first, but with patience and proper alignment, your zipper will follow the curve beautifully. This step turns your quilt project into a fully functional zippered pouch.
Sewing the Pouch Together
Once both sides of the zipper are attached, open the zipper halfway. Fold the pouch so that the two outer fabric hearts are right sides together and the two lining hearts are right sides together. Pin or clip all around the edges.
Sew around the entire pouch, leaving a 2″ opening in the lining for turning. Trim any excess zipper and clip around the curved edges to reduce bulk. Be careful not to cut through your stitching.
This is where your Heart Zipper Pouch really starts taking shape. The soft curves and quilted texture of the outer fabric bring the charm of quilt patterns into a compact, functional accessory.
Turning and Finishing
Turn the pouch right side out through the opening in the lining. Push out the edges and curves gently with a blunt tool or your fingers. Hand stitch or machine sew the lining opening closed with a small, neat seam.
Tuck the lining into the pouch and smooth everything into place. Zip it up and admire your finished work! You can now add embellishments like a fabric tab, ribbon loop, or decorative zipper pull if desired.
Your handmade Heart Zipper Pouch is now ready to use or gift. It’s the perfect project to combine your love of quilt techniques and practical sewing skills while making something beautiful and usable.
Customizing Your Heart Zipper Pouch
The beauty of this project lies in its flexibility. Use bright, bold colors for a fun look, or opt for soft pastels for a romantic vibe. You can also scale the heart pattern up or down to make larger or smaller pouches, depending on your needs.
Want to show off your patchwork skills? Piece together small scraps from various quilt patterns to create a scrappy outer heart. This not only adds visual interest but also helps reduce fabric waste—perfect for sustainable crafting.
Whether you’re making pouches for Valentine’s Day, Mother’s Day, or just to practice your quilt skills, the customization options are endless. Add embroidery, appliqué, or even a monogram for a personalized finish.
Why Quilters Love This Project
Quilters often end up with extra blocks or scraps that are too small for full quilts but too lovely to toss. The Heart Zipper Pouch gives new life to those pieces. It’s a creative outlet for experimenting with quilt patterns on a smaller scale.
This project also offers instant gratification. While a full quilt may take days or weeks to complete, you can finish a Heart Zipper Pouch in under two hours. It’s satisfying, practical, and gives you a quick way to enjoy your favorite fabrics.
Plus, it’s giftable! Handmade pouches are always appreciated, especially when personalized with quilted designs. Whether it’s for a friend, a child, or a teacher, this heart-shaped pouch adds a touch of love to any occasion.
Final Thoughts
The Heart Zipper Pouch is a charming and quick project that brings together functionality and creativity. With just a few fabric scraps, a zipper, and a little bit of quilting, you can create a pouch that showcases your love of quilt patterns.
Use this tutorial as a base to experiment with your own ideas. Play with fabrics, embellishments, and shapes to make it truly unique. It’s the perfect way to keep sewing fun and stress-free while sharpening your skills.
Whether you’re a beginner looking to practice or an experienced quilter wanting to use your leftover fabrics, this Heart Zipper Pouch is a rewarding and enjoyable project that celebrates the art of quilting in every stitch.
