
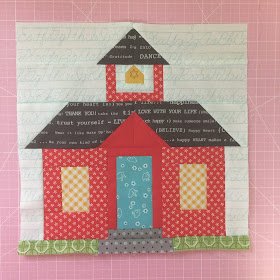
The Schoolhouse Block is a classic quilt pattern that captures the charm of traditional quilting. This iconic design, often seen in heritage quilts, represents a quaint schoolhouse and brings a nostalgic touch to any quilting project. Known for its versatility and historical significance, the Schoolhouse Block can be adapted to various color schemes and fabric styles, making it a popular choice for quilters of all skill levels.
Quilters are drawn to the Schoolhouse Block for its unique structure and storytelling element. By combining simple geometric shapes, this pattern creates a detailed and recognizable building that can be customized with different fabric choices. Whether you’re crafting a wall hanging or incorporating it into a larger quilt, the Schoolhouse Block adds depth and character to your work.
In this tutorial, we’ll guide you through the process of creating your own Schoolhouse Block, complete with precise fabric cuts and measurements. With step-by-step instructions and helpful tips, you’ll be able to achieve clean lines and accurate seams, resulting in a beautifully crafted quilt block.
Materials and Fabric Selection
Selecting the right materials is essential for a successful quilt project. For the Schoolhouse Block, you’ll need:
- Fabric for the background: Light-colored fabric to contrast with the darker elements of the house.
- Fabric for the house and roof: Bold, solid, or patterned fabrics for the walls and roof.
- Cutting tools: Rotary cutter, ruler, and cutting mat.
Choose 100% cotton quilting fabric for the best results. Pre-washing and ironing your fabric is recommended to prevent shrinkage and ensure accurate cutting.
Cutting the Fabric
Accurate cutting is key to achieving precise seams. For a 12-inch finished Schoolhouse Block, cut the following pieces:
- Background fabric: (2) 4.5” x 4.5” squares, (2) 2.5” x 2.5” squares, (1) 4” x 6” rectangle.
- House fabric: (1) 6” x 6” square, (2) 3” x 4.5” rectangles.
- Roof fabric: (2) 3” x 6” rectangles.
Label each piece to avoid confusion during assembly.
Piecing the Roof Section
The roof section forms the top part of the Schoolhouse Block. To assemble:
- Create half-square triangles (HSTs): Pair the 3” x 6” roof fabric with background squares. Draw a diagonal line on the back of the background square and sew along both sides of the line. Cut along the line and press seams open.
- Join the HSTs: Stitch the HSTs to the rectangular roof pieces.
- Trim the section to size: Ensure all pieces are squared up for a perfect fit.
Constructing the House Section
The house section is the main body of the block:
- Assemble the windows and doors: Sew the smaller squares and rectangles to form the window and door details.
- Attach the background rectangles: Add the side pieces to frame the house.
- Press seams for accuracy: Properly press seams to ensure flat, smooth blocks.
Joining the Sections
Combining the roof and house sections is the final step:
- Align seams carefully: Pin the roof section to the house section, matching seam intersections.
- Sew with a consistent seam allowance: A 1/4-inch seam allowance is standard.
- Press the final block: Use steam to set the seams and flatten the block.
Tips for Perfecting Your Schoolhouse Block
- Use starch for crisp fabric handling.
- Check seam allowances frequently to avoid distortion.
- Trim each section to maintain accuracy.
Pattern Here
The Schoolhouse Block is a rewarding and visually striking quilt pattern. By following these steps and paying attention to detail, you’ll create a beautiful and timeless quilt block that can be incorporated into various quilt projects. Enjoy your quilting journey and explore different fabric combinations to personalize your Schoolhouse Block.