
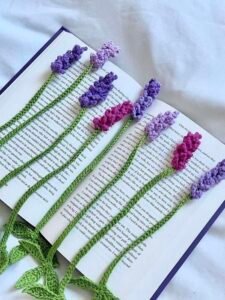
Creating delicate and realistic crochet flowers is a popular trend in the world of crochet patterns. Among these, the Free Crochet Lavender Flower Pattern stands out for its elegance and simplicity. Whether you’re looking to embellish home décor, enhance your wardrobe, or create handmade gifts, this pattern is a perfect choice. In this tutorial, we’ll guide you step-by-step to craft your own beautiful lavender flowers with precision and ease.
Crocheting lavender flowers can be a rewarding project for both beginners and experienced crafters. The pattern allows for creativity while following structured steps to achieve a lifelike design. Additionally, working with this pattern provides an opportunity to practice various stitches and techniques, enhancing your overall crochet skills.
Incorporating the Free Crochet Lavender Flower Pattern into your projects not only adds charm but also offers a sustainable and budget-friendly alternative to real flowers. With the right materials and techniques, you can create stunning lavender blooms that will last for years to come.
Materials and Tools Needed
Yarn Selection
Choosing the right yarn is essential for achieving the delicate and realistic appearance of lavender flowers. Opt for lightweight yarn, such as cotton or acrylic, in shades of lavender, purple, and green for the stem and leaves.
Using a thinner yarn allows you to create intricate details and maintain the flower’s delicate nature. Ensure that the yarn is soft and flexible to make the stitching process easier and more comfortable.
Additionally, consider using a contrasting color for the flower buds to add depth and realism to your design. This will make the lavender blooms more visually appealing and lifelike.
Crochet Hook
A crochet hook that corresponds to your yarn’s weight is crucial for maintaining the pattern’s structure. For lightweight yarn, a 2.5mm or 3.0mm crochet hook is typically recommended.
Choosing the right hook size ensures that the stitches are tight and uniform, preventing the flower from becoming too loose or misshapen. A smaller hook size can also help create finer details, enhancing the overall look of the lavender.
Keep in mind that the hook’s material, such as metal or ergonomic plastic, can affect your comfort and efficiency during the crocheting process.
Additional Accessories
Besides yarn and a crochet hook, you’ll need additional accessories like scissors, a tapestry needle, and floral wire for the stem. The floral wire adds stability and allows you to shape the flower easily.
Using stitch markers can also help you keep track of your progress and ensure even spacing between stitches. A hot glue gun or fabric glue may be necessary for attaching the flower to other projects or decorations.
Having all the necessary tools prepared before you start will make the process smoother and more enjoyable.
Step-by-Step Crochet Instructions
Step 1: Creating the Flower Buds
- Foundation Chain: Begin with a slip knot and create a foundation chain of 10 stitches.
- Single Crochet Rounds: Work single crochet stitches in each chain, turning at the end of each row. Repeat this process for 5 rows to form the cylindrical shape of the lavender bud.
- Shaping the Bud: Gradually decrease the stitches at the top by skipping every third stitch. This will create a tapered effect that resembles the natural shape of lavender buds.
Step 2: Crafting the Stem
- Insert Floral Wire: Wrap the floral wire with green yarn to create the stem’s texture. Secure the yarn with a knot at the base.
- Attaching the Buds: Use a tapestry needle to sew the buds onto the wire. Position them evenly along the stem to mimic the natural arrangement of lavender flowers.
- Adding Leaves: Crochet small leaf shapes using green yarn and attach them to the stem at intervals for a more authentic look.
Step 3: Finishing Touches
- Secure the Yarn Ends: Weave in any loose ends with a tapestry needle to prevent unraveling.
- Shaping the Flower: Gently bend the floral wire to achieve the desired curve and positioning of the lavender stems.
- Final Assembly: If creating a bouquet or arrangement, group multiple stems together and wrap them with additional yarn or ribbon for a polished finish.
Tips for Enhancing Your Crochet Lavender
Color Variations
Experiment with different shades of purple and lavender to create a more vibrant and realistic flower. Mixing light and dark hues adds depth and dimension to the petals.
Adding subtle highlights or variegated yarn can enhance the texture and visual appeal of the buds, making them more lifelike.
Customizing the Size
Adjust the length of the foundation chain and the number of rows to create larger or smaller lavender buds. This flexibility allows you to tailor the pattern to fit various projects and designs.
Using a thicker yarn or larger hook can also produce a more robust and textured lavender flower for decorative purposes.
Combining with Other Flowers
Incorporate your crochet lavender flowers into bouquets, wreaths, or home décor arrangements. Pair them with other crochet flowers like roses or daisies for a diverse and colorful display.
Adding greenery and filler elements can enhance the overall aesthetic and create a more natural and balanced composition.
Pattern Here
The Free Crochet Lavender Flower Pattern is a versatile and rewarding project that allows you to explore your creativity while mastering essential crochet techniques. With the right materials and attention to detail, you can create stunning and lifelike lavender blooms that will enhance any craft or décor.
By following this step-by-step tutorial and incorporating your personal touch, you’ll achieve beautiful results that showcase your skills in the art of [crochet patterns]. Whether for personal use or as a heartfelt gift, these delicate flowers will bring joy and beauty to any setting.