
Quilting is a timeless craft that brings warmth and creativity to every home. In this Country Fall Block Tutorial Quilt Block Pattern, we will guide you through the process of making a stunning quilt block inspired by the rich colors and cozy feelings of autumn. Whether you’re a seasoned quilter or a beginner, this step-by-step guide will help you create a beautiful design perfect for fall-themed projects.
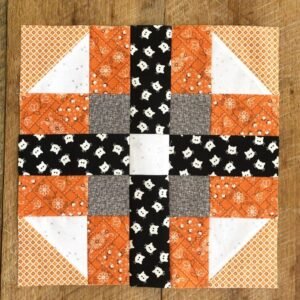
The Country Fall Block is a charming pattern that captures the essence of autumn with its earthy tones and classic geometric shapes. It is a versatile quilt block that can be used in various projects, from table runners to full-sized quilts. By following this tutorial, you will learn how to cut fabrics, assemble pieces, and stitch everything together to achieve a flawless quilt block.
With detailed instructions and helpful tips, this quilt block pattern will be easy to follow, even if you are just starting in the quilting world. Let’s dive into the tutorial and create a beautiful piece that celebrates the beauty of fall!
1. Materials and Fabric Selection
Choosing the right materials is crucial for achieving a high-quality Country Fall Block Quilt. The right fabrics and tools will make your quilting experience smoother and more enjoyable.
- Fabric Choices: Opt for warm, autumnal colors like deep oranges, rustic reds, golden yellows, and earthy browns. Batik fabrics and prints with leaves, pumpkins, or plaids enhance the fall theme.
- Cotton Fabric: 100% cotton is ideal for quilting as it is durable, easy to work with, and holds its shape well.
- Cutting Tools: Use a rotary cutter, self-healing cutting mat, and quilting ruler to ensure precise cuts.
- Thread and Needles: Choose high-quality quilting thread in a complementary color. A size 80/12 quilting needle works best for stitching.
- Sewing Machine: A machine with a quarter-inch foot will help achieve precise seam allowances.
- Iron and Pressing Mat: Pressing seams as you go will ensure a smooth and professional finish.
Once you have gathered all your materials, it’s time to move on to cutting the fabric pieces accurately.
2. Cutting and Preparing the Pieces
To create a well-structured Country Fall Block, precise cutting is essential. Follow these measurements for a standard 12-inch quilt block.
- Main Fabric (Autumn Color 1): Cut (2) 4.5-inch squares for the center blocks.
- Contrast Fabric (Autumn Color 2): Cut (4) 2.5-inch squares for the corner accents.
- Background Fabric (Neutral Tone): Cut (4) 3-inch squares for the half-square triangles (HSTs).
- Border Strips: Cut (4) 2.5-inch strips to frame the block.
- Binding Fabric: Cut 2.5-inch strips for the final binding if you plan to use the block in a quilted piece.
Tips for cutting:
- Use a rotary cutter and quilting ruler for clean, straight edges.
- Stack fabric layers to cut multiple pieces at once for efficiency.
- Label each piece to avoid confusion during assembly.
Now that all pieces are ready, let’s start sewing the block together.
3. Sewing the Quilt Block Together
With all the pieces cut, assembling the Country Fall Block Quilt becomes an easy and enjoyable process. Follow these steps for a perfect finish.
- Step 1: Making Half-Square Triangles (HSTs): Pair a background fabric square with a contrast fabric square, sew diagonally, and cut along the seam to create two HSTs.
- Step 2: Pressing Seams: Always press seams toward the darker fabric for a neat finish and reduced bulk.
- Step 3: Arranging the Layout: Lay out the quilt block pieces in the final design to ensure proper placement before sewing.
- Step 4: Stitching Rows Together: Sew the squares together row by row, maintaining a 1/4-inch seam allowance.
- Step 5: Joining the Rows: Carefully match seams and stitch the rows together, pressing each seam as you go.
- Step 6: Adding Borders: If desired, sew border strips around the finished block to frame it beautifully.
With the sewing complete, your quilt block pattern is almost ready for use in a larger project!
4. Final Touches and Quilting Ideas
Once your Country Fall Block is assembled, it’s time to add finishing touches and think about incorporating it into a quilt.
- Trimming and Squaring Up: Use a quilting ruler to ensure the block measures exactly 12.5 inches before sewing it into a quilt.
- Adding Sashing and Borders: If using the block in a quilt, add sashing strips between blocks for better definition.
- Quilting Design: Consider free-motion quilting with leaf or vine patterns to enhance the fall theme.
- Batting and Backing: Choose a warm batting like cotton or wool for added coziness.
- Binding Options: A deep red or golden yellow binding will frame the quilt beautifully.
- Displaying Your Work: Use your block in table runners, pillows, or as part of a fall-themed quilt.
Frequently Asked Questions (FAQ)
Q1: Can I make the Country Fall Block in different sizes?
A: Yes! Adjust the fabric measurements proportionally to create smaller or larger blocks.
Q2: What fabrics work best for this quilt block pattern?
A: Cotton fabrics in autumn hues work best, but you can also experiment with flannel for extra warmth.
Q3: Do I need a sewing machine, or can I sew this block by hand?
A: While a sewing machine makes the process faster, this block can be sewn by hand using small, even stitches.
Q4: How do I keep my quilt block from stretching?
A: Pressing seams carefully and using a light starch spray can help prevent fabric stretching.
Q5: Can I mix modern prints with traditional fall colors?
A: Absolutely! Mixing prints with solid colors can add depth and interest to your quilt block.
PATTERN HERE
This Country Fall Block Tutorial Quilt Block Pattern is a wonderful way to celebrate the beauty of autumn while improving your quilting skills. By following this step-by-step guide, you have learned how to select fabrics, cut pieces accurately, sew them together, and finish your quilt block professionally. Whether you use this block in a full quilt or a standalone project, it will add a warm and rustic charm to your home.
We would love to hear your thoughts! Leave a comment with your feedback, questions, or suggestions for future tutorials. Happy quilting!