
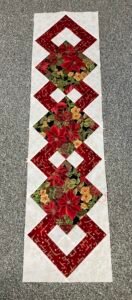
Creating a Interlocking Squares Table Runner is a fantastic way to add a handmade, elegant touch to your home decor. Whether you’re a beginner or an experienced quilter, this project is both enjoyable and rewarding.
The interlocking square design creates a beautiful geometric pattern that looks intricate but is surprisingly easy to achieve.In this article, we’ll walk through a step-by-step guide on how to create a quilted table runner with this eye-catching design.
We’ll cover fabric selection, cutting measurements, assembling the blocks, quilting, and binding. Follow along and get ready to create a stunning centerpiece for your dining table!
Choosing Fabrics and Materials for Your Interlocking Squares Table Runner
Selecting the right fabrics and materials is crucial to achieving a stunning quilt pattern. The interplay of colors and textures will define the aesthetic appeal of your quilt.
- Fabric Selection: Choose three or four contrasting fabric colors to enhance the interlocking square design. Solid colors or subtle prints work best for maintaining the geometric look.
- Fabric Types: 100% cotton is the preferred fabric for quilting, as it is easy to sew, durable, and available in a wide range of colors and patterns.
- Measurements & Cutting: You will need (all in inches):
- (2) 5″ x 5″ squares from Fabric A
- (2) 5″ x 5″ squares from Fabric B
- (4) 2.5″ x 5″ rectangles from Fabric C
- (4) 2.5″ x 5″ rectangles from Fabric D
- Additional Supplies: Quilting ruler, rotary cutter, self-healing cutting mat, sewing machine, coordinating thread, and quilting pins.
- Batting & Backing: A lightweight batting (cotton or polyester blend) and a complementary backing fabric will give your table runner a finished and professional look.
- Pre-Wash & Ironing: Always pre-wash your fabrics to prevent shrinking and iron them before cutting to ensure precision in measurements.
Cutting and Arranging the Interlocking Squares
Proper cutting and arrangement of fabric pieces are essential for maintaining the integrity of the quilt pattern. Follow these steps carefully to achieve a seamless design.
- Cut Precisely: Using a rotary cutter and ruler, carefully cut all fabric pieces according to the measurements listed in the previous section.
- Lay Out the Design: Arrange the fabric pieces on a flat surface to visualize the interlocking squares pattern before sewing.
- Check Color Balance: Step back and ensure that the contrast between fabrics is visible and that the colors complement each other.
- Sew in Sections: Begin by sewing the smaller rectangles together to form pairs, then attach them to the squares.
- Press Seams: Always press the seams open or to one side after each step to maintain a smooth and professional finish.
- Repeat for Desired Length: Depending on how long you want your quilted table runner, repeat the pattern until you reach the desired length.
Sewing Techniques for a Flawless Finish
Now that your fabric pieces are cut and arranged, it’s time to sew them together. Here are essential sewing techniques for a professional-looking quilt.
- Use a Quarter-Inch Seam Allowance: Quilters commonly use a 1/4-inch seam allowance for precision and consistency in quilt patterns.
- Chain Piecing: To speed up the sewing process, use chain piecing, sewing multiple pieces in a continuous sequence before cutting the threads.
- Check Alignment: Make sure your interlocking squares align perfectly by pinning sections together before sewing.
- Sew Row by Row: Start by sewing the rows separately and then join them together to form the complete quilt pattern.
- Press the Seams Again: Press seams after assembling the rows to keep the quilt top flat and tidy.
- Square Up the Runner: Trim excess fabric or uneven edges to ensure a perfectly shaped table runner.
Quilting and Binding Your Interlocking Squares Table Runner
The final step in making your quilted table runner is adding batting, quilting the layers together, and finishing with a neat binding.
- Layering the Quilt: Place the backing fabric right side down, followed by the batting, and finally the quilt top facing up.
- Basting the Layers: Use safety pins or spray adhesive to secure the layers together before quilting.
- Quilting Options: Choose a quilting method such as straight-line quilting along the seams or free-motion quilting for a decorative touch.
- Trim the Excess: Once the quilting is complete, trim the batting and backing fabric to match the edges of your quilt top.
- Binding the Edges: Cut 2.5-inch strips of fabric, fold them in half, and attach them to the edges for a clean and durable finish.
- Final Pressing and Inspection: Give your finished table runner a final press and check for any loose threads or imperfections before displaying it proudly on your table.
With these steps, you have successfully created an Interlocking Squares Table Runner, a stunning quilt pattern that enhances your home decor. Enjoy your handcrafted piece and happy quilting!