
Creating a Tiger Baby Quilt Pattern is a wonderful way to craft a unique and cozy quilt for a little one. This design captures the beauty and playfulness of a tiger while providing warmth and comfort. Whether you are an experienced quilter or just starting, this guide will walk you through the process of making a charming quilt that will be cherished for years.
A quilt is more than just a blanket; it is a piece of art, a keepsake, and a functional item that can be passed down through generations. The Tiger Baby Quilt Pattern brings a fun and adventurous theme to a nursery, making it a delightful project for those who love creative quilting.
In this tutorial, we will cover everything you need to know to make a Tiger Baby Quilt Pattern, from fabric selection to step-by-step instructions for piecing and assembling your quilt. Follow along, and let’s get started!
1. Choosing the Right Materials
Selecting high-quality materials is crucial to ensure your Tiger Baby Quilt Pattern is soft, durable, and safe for babies.
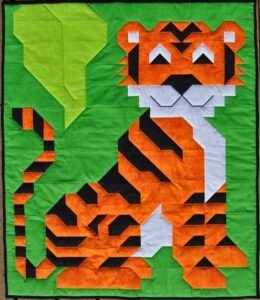
- Fabric Selection – Choose 100% cotton fabric for breathability and softness. Opt for orange, black, and white fabrics to mimic the tiger’s colors, or pick fun jungle prints for added charm.
- Batting – Use lightweight, hypoallergenic cotton or bamboo batting to provide warmth without making the quilt too bulky.
- Backing Fabric – Select a coordinating fabric for the quilt’s back, such as a jungle or animal print, to enhance the theme.
- Thread – High-quality cotton thread ensures durability and prevents unraveling over time.
- Cutting Tools – Rotary cutters, self-healing mats, and quilting rulers will help achieve precise cuts.
- Sewing Machine and Needles – A basic sewing machine with a quilting foot attachment is ideal for stitching the quilt together.
2. Cutting and Preparing Fabric Pieces
Once you have gathered your materials, it’s time to cut and prepare the fabric for assembling the Tiger Baby Quilt Pattern.
- Determine the Quilt Size – A standard baby quilt measures around 36×52 inches, but you can adjust according to your preference.
- Cut the Main Pieces – Using a rotary cutter, cut squares, rectangles, and triangle pieces needed for the tiger design.
- Arrange the Fabric – Lay out the pieces on a flat surface to plan the design before stitching.
- Press the Fabric – Iron each piece to remove wrinkles and ensure smooth sewing.
- Add Embellishments – Consider appliquéing tiger stripes or using embroidery to add facial details for a more realistic look.
- Label Pieces – Use small stickers or pins to mark different fabric sections, helping you keep track while sewing.
3. Assembling the Quilt Top
Now that your fabric pieces are ready, it’s time to assemble the quilt top for your Tiger Baby Quilt Pattern.
- Start with the Centerpiece – Begin by sewing together the main tiger design or panel to serve as the focal point.
- Piece Together the Blocks – If using a patchwork design, sew the blocks together in rows, pressing seams open as you go.
- Join the Rows – Carefully align each row and sew them together, ensuring the design stays balanced.
- Add Borders – Frame the quilt with coordinating fabric strips to give it a finished look.
- Check for Accuracy – Measure the quilt top to ensure all sections are aligned and squared.
- Press the Entire Quilt Top – A final pressing helps smooth out seams and prepares the quilt for layering.
4. Quilting and Finishing Touches
The final steps in creating your Tiger Baby Quilt Pattern involve quilting and binding to secure the layers together.
- Create the Quilt Sandwich – Layer the quilt top, batting, and backing fabric, securing them with safety pins.
- Choose a Quilting Pattern – Decide whether to use straight-line quilting, free-motion designs, or hand-quilting for a more traditional look.
- Quilt the Layers Together – Sew through all layers, following your chosen quilting pattern to enhance the design.
- Trim the Edges – Use a ruler and rotary cutter to trim any excess fabric and batting.
- Bind the Quilt – Attach a fabric binding around the edges, folding and sewing it in place to create a clean finish.
- Final Press and Inspection – Give the quilt one last press and check for any loose stitches or misaligned pieces before gifting or using it.
FAQ: Common Questions About Tiger Baby Quilt Pattern
1. What size should a baby quilt be?
A typical baby quilt measures around 36×52 inches, but you can adjust the dimensions based on your needs.
2. What is the best fabric for a baby quilt?
100% cotton is the best choice due to its softness, breathability, and ease of washing.
3. Can I make a Tiger Baby Quilt Pattern without a sewing machine?
Yes! Hand-sewing is possible, though it takes longer. Use small, even stitches for durability.
4. How do I make my quilt softer?
Choose soft cotton fabric, prewash your materials, and use lightweight batting for a gentle touch.
5. What is the easiest way to quilt a baby quilt?
Straight-line quilting with a walking foot is one of the easiest and most beginner-friendly techniques.
6. Can I personalize the quilt?
Absolutely! Add embroidery, appliqué, or a label with the baby’s name for a special touch.
PATTERN HERE
Creating a Tiger Baby Quilt Pattern is a rewarding project that combines creativity and craftsmanship. With careful fabric selection, precise cutting, and meticulous stitching, you can make a stunning quilt that will be treasured for years. Whether as a gift or a keepsake for your little one, this quilt brings warmth and personality to any nursery.
We hope this guide has helped you in your quilting journey! Feel free to share your thoughts, experiences, or any suggestions in the comments below. Happy quilting!