
Crocheting is a timeless craft that allows you to create beautiful and functional pieces. Among the various techniques, the Tunisian stitch stands out for its unique texture and versatility. Whether you’re a beginner or an experienced crafter, mastering the Tunisian stitch opens up a world of possibilities for creating stunning crochet blankets.
In this guide, we’ll explore how to create a Crochet Blanket using the Tunisian stitch. This step-by-step tutorial includes precise stitch counts and instructions to ensure you achieve flawless results. By focusing on the Tunisian stitch, you can elevate your crochet skills while crafting a cozy and elegant blanket.
If you’re passionate about crochet patterns and enjoy experimenting with new techniques, this article is perfect for you. Let’s dive into the materials, tools, and detailed steps required to complete your Tunisian stitch blanket.
Materials and Tools Needed
Gathering Your Supplies
Before starting any crochet project, having the right materials is essential. For this Tunisian stitch blanket, you will need a few specific tools and yarn types to ensure success.
- Yarn: Choose a medium-weight yarn, such as worsted or aran, for a balanced thickness and warmth.
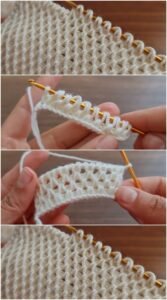
- Tunisian Crochet Hook: A long hook or one with a cord is necessary for working multiple stitches at a time.
- Stitch Markers: These are optional but helpful for keeping track of rows and sections.
Yarn Selection Tips
Opt for a soft, durable yarn that suits your color preferences and matches the blanket’s intended use. Acrylic or wool blends work well for this project as they provide warmth and are easy to maintain.
Choosing the right color palette can also enhance the final look of your blanket. Solid colors emphasize the texture of the Tunisian stitch, while variegated yarn adds visual interest.
Additional Essentials
Other items you might need include a tapestry needle for weaving in ends and a pair of scissors for trimming excess yarn. Having these on hand ensures a smooth workflow from start to finish.
Understanding the Tunisian Stitch
What Is the Tunisian Stitch?
The Tunisian stitch, often referred to as Afghan stitch, is a hybrid between knitting and crocheting. It involves working loops onto the hook in one row and completing them in the next, creating a dense, textured fabric.
This technique is perfect for blankets because it results in a thick and cozy material. The stitches resemble small, vertical bars, giving the blanket a unique woven look.
Benefits of the Tunisian Stitch
Using the Tunisian stitch for your crochet blanket offers several advantages:
- Durability: The dense fabric withstands regular use and washing.
- Aesthetic Appeal: Its texture adds depth and visual interest to any project.
- Ease of Learning: While it may seem intimidating at first, the stitch is beginner-friendly with a little practice.
Basic Tunisian Stitch Techniques
Before starting the blanket, familiarize yourself with these foundational techniques:
- Tunisian Simple Stitch (TSS): Insert the hook under the vertical bar, yarn over, and pull through.
- Forward Pass: Work loops onto the hook across the row.
- Return Pass: Remove loops from the hook by yarning over and pulling through two loops at a time.
Step-by-Step Instructions for the Blanket
Step 1: Foundation Row
- Create a Foundation Chain: Chain 100 stitches for a medium-sized blanket.
- First Forward Pass: Insert the hook into the second chain from the hook, yarn over, and pull up a loop. Repeat across the row.
- First Return Pass: Yarn over and pull through one loop, then yarn over and pull through two loops until only one loop remains.
The foundation row sets the base for the rest of the blanket and determines its width. Ensure your tension is even to avoid puckering or uneven edges.
Step 2: Working the Main Pattern
- Forward Pass: Insert the hook under the next vertical bar, yarn over, and pull up a loop. Continue across the row.
- Return Pass: Yarn over and pull through one loop, then yarn over and pull through two loops repeatedly.
- Repeat: Continue the forward and return passes for 50 rows or until the blanket reaches your desired length.
Maintaining consistent tension is key during this stage. Use stitch markers to mark every 10 rows to track your progress easily.
Step 3: Binding Off
- Final Row: Work a slip stitch under each vertical bar across the row to bind off.
- Weaving in Ends: Use a tapestry needle to weave in loose ends securely.
- Blocking: Wet block the blanket to relax the stitches and shape it evenly.
Binding off ensures the edges are neat and prevents unraveling. Blocking enhances the texture and gives the blanket a professional finish.
Troubleshooting Common Issues
Uneven Edges
If your edges are uneven, ensure you’re working into the last vertical bar of each row. Adding a border with single crochet stitches can also help.
Curling
Tunisian crochet fabric tends to curl. Blocking the finished blanket or using a larger hook size can minimize this issue.
Tension Problems
Inconsistent tension can create uneven rows. Practice maintaining a steady hand and adjust your grip as needed.
Creative Variations
Adding Colors
Incorporate multiple colors by changing yarns every few rows. This creates a striped pattern that adds vibrancy to the blanket.
Using Different Stitches
Experiment with variations like the Tunisian Knit Stitch or the Tunisian Purl Stitch for a different texture. Mixing stitches can create intricate designs.
Border Options
Finish the blanket with a decorative border, such as scallops or picots, to enhance its appearance. Choose a border stitch that complements the main pattern.
PATTERN HERE
Creating a Crochet Blanket using the Tunisian stitch is a rewarding project that combines creativity and functionality. With its unique texture and versatility, this stitch is perfect for crafting blankets that stand out.
By following this step-by-step guide and focusing on precise stitch counts, you’ll achieve a beautiful result that showcases your crochet skills. Embrace the art of crochet patterns and explore the endless possibilities the Tunisian stitch offers.