
Introduction to Groot Amigurumi
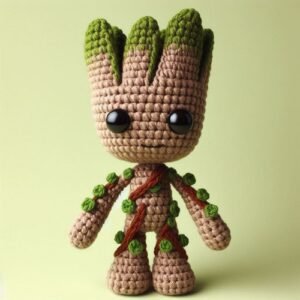
Creating your very own Groot amigurumi is an enjoyable crochet project that allows you to bring this beloved Marvel character to life. With this detailed guide, you’ll not only craft an adorable Groot, but also sharpen your crochet skills. The process involves basic crochet techniques like single crochet, increasing, and decreasing.
Groot amigurumi patterns have become a fan favorite among crochet enthusiasts, especially due to the simplicity of the design and the charm of the character. In this article, we’ll walk through each step to ensure even beginners can follow along. Whether you’re a seasoned crochet artist or just starting out, this tutorial will provide you with the exact stitch counts and materials needed to create a perfect Groot.
Using the right crochet patterns and techniques, you can craft a tiny, cuddly version of Groot that’s perfect as a gift or personal collectible. So, gather your supplies and follow along to create a Groot amigurumi that’s sure to impress!
Materials Needed for Your Groot Amigurumi
To start making your Groot, you will need to gather a few essential materials. While the pattern is straightforward, having the correct materials will ensure a smooth and enjoyable process. Here’s what you’ll need:
- Yarn: Use brown yarn for Groot’s body, arms, and legs, and green yarn for the small leaves on his head. A medium-weight (size 4) yarn works best for creating a sturdy amigurumi.
- Crochet Hook: A 3.0 mm crochet hook will help maintain the right tension and structure. This size will allow for a tight stitch, preventing any gaps in your amigurumi.
- Stuffing: Polyester fiberfill stuffing is essential for giving your Groot the right shape and firmness. Don’t overstuff, as this can distort the figure.
Apart from these basic materials, you’ll also need a yarn needle for weaving in ends, stitch markers to keep track of your rows, and safety eyes to bring Groot’s face to life. Optional materials include wire for shaping Groot’s limbs and blush for adding color to his cheeks.
Step 1: Crochet the Head and Body
The head and body of Groot are worked in one continuous piece. This technique ensures a smoother look and eliminates the need to join multiple parts later. Here’s how to crochet the head and body:
- Round 1: Begin with a magic ring, and crochet 6 single crochets (sc) into the ring.
- Round 2: Increase by crocheting 2 sc in each stitch (12 stitches).
- Round 3: Crochet 1 sc, 2 sc in the next stitch, and repeat around (18 stitches).
Continue to increase the rounds until you reach 36 stitches. From there, work several rounds of 36 sc to form the shape of the head. Once you’ve reached the desired height, you’ll begin decreasing to form the body. Decrease every third stitch to shape the neck and upper body, then continue working in rounds until the body is complete.
Step 2: Crochet the Arms and Legs
Groot’s arms and legs are thin, so they require fewer stitches but more careful work to maintain their shape. Let’s start with the legs:
- Legs: Begin with a magic ring and crochet 6 sc. Increase to 12 stitches, then work several rounds without increasing to create the length of the leg. Stuff lightly as you go.
- Arms: Similar to the legs, but thinner. Start with 4 sc in a magic ring, and only increase once to 8 stitches. Work in rounds until the arm reaches the length you prefer. You can optionally insert a thin wire for structure.
Once you’ve completed both arms and legs, attach them to the body. Position the arms so that they have a slight curve, giving Groot a more dynamic appearance.
Step 3: Crochet the Leaves and Details
The final touches involve adding the green leaves and facial details. The leaves are small and can be made using the following pattern:
- Leaf Pattern: Chain 4 stitches, then work back across with a slip stitch in the second chain from the hook, single crochet in the next chain, and a slip stitch in the last chain. This will create a tiny leaf shape.
- Face: For the eyes, use 8 mm safety eyes placed between the 6th and 7th round of the head. Use a yarn needle and black embroidery thread to create Groot’s smiling mouth.
Once all leaves are crocheted, attach them randomly around the top of Groot’s head. These little touches will bring your amigurumi to life!
Step 4: Assembly and Finishing
After you’ve completed all the individual parts, it’s time to assemble your Groot. Use your yarn needle and brown yarn to carefully sew the arms and legs onto the body. Be sure to secure the limbs tightly so that they stay in place.
For a finishing touch, you can use a bit of blush on Groot’s cheeks for added personality. You may also wish to pose the arms in different ways—either by curving them upwards as if Groot is dancing, or leaving them down in a more relaxed pose.
Remember to weave in any loose ends and trim any excess yarn. Once complete, give your Groot amigurumi a light shaping by pressing it into the desired form, especially around the head and limbs.
SEO Tips for Crochet Patterns and Amigurumi Projects
To optimize this article for SEO, it’s important to naturally incorporate relevant keywords. By focusing on terms like “crochet patterns” and “amigurumi,” we can ensure that search engines identify this content as useful and informative for readers looking to create amigurumi characters.
- Keyword Placement: Place the main keyword “crochet patterns” early in the introduction and throughout the article. Use variations like “Groot amigurumi crochet patterns” or “how to crochet amigurumi Groot” to cover related search terms.
- Subheadings and Structure: Break down the article with clear subheadings that include keywords such as “crochet Groot” and “amigurumi tutorial.” This not only makes it easier for readers to follow but also improves SEO rankings by organizing content logically.
- Internal and External Links: Link to other amigurumi patterns or crochet technique guides to enhance user experience and boost site engagement. Linking to related articles can improve on-page SEO and keep readers engaged for longer.
Conclusion: Bring Your Crochet Groot to Life
Congratulations! You’ve completed your own Groot amigurumi using these crochet patterns. Whether you’re a beginner or an experienced crocheter, following this guide step-by-step will help you achieve a high-quality result. Remember, crafting amigurumi is not just about following the pattern, but also about adding your personal touch, so feel free to customize Groot’s size or features as you see fit.
Crochet patterns like this Groot amigurumi offer a rewarding challenge for enthusiasts and a fun, creative outlet for fans of Marvel characters. With practice, you can experiment with other amigurumi designs and take on even more complex projects. Happy crocheting!