
The Bird Quilt Block is a stunning and intricate design that adds charm and personality to any quilt. Its unique shape, resembling a bird in flight, creates a visually appealing effect that quilters of all skill levels will appreciate.
In this blog post, we’ll walk you through how to create this captivating block step by step, providing fabric cuts and measurements to help you along the way.
The primary keywords for this article are “quilt” and “quilt patterns.”
What is The Bird Quilt Block?
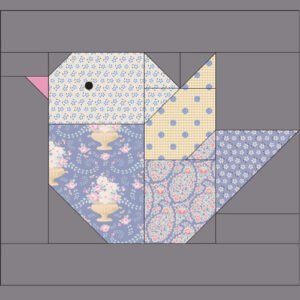
The Bird Quilt Block is a creative quilt pattern that takes inspiration from the graceful shape of a bird. The design allows for a lot of variation in color and fabric choice, giving quilters the freedom to personalize their creations. Whether you’re looking to create a large quilt or just a small decorative piece, this block fits seamlessly into many quilt designs.
When creating The Bird Quilt Block, it’s essential to select fabrics that provide a good contrast between the bird and the background. This helps the bird shape stand out, making the design more vibrant and eye-catching. Many quilters choose earthy tones or soft pastels to mimic the natural colors of birds.
This block can be a fun and fulfilling project for quilters at various skill levels. Beginners will enjoy practicing their piecing techniques, while experienced quilters can experiment with intricate fabric selections and quilting stitches to enhance the design.
Materials and Fabric Cuts for The Bird Quilt Block
Before you begin piecing your Bird Quilt Block, you’ll need to gather the right materials and make precise fabric cuts. Below is a list of what you will need for one block:
- Background fabric: One 6.5″ x 6.5″ square
- Bird body fabric: One 4.5″ x 4.5″ square
- Bird wing fabric: Two 2.5″ x 2.5″ squares
- Bird beak fabric: One 1.5″ x 1.5″ square
- Bird tail fabric: One 2.5″ x 4.5″ rectangle
These measurements are based on a finished 6″ block. You can adjust the fabric cuts if you want to scale the block up or down, depending on your quilt’s desired size. Make sure to press your fabrics before cutting to ensure accurate measurements and clean lines.
The combination of the background and bird body fabric is essential for creating a striking design. Choose contrasting colors to make the bird silhouette pop against the quilt’s background, ensuring the bird motif remains the focal point.
Step-by-Step Tutorial for The Bird Quilt Block
- Prepare the fabric pieces:
Start by cutting all the fabric pieces as listed above. Make sure each piece is accurately cut to avoid alignment issues when sewing. Lay the pieces out on a flat surface to ensure you have all the parts necessary for the block. - Once your fabric is ready, begin by taking the 4.5″ square for the bird body and the two 2.5″ squares for the wings. These will form the core structure of your bird shape. Pin the pieces to keep them secure before sewing.
It’s helpful to organize your fabric pieces before you begin sewing. This will streamline the process and allow you to focus on achieving crisp seams.
- Assembling the bird’s body and wings:
Take the two 2.5″ wing squares and attach them to opposite corners of the 4.5″ bird body square using a half-square triangle method. To do this, place the wing squares right sides together with the body fabric, draw a diagonal line from corner to corner on the back of the squares, and sew along this line.After sewing the diagonal line, trim 1/4″ away from the seam to reduce bulk and press the seams toward the darker fabric. This technique will create the bird’s wings, which should now be noticeable as triangles on either side of the bird’s body.The precision in cutting and sewing the half-square triangles is essential to ensuring the overall block comes together seamlessly. Take your time to measure, sew, and trim accurately.
- Adding the beak and tail:
Now, take the 1.5″ square for the bird’s beak and attach it to the corner of the bird’s body using the same half-square triangle technique. This small detail adds charm to the design, making the bird more lifelike. Sew and trim the fabric carefully, then press the seam toward the darker fabric.For the tail, use the 2.5″ x 4.5″ rectangle and sew it to the bottom of the bird’s body. Make sure that the edges align perfectly before stitching. Press the seam downwards to ensure the tail lays flat against the rest of the block.With the beak and tail in place, your bird should now have a complete shape. The small details, like the beak, are what make this quilt pattern stand out.
Final Assembly and Quilting Techniques
After assembling the bird’s body, wings, beak, and tail, it’s time to sew the bird onto the 6.5″ x 6.5″ background square. Pin the bird block to the center of the background fabric, ensuring the edges align properly. Once you’re satisfied with the placement, sew the bird block onto the background fabric.
Press the entire block to remove any wrinkles and ensure the seams lay flat. You can also use a quilting iron for better precision. At this point, your Bird Quilt Block is complete, and you can either add it to your quilt top or continue creating additional blocks.
To finish the quilt, consider adding some quilting stitches around the bird’s silhouette. This can help define the bird’s shape and add a touch of texture to your quilt. Free-motion quilting or echo quilting are excellent choices for enhancing this block’s design.
Tips for Customizing The Bird Quilt Block
One of the best aspects of The Bird Quilt Block is its versatility. You can easily customize the block to fit your desired quilt patterns by experimenting with different fabric colors and prints. Bright, bold colors can give the bird a modern look, while muted, natural tones can evoke a vintage or rustic feel.
If you want to make a larger quilt using The Bird Quilt Block, consider varying the sizes of your blocks. You could make some smaller blocks alongside larger ones to create an interesting visual effect. This technique also adds complexity and depth to the overall quilt design.
Another fun way to personalize this block is to add embroidery details. You can embroider eyes or feathers onto the bird, giving it a unique touch that makes it stand out even more. This extra detail can turn a simple block into a showpiece for your quilt.
PATTERN HERE
The Bird Quilt Block is a delightful addition to any quilt, offering both visual appeal and creative possibilities. Whether you’re a beginner looking to practice basic quilting techniques or an experienced quilter eager to try something new, this block is sure to add charm to your quilt patterns.
With its easy-to-follow assembly process and endless customization options, The Bird Quilt Block is a great way to explore your quilting creativity. Try out different fabric combinations and sizes to make this block your own, and don’t forget to have fun with the process! Happy quilting!