
Crazy quilts are a beloved and creative way to express individuality in quilting.
Unlike traditional quilt blocks with uniform shapes and patterns, the Crazy Quilt block allows for a freestyle approach, combining various fabrics, colors, and stitching methods.
This block is a favorite among quilters who enjoy a more artistic and improvisational style. In this article, we will take you through a detailed step-by-step process of creating a Crazy Quilt block, complete with fabric cuts, measurements, and expert tips to make your project a success.
What is a Crazy Quilt Block?
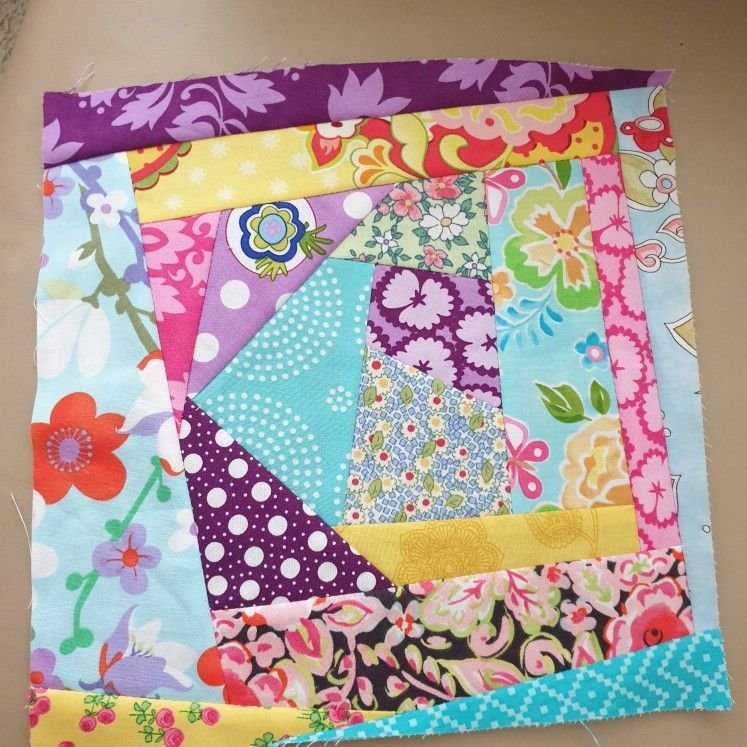
A Crazy Quilt block is a distinctive type of quilt pattern that embraces irregular shapes and mismatched fabric pieces. Unlike the precision-based quilt blocks, Crazy Quilt blocks are more fluid and random, resulting in a one-of-a-kind creation. These blocks originated in the Victorian era, where quilters would use scraps of luxurious fabrics like silk, velvet, and satin to create intricate designs.
The beauty of Crazy Quilt blocks lies in their versatility. You can use any fabric scraps you have, and there’s no set structure to follow, making it perfect for those who want to experiment. Additionally, the stitching in Crazy Quilts often includes embroidery, adding a decorative element that sets this block apart from other quilt patterns. As you craft your own Crazy Quilt block, you’ll find that no two pieces are ever the same.
In modern quilting, Crazy Quilts have made a comeback. They are especially popular with those who enjoy a more whimsical and artistic approach to quilting. Whether you are a beginner or an experienced quilter, creating a Crazy Quilt block is a fantastic way to showcase your creativity.
Selecting Fabrics for Your Crazy Quilt Block
The first step in creating a Crazy Quilt block is selecting the fabrics. One of the best aspects of this quilt pattern is that you can use an array of fabric types and textures. Traditionally, quilters used leftover scraps, but today you can be intentional about selecting different colors and patterns that complement each other.
Choose fabrics that vary in texture, such as cotton, silk, velvet, and linen. This variation adds dimension to your quilt block and creates a more interesting final product. You might also want to consider incorporating patterned fabrics with solids to balance the design.
When selecting fabrics, keep in mind the overall color scheme you want for your quilt. While Crazy Quilts are known for their randomness, having a color theme can help tie the block together, preventing it from looking too chaotic. For example, you might choose fabrics in various shades of blue, or mix warm tones like red, orange, and yellow for a cohesive look.
Cutting the Fabrics for a Crazy Quilt Block
Once you have your fabric selection ready, it’s time to cut them into the shapes needed for the Crazy Quilt block. Unlike traditional quilt patterns that require precise measurements, Crazy Quilts allow for more freedom in cutting. However, you’ll still want to aim for pieces that fit well together without too much excess fabric.
Start by cutting your fabric scraps into irregular shapes. Squares, triangles, and trapezoids work well for this quilt block. For a 12-inch Crazy Quilt block, aim for fabric pieces that range from 3 to 6 inches in size. Don’t worry too much about perfection; the beauty of Crazy Quilts lies in their asymmetry.
Be sure to leave a ¼-inch seam allowance around each fabric piece. This will ensure that your pieces have enough room for stitching without losing too much of the fabric in the seams. Once your fabrics are cut, you can start laying them out to get an idea of how they’ll fit together.
Assembling the Crazy Quilt Block
Now that you have your fabric pieces cut, it’s time to start assembling your Crazy Quilt block. Begin by selecting two pieces of fabric and sewing them together along one edge with a ¼-inch seam allowance. Press the seam open before adding the next piece of fabric.
Continue adding fabric pieces in a random, yet fitting manner, sewing and pressing each seam as you go. There’s no need to worry about straight lines or perfect angles – the charm of Crazy Quilts is in their unpredictability. Keep sewing pieces until your block reaches the desired size, which for this tutorial is a 12-inch square.
Once you’ve sewn together enough pieces to complete your Crazy Quilt block, square it up by trimming any excess fabric along the edges. This will ensure that your block fits evenly with other blocks if you’re making a full quilt. The final step in assembly is to press the entire block flat to prepare it for quilting.
Adding Decorative Stitching
One of the defining features of a Crazy Quilt block is the decorative stitching that often adorns the seams. This is where you can let your creativity truly shine. Embroidery is a popular choice for embellishing Crazy Quilts, and there are countless stitches you can use to enhance your block.
Some common embroidery stitches include the blanket stitch, feather stitch, and herringbone stitch. These can be done by hand or with a sewing machine that offers decorative stitch options. You can also add beads, ribbons, or lace for extra embellishment, giving your Crazy Quilt block a rich, textured look.
Incorporating these embellishments not only adds visual interest but also reinforces the seams, making your quilt block more durable. This step is optional but highly recommended if you want to create a truly unique and artistic Crazy Quilt block.
Quilting and Finishing Your Crazy Quilt Block
Once your Crazy Quilt block is fully assembled and decorated, the next step is to quilt it. If you’re creating a single block as a decorative piece, you can add a simple backing and finish the edges. However, if you’re making a full quilt, you’ll need to join multiple Crazy Quilt blocks together.
To quilt your Crazy Quilt block, choose a simple quilting stitch, such as straight-line quilting, or go for a more intricate free-motion quilting design. This will not only secure the layers of the quilt but also add to the overall texture of the block. For Crazy Quilts, less is often more when it comes to quilting since the blocks are already visually busy.
After quilting, bind the edges of your quilt block with a coordinating fabric to complete the project. Congratulations! You’ve now created a stunning Crazy Quilt block that is truly one of a kind.
Creating a Crazy Quilt block is a rewarding process that allows for complete creative freedom. Unlike traditional quilt patterns, Crazy Quilts embrace irregularity and whimsy, making them the perfect project for quilters who want to step outside the box. By following this step-by-step guide, you can create your own Crazy Quilt block using fabric scraps, unique stitching techniques, and your personal artistic flair.
Whether you’re making a full Crazy Quilt or just a single block, this pattern is sure to stand out. Don’t be afraid to experiment with colors, textures, and embellishments to make your Crazy Quilt block as unique as you are. Happy quilting!