
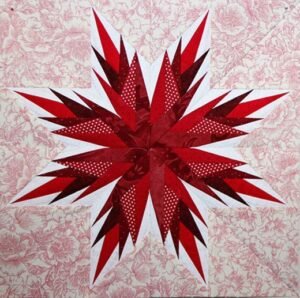
Quilters of all levels love the timeless appeal of the Holiday Star Quilt Block.
This elegant and festive design is perfect for creating seasonal quilts, table runners, or wall hangings. With its star-shaped geometry, it captures the spirit of the holidays while adding a touch of sophistication to any project.
In this article, we’ll explore how to create the Holiday Star Quilt Block using precise fabric cuts and sewing techniques. Whether you’re a seasoned quilter or just starting, this step-by-step guide will walk you through the process.
Understanding the Holiday Star Quilt Block Pattern
The Holiday Star Quilt Block is composed of a central star surrounded by various geometric shapes, often triangles and squares. This pattern gives a unique sense of balance and symmetry, which is essential for creating beautiful quilt designs.
When planning a project that features the Holiday Star Quilt Block, consider the color scheme that will enhance the star’s visual appeal. Traditional holiday colors like red, green, gold, and white are popular choices, but modern quilters may opt for a more contemporary palette. Mixing prints and solids also adds interest to the quilt.
Additionally, the versatility of the Holiday Star allows you to modify its size to fit your project. Smaller blocks can be used for table toppers or placemats, while larger blocks make great centerpieces for quilts.
Fabric Requirements for the Holiday Star Quilt Block
Before diving into the tutorial, it’s important to gather your fabric. To make a standard 12” x 12” Holiday Star Quilt Block, you’ll need the following:
- Background fabric: 1/4 yard (or a fat quarter)
- Star fabric (main color): 1/8 yard
- Accent fabric (secondary color): 1/8 yard
- Corner fabric: 1/8 yard
It’s essential to pre-wash your fabrics to avoid shrinking after the quilt is assembled. Press the fabric well before cutting to ensure that your pieces are precise. Proper preparation will ensure the success of your quilt block, making the piecing process smoother and more enjoyable.
The choice of fabric can dramatically change the final look of the Holiday Star Quilt Block. Solid fabrics create a bold and crisp look, while patterned fabrics add complexity and texture.
Cutting the Fabric for the Holiday Star Quilt Block
Precision is key in quilting, and the Holiday Star Quilt Block is no exception. The following measurements will help you cut your fabric accurately:
- Background fabric:
- Cut (4) 3.5” x 3.5” squares
- Cut (4) 2.5” x 2.5” squares
- Star fabric:
- Cut (2) 4.5” x 4.5” squares
- Accent fabric:
- Cut (4) 3.5” x 3.5” half-square triangles (HST)
- Corner fabric:
- Cut (4) 2.5” x 2.5” squares
Once your fabric is cut, it’s a good idea to label each piece with a fabric marker or sticky notes to avoid confusion during assembly. Double-check your measurements before cutting, as even slight errors can affect how the pieces fit together.

Assembling the Holiday Star Quilt Block
Now that you have your fabric pieces cut, it’s time to start assembling the block. The Holiday Star Quilt Block uses basic quilting techniques like piecing squares and triangles together. Follow these steps:
- Create the half-square triangles (HSTs): Take your 4.5” star fabric squares and the 4.5” background squares. Draw a diagonal line from corner to corner on the back of each background square. Place one background square on top of one star square, right sides together. Sew 1/4 inch away from the drawn line on both sides. Cut along the line and press the seams open. This will give you (4) half-square triangles.
- Assemble the star points: Next, you’ll use your half-square triangles to form the points of the star. Lay out your HSTs so that the star fabric forms the outer points, and the background fabric creates a clear border around them.
- Sew the rows together: Piece together the 3.5” squares and triangles into rows. Make sure the points of the star align neatly with the corner squares to maintain symmetry.
Piecing the Block Together
After creating the star points and assembling the rows, it’s time to sew the rows together. Pin each row at the seams to ensure the points match up perfectly. Use a 1/4 inch seam allowance throughout the process for accuracy.
Once the rows are stitched together, press the seams flat. Pressing plays a crucial role in the final appearance of the quilt block, as well-pressed seams reduce bulk and help the pieces fit together neatly.
Tips for a Perfect Holiday Star Quilt Block
Creating a flawless Holiday Star Quilt Block comes down to a few essential tips:
- Accurate Cutting: Double-check your measurements before cutting. Use a rotary cutter, ruler, and cutting mat to ensure precision.
- Seam Allowances: Maintaining a consistent 1/4 inch seam allowance is crucial. A scant 1/4 inch can lead to a smaller block, while a larger allowance may result in a block that doesn’t fit with others.
- Pressing: Press your seams as you go. Pressing seams open or to one side helps reduce bulk and makes assembling the quilt easier.
As with any quilt pattern, practice makes perfect. If you’re new to quilting, try making a few practice blocks before moving on to your final project.
Finishing Your Holiday Star Quilt Block
Once you have completed your block, the next step is to incorporate it into your larger quilt project. You can use multiple Holiday Star Quilt Blocks to create a festive quilt, or combine them with other patterns for a more complex design.
Borders and sashing can also be added around each block to give the quilt a more polished look. Consider using coordinating holiday fabrics to tie the whole quilt together and create a cohesive design.
After assembling your quilt top, you’ll need to add batting and backing fabric, and then quilt the layers together. You can choose to quilt by hand or machine, depending on your preference and skill level.
Conclusion: Craft a Holiday Star Masterpiece
The Holiday Star Quilt Block is a beautiful and festive pattern that adds holiday cheer to any quilt. By following this tutorial, you can create a stunning quilt block that’s perfect for Christmas, winter decor, or even as a thoughtful handmade gift.
Whether you’re creating a quilt to pass down through generations or simply looking for a fun project to celebrate the holidays, the Holiday Star Quilt Block is a great choice. With its striking star design and endless color possibilities, it’s a pattern you’ll want to make year after year.
Now that you have all the tools and tips, it’s time to start cutting fabric and sewing your way to a gorgeous Holiday Star Quilt Block! Happy quilting!