
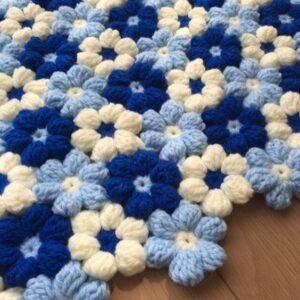
Crocheting has evolved into a diverse and creative hobby that brings joy and relaxation to people around the world. Among the various designs, Crochet Puff Flowers stand out for their texture and appeal.
These three-dimensional flowers add a unique touch to blankets, shawls, and even home décor. In this blog post, we will walk you through the process of creating these charming flowers using one of the most popular crochet patterns.
Our goal is to provide an easy-to-follow guide for both beginners and experienced crocheters.
What are Crochet Puff Flowers?
Crochet Puff Flowers are a popular design element in the crochet community, known for their texture and layered appearance. These flowers are made by creating puff stitches, which are thicker and puffier than regular crochet stitches, giving the flower a soft and voluminous look. This crochet pattern is ideal for adding extra dimension to your crochet projects.
The crochet patterns used for Puff Flowers vary depending on the desired size and style of the flower. Some patterns are more compact with fewer petals, while others are more elaborate, featuring multiple layers. Regardless of the variation, the fundamental technique remains the same, making it a versatile addition to any project.
Puff Flowers can be used in various ways: as appliqués for blankets, scarves, or hats, or as standalone items like coasters or decorations. The versatility of this pattern makes it a favorite among crochet enthusiasts, and once you master the basic steps, you can experiment with different designs and colors.
Materials You Need for Crochet Puff Flowers
Before diving into the step-by-step tutorial, it’s important to gather all the necessary materials. Having the right tools will make the process smoother and more enjoyable. For this particular crochet pattern, you’ll need a few basic items.
First, choose your yarn. For Crochet Puff Flowers, a light or medium-weight yarn works best. You can opt for cotton or acrylic yarn depending on the final use of the flowers. Cotton yarn gives a more structured finish, while acrylic provides a softer texture, perfect for blankets and shawls. Be sure to pick multiple colors if you want to make multicolored flowers.
Next, select your crochet hook. Typically, a 4.0mm to 5.0mm crochet hook is ideal for most crochet patterns involving puff stitches, but you may need to adjust depending on your yarn’s thickness. Also, don’t forget basic tools like scissors and a yarn needle for weaving in the ends.
Step-by-Step Guide: How to Crochet a Puff Flower
Now that you have your materials ready, let’s get into the step-by-step process of making a Crochet Puff Flower. This guide is designed for beginners, but even experienced crocheters will appreciate the details provided. Follow these instructions closely, and you’ll have a beautiful flower in no time.
Step 1: Make a Magic Ring
To start, create a magic ring. This is a popular technique in many crochet patterns because it allows you to work in the round without leaving a hole in the center. Hold the yarn in your left hand, loop it around your fingers, and use your crochet hook to pull the working yarn through the loop, forming a circle. Chain one to secure the ring.
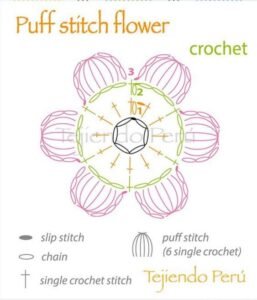
Step 2: Puff Stitch Foundation
Next, work eight puff stitches into the magic ring. To make a puff stitch, yarn over and insert the hook into the ring, yarn over again and pull through, leaving three loops on your hook. Repeat this process twice more, so you have seven loops on the hook. Yarn over and pull through all seven loops, then chain one to close the puff stitch.
Step 3: Closing the Round
Once you’ve made eight puff stitches, pull the tail of the magic ring to close the circle tightly. Slip stitch into the top of the first puff stitch to close the round. You now have the foundation of your Crochet Puff Flower.
Adding Petals to Your Crochet Puff Flower
The next stage involves adding petals around the foundation you just created. These petals will give the flower its characteristic fullness. Let’s explore how to build these petals step by step.
Step 4: Chain Three
After closing the round, chain three. This will serve as the base for the petal clusters that will form the outer layer of the flower. The chain should be loose enough to work the stitches, but not too loose that it becomes floppy.
Step 5: Puff Stitch Clusters
In the space between the first and second puff stitch of the previous round, work three puff stitches, chaining one between each stitch. This creates a cluster that forms the first petal. Continue this process around the flower, placing three puff stitches between each set of stitches from the foundation round.
Step 6: Finishing the Flower
After you’ve worked all your petals, finish the flower by slip stitching into the base of the first petal. At this point, you can fasten off and weave in the ends with a yarn needle. If you’re making multiple flowers for a larger project, this is a good time to prepare your next color or yarn for the next flower.
Uses for Crochet Puff Flowers in Crochet Projects
Once you’ve mastered the Crochet Puff Flower pattern, there are countless ways to incorporate these flowers into your crochet projects. Whether you’re creating large or small pieces, these flowers are a perfect decorative element.
You can create a stunning crochet pattern for a blanket by attaching multiple Puff Flowers in different colors. This adds both texture and visual interest, turning a simple blanket into a work of art. Another option is to attach the flowers to a plain scarf or hat, instantly elevating the design with minimal effort.
Crochet Puff Flowers can also be used as embellishments on bags, purses, and even home décor items like pillows and table runners. The possibilities are endless, and the satisfaction of seeing your project come together with such intricate details is unmatched.
Tips for Perfecting Your Crochet Puff Flowers
As with any crochet pattern, practice makes perfect. Here are a few tips to help you perfect your Crochet Puff Flowers and avoid common pitfalls.
Firstly, consistency is key. When making puff stitches, ensure that the loops are pulled to a uniform height. This will give your flowers a polished, even appearance. Secondly, be mindful of your tension. Too tight, and the flowers will be stiff and difficult to shape; too loose, and the petals may look floppy. Finding the right balance is essential for achieving the best results.
Lastly, don’t be afraid to experiment with different yarns and hook sizes. A bulkier yarn and a larger hook will give you a bigger, fluffier flower, while a smaller hook and finer yarn will create a more delicate result.
Crochet Puff Flowers are an elegant and versatile addition to any crochet project. Their textured appearance adds depth and style, making them perfect for everything from blankets to accessories.
With this step-by-step guide, you now have all the tools you need to create your own beautiful Crochet Puff Flowers. Remember to experiment with different crochet patterns and color combinations to make your projects truly unique. Happy crocheting!