
Crochet is an incredibly versatile craft, allowing you to make anything from cozy blankets to intricate clothing designs.
While following written instructions is helpful, many crocheters prefer using crochet patterns, also known as charts.
These visual guides represent crochet stitches in a clear, easy-to-follow format, making it simpler to create complex designs. In this article, we’ll explore everything you need to know about creating crochet patterns from scratch.
What Are Crochet Patterns?
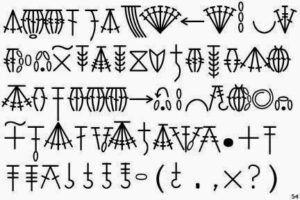
Crochet patterns, also known as crochet charts, are visual representations of crochet stitches. Unlike traditional written instructions, crochet charts allow you to see the design layout, which makes them easier to follow, especially for more complicated projects. Using symbols to represent different stitches, a crochet pattern provides a roadmap for your project.
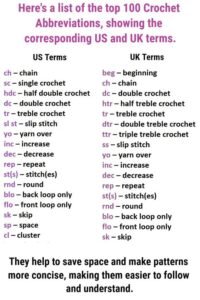
The symbols used in crochet patterns are standardized, meaning that once you’ve learned them, you can read any pattern with ease. Crochet charts are especially helpful for crocheters who are visual learners or for those who prefer a universal guide rather than reading lengthy written instructions.
Crochet patterns also make it easy to spot mistakes early. Since you can see your project’s progress in real-time, it’s simpler to catch any errors before they become a bigger issue. This can save you time and prevent frustration down the road.
Why Use Crochet Patterns Instead of Written Instructions?
While written crochet instructions are the traditional method of explaining crochet designs, crochet patterns offer a much clearer and more visual approach. This method is particularly beneficial when working on complex projects that require precision. Patterns allow you to see each stitch’s placement without needing to decipher long lines of text.
For advanced projects, like lace doilies or multi-color designs, a visual guide is indispensable. Written instructions can sometimes be confusing, and any small misinterpretation may lead to mistakes. Crochet patterns eliminate much of the guesswork and help ensure the end result looks just like the original design.
Additionally, crochet patterns are easier to share across languages. The symbols used are universal, so no translation is required, which makes them more accessible to crocheters around the world. They help bridge communication barriers between crocheters from different cultures.
The Importance of Symbols in Crochet Patterns
Symbols are the cornerstone of crochet patterns. Each stitch, whether it’s a single crochet, double crochet, or slip stitch, is represented by a unique symbol. Learning these symbols is key to understanding and creating your own crochet patterns. It might seem daunting at first, but with some practice, these symbols will become second nature.
Most crochet patterns include a key or legend that explains what each symbol represents. Make sure to familiarize yourself with this key before starting the project. Once you’ve learned the basics, you can easily follow a wide variety of patterns, from beginner to advanced levels.
Moreover, many online resources, such as Pinterest and crochet blogs, provide free guides to crochet symbols. You can even find printable charts to keep on hand while working on your projects. Having these references readily available will make the learning process smoother and more enjoyable.
Step-by-Step Guide: How to Create Your Own Crochet Pattern
Creating your own crochet pattern might sound challenging, but it’s a great way to take your crochet skills to the next level. To get started, choose a simple project, such as a granny square or basic scarf. You’ll need graph paper or a crochet chart app to map out your design.
- Sketch Your Design: Begin by sketching a rough outline of your design on graph paper. This doesn’t need to be detailed but should give you a clear idea of the shape and pattern you want to create. Each square on the graph represents a stitch, and you can fill them in as you go.
- Use Standardized Symbols: Start filling in your graph with the appropriate symbols for each stitch. For example, a small “x” usually represents a single crochet, while a long vertical line with a small horizontal line represents a double crochet. Stick to standardized symbols so your pattern can be easily read by other crocheters.
- Test Your Pattern: Once your chart is complete, it’s essential to test your pattern. Follow your own crochet pattern step-by-step to ensure that it produces the intended result. Adjust any errors in the chart, and don’t hesitate to make refinements if necessary.

Essential Crochet Stitches for Creating Patterns
Before creating complex crochet patterns, it’s essential to master a few basic stitches. These fundamental stitches form the building blocks of most crochet projects and will appear frequently in your charts. Here are three key stitches you need to know:
- Single Crochet (sc): This is one of the simplest and most commonly used stitches. It’s represented by an “x” or plus sign in patterns. To perform this stitch, insert your hook into the next stitch, yarn over, pull through, and yarn over again to complete the stitch.
- Double Crochet (dc): A taller stitch, the double crochet is represented by a vertical line with a horizontal dash. To create this stitch, yarn over before inserting your hook into the next stitch. Yarn over again, pull through two loops, and yarn over one last time to complete.
- Slip Stitch (sl st): The slip stitch is used to join rounds or move your hook across stitches without adding height. It’s often represented by a small dot in crochet patterns. To perform a slip stitch, insert your hook into the stitch, yarn over, and pull through both loops at once.
Adding Complexity to Your Crochet Patterns
Once you’ve mastered basic stitches, you can begin adding more complexity to your crochet patterns. Complex patterns often include a combination of different stitches to create texture and depth. Here’s how you can gradually introduce complexity to your crochet charts:
- Combine Stitches: A simple way to add complexity to your pattern is to combine stitches. For example, alternate between single crochet and double crochet in a repeating pattern. This will add visual interest and create a unique texture in your project.
- Introduce Color Changes: Adding color changes to your crochet pattern can significantly enhance the final product. You can include color changes in your chart by marking sections in different colors or shading the areas where the new color will be used.
- Incorporate Special Stitches: Once you’re comfortable with the basics, try incorporating special stitches such as bobbles, popcorns, or front post stitches. These stitches will be represented by more complex symbols in your crochet chart, but they will add dimension and texture to your design.
Final Thoughts: Benefits of Designing Your Own Crochet Patterns
Designing your own crochet patterns is not only a fun and creative process but also an excellent way to challenge yourself as a crocheter. Once you’ve learned how to read crochet patterns and understand the standard symbols, the possibilities are endless. You can create customized projects, whether it’s a one-of-a-kind blanket, scarf, or intricate doily.
Creating your own crochet patterns also gives you a deeper appreciation for the craft. You’ll gain a better understanding of how stitches come together to form different shapes and designs, which will improve your overall crochet skills.
So, don’t hesitate to give it a try. Start small with simple designs, and as you become more comfortable, challenge yourself with more intricate projects. Over time, you’ll be able to create stunning, unique crochet items that reflect your personal style.
CROCHET SYMBOL CHARTS EXPLAINED
By following this guide and mastering the basics, you’ll be well on your way to designing crochet patterns that are not only functional but also works of art.