
Quilting is a beloved craft that allows for creativity and skill to shine through in every stitch.
Among the most versatile quilt patterns, String Quilt Blocks stand out as a fun, scrappy project that makes use of leftover fabric strips. In this tutorial, we’ll walk through the process of making a String Quilt Block, covering everything from fabric selection to assembly.
This guide will ensure that your next quilt project turns out stunning and unique.
What are String Quilt Blocks?
String Quilt Blocks are a type of quilt pattern that utilizes narrow strips, or “strings,” of fabric to create a patchwork design. These strips are sewn onto a base fabric, usually muslin or paper, to form a block. The result is a vibrant and often colorful quilt pattern that has a scrappy, vintage charm.
One of the best things about String Quilt Blocks is that they are perfect for using up fabric scraps from previous projects. Instead of throwing away those small pieces of fabric, you can repurpose them into something beautiful. This makes string quilts not only eco-friendly but also cost-effective.
Moreover, string quilts are ideal for quilters of all skill levels. Whether you are a beginner or have been quilting for years, the technique is simple to learn, and there’s plenty of room to get creative with color and fabric choices.
Materials Needed for String Quilt Blocks
Before starting your string quilt project, gather all the necessary materials. While string quilts are primarily made from fabric scraps, there are a few essential items you’ll need to complete the project. Here’s a list of materials you should have on hand:
- Fabric strips (strings): These should be cut into narrow strips, usually between 1-2 inches wide. The lengths can vary, depending on the size of your block.
- Foundation fabric: This can be muslin, batting, or even paper. The foundation provides stability as you sew the strings together.
- Thread: Use a neutral-colored thread to ensure that it doesn’t distract from the fabric strips.
Having these materials ready will streamline your quilting process. You can also plan to experiment with different color palettes and fabric textures for added creativity. Keep in mind that the foundation fabric will not be visible in the final quilt, so feel free to use older or less decorative materials.
Preparing the Fabric Strips
The first step in creating your string quilt block is to prepare your fabric strips. Since the design is scrappy and eclectic, there’s no strict rule for the strips you use, but some guidelines will help you achieve a balanced and harmonious look.
Start by gathering fabric scraps from previous projects. These can be solids, prints, or a mix of both. The variety of fabrics is what makes string quilts so visually appealing. You can cut your fabric into strips that are between 1-2 inches wide, making sure the strips are long enough to cover the foundation block.
If you’re aiming for a more uniform look, you can sort your strips by color or print style before sewing. On the other hand, if you prefer a more random design, simply pull from your pile of scraps as you go. Either method will result in a beautiful quilt pattern with lots of visual interest.
Sewing the Strings onto the Foundation
Once your fabric strips are prepared, it’s time to sew them onto your foundation fabric. This step is relatively simple, but it’s important to take your time to ensure that each strip is sewn straight and securely.
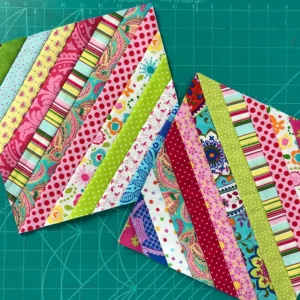
Start by cutting your foundation fabric into squares. A common size is 8.5 inches by 8.5 inches, but you can adjust the size depending on the overall quilt size you want. Lay your first strip diagonally across the foundation square, right side up, and sew it down with a 1/4-inch seam allowance.
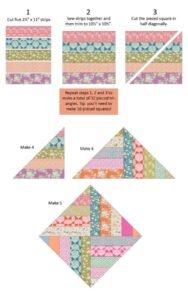
Continue adding strips, one by one, making sure to overlap slightly as you sew. Press the seams flat as you go to avoid bulk. By sewing the strips onto the foundation fabric, you create a strong, stable block that is easy to work with as you assemble the final quilt.
Trimming and Squaring the Block
After sewing all of your fabric strips onto the foundation, your block will likely have uneven edges. Don’t worry! This is a normal part of the process, and trimming the block will give it a clean, professional finish.
Use a rotary cutter and ruler to trim the excess fabric from the edges of the block. Be sure to square the block to your desired size. For example, if your foundation square started as 8.5 inches, you can trim it down to a perfect 8-inch block, accounting for the seam allowance.
At this point, you can admire your finished string quilt block. If you are making a larger quilt, repeat this process until you have enough blocks to complete your quilt top. The number of blocks you need will depend on the size of the quilt you’re aiming to create.
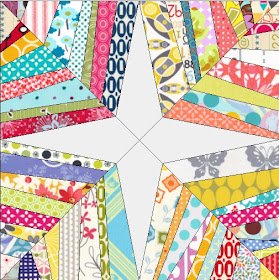
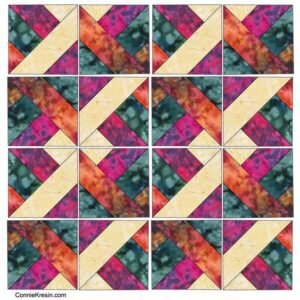
Assembling the Quilt Top
Now that you have completed your string quilt blocks, it’s time to assemble the quilt top. This is where the real magic happens, as you start to see your individual blocks come together to form a cohesive design.
Lay out your blocks on a large, flat surface, such as a bed or floor. Play around with the arrangement to see how the colors and patterns interact. You may choose to arrange the blocks randomly for a more scrappy look, or you can group similar colors together for a more organized design. Once you’re happy with the layout, begin sewing the blocks together, row by row.
After sewing all the rows together, press the seams to ensure the quilt top lays flat. Now, your quilt top is ready for batting, backing, and quilting.
Quilting and Binding
The final steps in completing your string quilt are quilting and binding. Quilting refers to the process of stitching all the layers of the quilt together: the quilt top, batting, and backing. You can choose to quilt your string quilt in a variety of patterns, from simple straight lines to more intricate free-motion quilting designs.

Once the quilting is complete, it’s time to add the binding. The binding is the fabric strip that covers the raw edges of the quilt. Cut your binding strips, sew them together, and then attach them to the edges of your quilt using a sewing machine or by hand.
After the binding is attached, give your quilt a final press, and you’re done! Your beautiful string quilt is now complete, and ready to be used, gifted, or displayed proudly.
Final Thoughts on String Quilt Blocks
String quilt blocks are a fantastic way to make use of fabric scraps and create something both beautiful and practical. Whether you’re new to quilting or a seasoned pro, this quilt pattern offers plenty of opportunities to get creative and experiment with different colors and textures.
By following this step-by-step tutorial, you’ll be able to craft your very own string quilt with ease. The best part? Each string quilt block is as unique as the fabrics you choose, ensuring that no two quilts are ever the same. Happy quilting!