
Quilting is an age-old craft that brings joy to countless artisans. For those looking to challenge themselves with a unique project, the Woven – A 3-Dimensional Quilt Pattern is a stunning design that offers visual intrigue and depth.
In this tutorial, we’ll walk you through how to create this quilt pattern, covering everything from fabric cutting to assembling the final quilt.
If you love quilt patterns that push the boundaries of traditional quilting, this guide is for you.
What is the Woven – A 3-Dimensional Quilt Pattern?
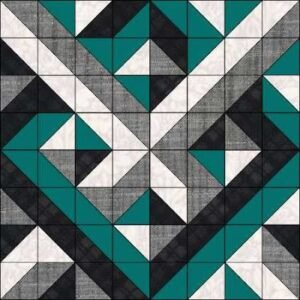
The Woven – A 3-Dimensional Quilt Pattern is designed to create the illusion of a woven texture, bringing depth and dimension to your quilt. Unlike traditional flat quilt patterns, this design uses color, placement, and fabric cutting techniques to create a quilt that seems to pop right off the fabric.
This quilt pattern involves the strategic placement of fabric strips, sewn together to resemble a woven texture. The result is a visually striking quilt that gives the appearance of layers, despite being entirely flat. Whether you’re a beginner looking for a challenge or an experienced quilter searching for your next project, this pattern offers something for everyone.
The illusion of 3D is achieved through a careful combination of light, medium, and dark fabrics. Choosing the right fabric tones is essential for making the quilt look as though it’s woven with layers of fabric intertwining across its surface.
Choosing the Right Fabric for Your 3D Quilt
To achieve the full effect of the Woven – A 3-Dimensional Quilt Pattern, selecting the right fabric is crucial. You’ll want to pick fabrics that offer a strong contrast between light, medium, and dark shades. This contrast will create the 3D illusion, so be sure to take your time when selecting your materials.
For a classic 3D woven look, choose solids or subtle tone-on-tone fabrics. Avoid patterns that may distract from the illusion. Think in terms of light, medium, and dark tones—each shade will play a specific role in how the quilt comes together visually.
In terms of fabric amounts, you’ll need to ensure that you have enough for each tone. A safe rule of thumb is to purchase ½ yard each of light, medium, and dark fabrics for a small quilt. For larger quilts, you may want to increase this to 1 yard of each fabric. Remember to always prewash your fabrics before cutting to prevent shrinkage later.
Cutting the Fabric Strips for a 3D Quilt Pattern
The beauty of the Woven – A 3-Dimensional Quilt Pattern lies in its precise fabric cutting and arrangement. You’ll begin by cutting strips of fabric, which will eventually be woven together through sewing. Accurate cutting is essential for ensuring that the quilt pattern comes together seamlessly.
For a small quilt measuring about 40 inches square, cut the following fabric strips:
- Light fabric: Cut 10 strips measuring 2.5 inches by WOF (width of fabric).
- Medium fabric: Cut 10 strips measuring 2.5 inches by WOF.
- Dark fabric: Cut 10 strips measuring 2.5 inches by WOF.
These strips will later be sewn together in alternating patterns to create the woven effect. If you’re aiming for a larger quilt, simply increase the number of strips proportionally. Always use a rotary cutter, ruler, and cutting mat for clean, straight edges.
Sewing the Quilt Strips Together
Now that you have your fabric strips, it’s time to sew them together. Start by laying out your strips in the order you want to sew them. Typically, you’ll alternate between light, medium, and dark strips to achieve the woven effect. Keep in mind that the sequence of the fabric is crucial for creating the 3D illusion.
When you’re ready to sew, place the first two strips right sides together and sew along the long edge using a ¼ inch seam allowance. Press the seams open to reduce bulk. Continue adding strips, alternating colors as you go, until you’ve sewn together all your strips for the first row.
Once the first row is complete, you’ll repeat the process to create multiple rows. Each row should follow the same alternating pattern of light, medium, and dark fabrics. Be sure to maintain consistent seam allowances to ensure the rows line up evenly when it’s time to piece the quilt top together.
Creating the 3D Effect with Block Layout
After you’ve sewn all the strips together into rows, the next step is arranging the rows to enhance the 3D woven look. The secret to the dimensional effect lies in how you position and sew your rows. Begin by staggering each row, moving it slightly to the left or right as you lay them out.
This staggered layout will mimic the look of interwoven fabric, creating the illusion that the quilt pattern is three-dimensional. Once you’re satisfied with the layout, sew the rows together using a ¼ inch seam allowance, and press the seams flat.
Be mindful of fabric alignment at this stage. The slight shifts in row placement are key to making the 3D effect believable. With patience and precision, your quilt will start to take on its dimensional form.
Assembling the Quilt Top
With the rows assembled, it’s time to create the quilt top. Begin by carefully pinning and aligning the rows before sewing them together. Accuracy in this step is essential, as small misalignments can distort the 3D illusion. Use plenty of pins to keep the fabric strips in place while you sew.
Start sewing the rows together from one side of the quilt top to the other, maintaining the staggered layout you’ve created. After each seam, press the fabric to keep the quilt top flat and avoid wrinkles or puckers. This will help ensure your finished quilt has a smooth surface.
Once all the rows are sewn together, your quilt top is complete. You’ll be able to see the woven 3D effect more clearly now, and the next step will be preparing the quilt for backing, batting, and binding.
Finishing the 3D Quilt
To finish your Woven – A 3-Dimensional Quilt Pattern, you’ll need to layer the quilt top, batting, and backing fabric. Begin by laying out your quilt backing on a flat surface, then layer the batting on top, followed by the quilt top. Smooth out any wrinkles and pin the layers together using quilting pins.
Quilt as desired. For this pattern, simple straight-line quilting works beautifully, as it emphasizes the woven design without distracting from it. You could also try stitch-in-the-ditch quilting, where you sew along the seams to maintain the clean, dimensional appearance of the quilt.
Finally, trim any excess fabric and attach the binding to finish the edges. Once the binding is sewn on, your Woven – A 3-Dimensional Quilt is complete and ready to display. You’ll have a beautiful, eye-catching quilt that appears to leap off the fabric.
Tips for Quilters: Perfecting Your 3D Quilt
The Woven – A 3-Dimensional Quilt Pattern may seem intimidating at first, but with careful planning and execution, it can be a rewarding project. One of the most important tips to remember is to take your time during the cutting and sewing phases. Precision is key to ensuring that the woven pattern looks smooth and dimensional.
Another helpful tip is to always press your seams open to reduce bulk. This will make it easier to sew the strips together and ensure that the quilt lies flat. Using a seam roller or iron throughout the sewing process will help achieve a professional finish.
Lastly, don’t be afraid to experiment with fabric choices. While the traditional 3D woven quilt uses light, medium, and dark solids, you could try incorporating subtle patterns or even metallic fabrics for a more modern twist on this classic design.