
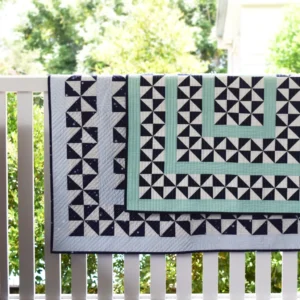
The Pinwheel Block is a timeless and versatile design that adds a playful, yet sophisticated touch to any quilt. Known for its spinning motion, the block is made up of simple triangles arranged to form a windmill pattern.
This tutorial will guide you through the process of creating a Pinwheel Block, complete with fabric cuts, measurements, and sewing techniques.
Whether you’re a beginner or experienced quilter, this step-by-step guide is designed to help you achieve precision and create a beautiful quilt block.
What is a Pinwheel Block in Quilting?
The Pinwheel Block is a fundamental design in the world of quilting. It’s created by arranging half-square triangles (HSTs) in such a way that they form a spinning pinwheel. This classic pattern is popular among quilters because it offers a dynamic design that’s visually striking yet simple to construct.
The beauty of the Pinwheel Block lies in its versatility. By changing the colors and fabrics, you can create a completely different effect, from playful and whimsical to elegant and traditional. Whether you’re making a single quilt block for a sampler quilt or incorporating multiple Pinwheel Blocks into a full quilt, this pattern never disappoints. It’s perfect for anyone looking to add movement and interest to their quilt patterns.
For those who are new to quilting, mastering the Pinwheel Block is an excellent way to get comfortable with basic quilting techniques like cutting, piecing, and pressing. It also helps you practice working with triangles and achieving perfect points, both essential skills for more advanced quilt patterns.
Fabric Requirements and Cutting Instructions
To begin, you’ll need to select your fabrics. The Pinwheel Block works best when there is a clear contrast between the two fabrics used for the triangles. This will help define the pinwheel shape and make the block stand out. For this tutorial, we’ll use two contrasting fabrics: one light and one dark. You will need:
- Light Fabric: 5-inch square
- Dark Fabric: 5-inch square
Once you’ve chosen your fabrics, it’s time to cut them. For one Pinwheel Block, cut two 5-inch squares of each fabric. If you’re working on a larger quilt, you can multiply the fabric cuts by the number of blocks you intend to make. Precision is key here, so make sure to use a rotary cutter and quilting ruler to get the most accurate cuts.
Next, we’ll turn these squares into half-square triangles (HSTs). The process is simple: place one light and one dark square right sides together, then draw a diagonal line from one corner to the opposite corner. This line will serve as a guide for sewing.
Creating Half-Square Triangles (HSTs)
Now that you’ve marked your squares, it’s time to sew. Stitch a ¼-inch seam on both sides of the diagonal line you drew earlier. Use a consistent seam allowance to ensure your HSTs come out even. After sewing, use a rotary cutter or sharp scissors to cut along the drawn line, separating the two halves.
Once cut, you’ll have two triangle pieces that form the basis of your Pinwheel Block. Press the seams open or toward the darker fabric, depending on your preference. Using a hot iron with steam will help set the seams and flatten the fabric for easy assembly. Make sure all your pieces are squared up to the correct size, typically 4½ inches.
Repeat this process with the remaining light and dark squares until you have four HSTs. Each HST will represent one-quarter of the finished Pinwheel Block, and when sewn together, they will form the spinning pinwheel pattern that this block is famous for.
Assembling the Pinwheel Block
To assemble your Pinwheel Block, lay out your four HSTs in a 2×2 grid, with the light and dark triangles alternating to create the pinwheel effect. Make sure the seams align properly to form the illusion of spinning motion. Take a moment to check the orientation of each HST before sewing to avoid any mistakes.
Begin by sewing the top two HSTs together, using a ¼-inch seam allowance. Do the same with the bottom two HSTs. After pressing the seams, sew the top and bottom rows together. When doing this, be mindful of where the seams meet in the center of the block—this is where accuracy really matters. A well-matched center will make your Pinwheel Block look crisp and professional.
After the rows are joined, press the block flat using a hot iron. You now have a completed Pinwheel Block, which should measure 8½ inches, including seam allowances. Once it’s sewn into a quilt, it will finish at 8 inches.
Tips for Perfect Pinwheel Blocks
Achieving perfect points in your Pinwheel Block can be tricky, but there are a few techniques to help you along the way. One of the most important is to always use a consistent ¼-inch seam allowance. Many quilting machines come with a special foot for this, but you can also use a seam guide to ensure accuracy.
Another tip is to press your seams carefully. Some quilters prefer pressing seams open for less bulk, while others press them to one side. Experiment with both methods to see which works best for you, but always press the seams in the same direction for consistency.
Finally, trimming your HSTs to the correct size is crucial. After you’ve sewn and pressed your triangles, use a ruler to trim them down to the desired size. This will ensure that your Pinwheel Block pieces fit together perfectly, without any distortion or uneven edges.
Incorporating Pinwheel Blocks into Your Quilt
Now that you’ve mastered the Pinwheel Block, you can start incorporating it into a full quilt. One option is to create a quilt using only Pinwheel Blocks in different colors and fabrics. This creates a cohesive yet dynamic design, as each block spins in its own direction, creating movement across the quilt.
Alternatively, you can use Pinwheel Blocks as accents or focal points within a larger quilt pattern. For example, you could alternate Pinwheel Blocks with other quilt blocks like the Nine-Patch or Flying Geese to create an interesting layout. The Pinwheel Block’s versatility makes it easy to combine with other quilt patterns.
You can also experiment with scale. Try making larger Pinwheel Blocks for a bold statement or smaller ones for a more intricate look. Mixing block sizes in one quilt adds visual interest and allows for creative layouts.
The Pinwheel Block is a fantastic addition to any quilter’s repertoire. Whether you’re creating a whole quilt from these blocks or using them as an accent in a larger pattern, the Pinwheel Block adds energy and movement to your design. By following the steps in this tutorial, you can achieve precise, professional-looking blocks that will elevate your quilting projects.
Remember to play around with different fabrics and colors to create unique and personalized quilts. And don’t forget to have fun—after all, quilting is all about expressing your creativity and enjoying the process! Happy quilting!