
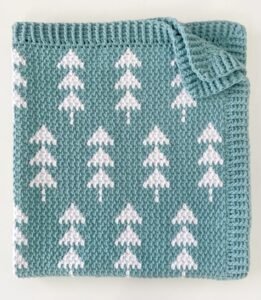
Are you looking for a crochet pattern to create a stunning and unique baby blanket? In this blog post, we will guide you through a Trees Baby Blanket Free Crochet Pattern that’s perfect for any little one.
This pattern is ideal for both beginner and intermediate crocheters, as it uses basic stitches to create an intricate tree design.
Follow along as we explain the steps to create this lovely blanket, complete with stitch counts, detailed instructions, and tips to help you perfect your project.
Materials Needed for the Trees Baby Blanket Free Crochet Pattern
Before diving into the crochet pattern, it’s essential to gather all the materials you’ll need. For this baby blanket crochet pattern, you’ll want to select soft, baby-friendly yarn, as this will ensure comfort and durability for little ones. Opt for a medium-weight yarn that’s easy to wash and maintain.
You’ll also need a 5mm crochet hook, which is the recommended size for this blanket. If you crochet tightly or loosely, you may need to adjust your hook size slightly to match the gauge. Having the right tools, including stitch markers and a yarn needle, will make following this free crochet pattern much smoother.
Lastly, make sure you have a good pair of scissors on hand to cut your yarn at the end. The finishing touches of weaving in ends and blocking the blanket will require attention to detail, so prepare to set aside time for these final steps.
Crochet Stitches and Abbreviations to Know
To begin the Trees Baby Blanket pattern, it’s important to familiarize yourself with a few basic crochet stitches and abbreviations. This pattern primarily uses double crochet (dc), single crochet (sc), and chain stitches (ch), making it easy to follow for most crocheters.
Here’s a quick overview of the key stitches:
- Ch (Chain): This is the foundation of the blanket, used at the beginning of rows and for spacing between tree motifs.
- Sc (Single Crochet): A simple stitch that creates a dense and sturdy fabric. It’s used to outline the tree designs.
- Dc (Double Crochet): This is the main stitch for the tree pattern. It creates height and texture, forming the tree branches and trunk.
Learning these stitches will help you complete the pattern with confidence. You might also want to practice each stitch on a small swatch before starting the full blanket.
Step-by-Step Instructions: Starting Your Trees Baby Blanket
To start the Trees Baby Blanket, chain a foundation row of 120 stitches. This will give you a blanket that is approximately 36 inches wide, making it the perfect size for a baby. If you’d like a larger blanket, you can adjust the chain in multiples of 15 to maintain the pattern’s symmetry.
Once you have your foundation chain, begin the first row by working a single crochet in the second chain from the hook. Continue with a single crochet across the entire row. This will give you a solid base to start building your tree design.
For the next row, chain two and turn your work. Now, work double crochets across the row. This will form the first part of your blanket’s body and prepare the foundation for the tree motifs. Continue this pattern for the next few rows, alternating between single crochet and double crochet rows to create a sturdy foundation.
Creating the Tree Design in the Baby Blanket
After completing the base of the blanket, it’s time to begin the tree motif. This is the most exciting part of the pattern, as it brings the blanket to life. To create the tree, you’ll use a combination of double crochet and chain stitches, strategically placed to form the trunk and branches.
Start by chaining 10 stitches to create the trunk. Skip five stitches in the row and then work double crochets into the next ten stitches. This forms the base of your first tree. Continue with chain stitches for spacing and then work double crochets into the next section to form the branches. Repeat this pattern across the row, spacing out the trees as you go.
Once you have completed one row of trees, work a row of single crochet across the entire blanket to secure the design. This will make your trees pop and add texture to the blanket.
Adding Texture with Bobble Stitches
For an extra touch of texture, consider incorporating bobble stitches into your tree design. These stitches create a raised, 3D effect that makes the trees stand out even more. Bobble stitches are created by working multiple incomplete double crochets into the same stitch and then pulling through all the loops on your hook at once.
To add a bobble stitch at the top of each tree, simply replace a few of the double crochets in the branch section with bobble stitches. This will give the appearance of full, leafy treetops and add visual interest to the blanket.
Adding bobble stitches is entirely optional, but it’s a great way to personalize the Trees Baby Blanket. If you prefer a simpler look, you can skip this step and stick with basic double crochets.
Finishing Touches: Bordering and Blocking the Blanket
Once you have completed the body of the blanket and are satisfied with your tree designs, it’s time to add a border. A simple single crochet border works well for this pattern, as it complements the tree motif without overpowering it. To create the border, work single crochets evenly around the entire edge of the blanket.
Be sure to place two or three single crochets in each corner to prevent the border from curling. You can also experiment with different border styles, such as picot stitches or a scalloped edge, if you want to add extra flair.
Finally, block your blanket to ensure it lays flat and the tree designs are well-defined. Wet blocking or steam blocking works best for this type of blanket. Once blocked, weave in any remaining yarn ends, and your Trees Baby Blanket is complete!
Tips for Customizing Your Trees Baby Blanket
One of the best things about crochet patterns is their flexibility. You can easily customize this Trees Baby Blanket Free Crochet Pattern to suit your preferences or the recipient’s needs. For example, you can use different yarn colors to create a more vibrant look, or stick with a neutral palette for a classic appearance.
You can also adjust the size of the blanket by adding or subtracting rows or stitches. If you want a larger blanket, simply repeat the tree motif as many times as necessary to achieve the desired length.
Another idea is to incorporate different types of stitches into the blanket to create texture and dimension. For example, you could alternate rows of bobble stitches with rows of double crochet for a truly unique design.
Conclusion: A Versatile and Timeless Crochet Pattern
The Trees Baby Blanket is a versatile and timeless crochet pattern that’s sure to impress. Whether you’re making it as a gift for a baby shower or keeping it for yourself, this blanket will be cherished for years to come. Its intricate tree design, combined with the simplicity of basic stitches, makes it a great project for crocheters of all levels.
By following the step-by-step instructions and adding your own personal touches, you can create a truly one-of-a-kind blanket. So grab your crochet hook, choose your favorite yarn, and start working on your very own Trees Baby Blanket today!