
Crocheting is an art form that allows you to create beautiful and functional pieces, and one of the most delightful projects you can tackle is the Phoenix Crochet Ear Warmer.
This versatile and stylish accessory is perfect for keeping warm during chilly weather.
In this comprehensive guide, we’ll walk you through the entire process of creating a Phoenix Crochet Ear Warmer, complete with step-by-step instructions, tips, and tricks to ensure your project turns out beautifully.
Understanding the Phoenix Crochet Ear Warmer
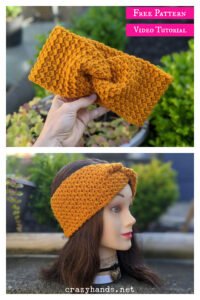
The Phoenix Crochet Ear Warmer is not just a practical item but also a fashionable one. It features a unique stitch pattern that resembles the fiery plumes of a phoenix, hence the name. This ear warmer is designed to be both snug and stylish, providing warmth without sacrificing style.
The pattern for this ear warmer involves a series of stitches that create a textured, cozy fabric. The choice of yarn and the specific crochet stitches used are crucial to achieving the desired look and feel. In this guide, we’ll break down each component of the pattern to help you create your own Phoenix Crochet Ear Warmer with ease.
Understanding the materials and stitches involved is key to a successful project. Make sure you have all the necessary tools and yarn before starting. We’ll also provide tips on selecting the best yarn and crochet hook to ensure your ear warmer turns out just right.
Materials Required
To start your Phoenix Crochet Ear Warmer, you’ll need a few essential materials. Gather the following items before you begin:
- Yarn: Choose a medium-weight yarn (worsted weight) in your preferred color. For this pattern, you’ll need approximately 150 yards of yarn. A soft, warm yarn such as acrylic or a wool blend works best for this project.
- Crochet Hook: Use a 5.5mm (I-9) crochet hook for this pattern. This size ensures the ear warmer has the right amount of stretch and snug fit.
- Tapestry Needle: You’ll need a tapestry needle for weaving in ends and sewing any seams. This tool helps you finish your project neatly.
- Scissors: Sharp scissors are essential for cutting yarn cleanly. Keep them handy to trim any excess yarn as you work.
Make sure to choose yarn that complements your style and preferences. The texture and warmth of the yarn will affect the final look and comfort of your ear warmer. If you’re new to crocheting, starting with a solid, medium-weight yarn is recommended.
Crochet Stitches and Techniques
The Phoenix Crochet Ear Warmer pattern uses a combination of basic and intermediate crochet stitches to create its distinctive look. Here are the main stitches and techniques you’ll need to know:
- Chain Stitch (ch): This is the foundational stitch for most crochet projects. It’s used to create the initial row of stitches.
- Half Double Crochet (hdc): This stitch is taller than a single crochet but shorter than a double crochet. It provides a nice texture and coverage for the ear warmer.
- Front Post Double Crochet (fpdc): This stitch is worked around the post of a double crochet stitch from the previous row, creating a raised texture. It’s key to achieving the phoenix-inspired design.
- Slip Stitch (sl st): This stitch is used to join rounds and finish off rows. It creates a seamless look and helps in joining the ends of the ear warmer.
Familiarize yourself with these stitches before starting the pattern. Practice them individually if you’re not confident, as they form the basis of the Phoenix Crochet Ear Warmer’s texture.
Step-by-Step Instructions
Now that you have your materials and understand the necessary stitches, let’s dive into the step-by-step instructions for creating your Phoenix Crochet Ear Warmer.
Step 1: Foundation Chain Start by making a foundation chain of 60 stitches. This chain will determine the width of your ear warmer. Ensure that the chain is not twisted and is the correct length before moving on to the next step.
Step 2: First Row In the first row, work half double crochets into each chain stitch. This row forms the base of your ear warmer. At the end of the row, join with a slip stitch to the first half double crochet to form a circle.
Step 3: Texture Rows For the next rows, alternate between front post double crochet and half double crochet. Work 2 rows of front post double crochet followed by 2 rows of half double crochet. This pattern creates a textured, phoenix-like appearance. Repeat these rows until the ear warmer reaches your desired length, typically about 7 to 8 inches.
Step 4: Finishing Once you have reached the desired length, fasten off your yarn and weave in the ends with a tapestry needle. If you need to join ends, use a slip stitch to secure them together, ensuring a seamless finish.
Tips and Tricks
Creating the Phoenix Crochet Ear Warmer can be a fun and rewarding experience. Here are some tips to help you achieve the best results:
- Gauge: Check your gauge before starting the project. Crochet gauge affects the fit and size of your finished ear warmer. Adjust your hook size if necessary to match the pattern’s gauge.
- Yarn Substitution: If you choose to use a different yarn weight, adjust the number of foundation chains and rows accordingly. This ensures your ear warmer fits properly and has the right texture.
- Customizing: Feel free to customize your ear warmer by adding buttons, embellishments, or using variegated yarn for a unique look. Experiment with different colors and textures to make your project stand out.
By following these tips and taking your time, you’ll create a Phoenix Crochet Ear Warmer that’s both beautiful and functional. Enjoy the process and take pride in your handcrafted accessory.
The Phoenix Crochet Ear Warmer is a fantastic project for both beginners and experienced crocheters. With its unique stitch pattern and cozy design, it’s sure to become a favorite accessory during the colder months. By following this guide, you can create your own Phoenix Crochet Ear Warmer with confidence and skill.
Whether you’re making it for yourself or as a gift, this pattern offers a wonderful opportunity to showcase your crochet skills. Happy crocheting, and may your Phoenix Crochet Ear Warmer keep you warm and stylish all season long!