
A Step-by-Step Guide to Master This Beautiful Crochet Pattern
Crochet patterns are a great way to explore your creativity and expand your skills. One of the most beautiful and intricate stitches that can take your crochet work to the next level is the Catherine’s Wheel stitch.
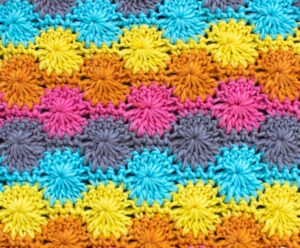
This stitch creates a stunning textured pattern that resembles a series of circular wheels, making it ideal for blankets, scarves, and other large projects.
In this tutorial, we’ll walk you through the steps of creating the Catherine’s Wheel stitch, provide helpful tips, and explain how to perfect your technique.
What is the Catherine’s Wheel Stitch?
The Catherine’s Wheel stitch is a type of crochet pattern that forms a circular, wheel-like design. The stitch is created by combining clusters of double crochets with chain stitches, which create the raised, rounded appearance. While it may seem intricate at first, once you understand the repeat pattern, the Catherine’s Wheel becomes quite manageable, even for intermediate crocheters.
This stitch is typically worked in rows, with alternating sections of shells and half shells to give the finished project its distinctive look. Although the Catherine’s Wheel stitch works best with thicker yarn, it can be adapted to almost any crochet project. Its visual impact and durability make it an excellent choice for blankets, throws, and even bags.
If you’re looking for a crochet pattern that stands out and offers a bit of a challenge, the Catherine’s Wheel stitch is perfect. It’s an excellent stitch for intermediate crocheters who want to try something new or improve their skills.
Materials You’ll Need
Before diving into the tutorial, make sure you have the following materials ready. The Catherine’s Wheel stitch works well with most types of yarn, but it’s often used with worsted weight yarn for a more textured finish. Choose your materials carefully to get the best results from this stunning crochet pattern.
Yarn: A worsted weight or medium-weight yarn works best for beginners who are learning this crochet pattern. If you want to add an extra layer of texture or dimension, you can also try using a chunky yarn.
Crochet Hook: For worsted weight yarn, a 5.5mm or 6mm crochet hook is ideal. Make sure that your hook size matches your yarn weight to ensure your stitches are even.
Other Tools: You’ll also need a pair of scissors and a tapestry needle for weaving in the ends when you’re done. If you like to use stitch markers, they can be helpful when working through the rows of this crochet pattern.
Abbreviations and Terms
Before we begin, let’s go over some of the abbreviations and terms you’ll encounter in this tutorial. If you’re familiar with standard crochet patterns, these should be easy to follow. For beginners, make sure you understand these before starting:
- Ch: Chain
- Dc: Double crochet
- Sc: Single crochet
- St(s): Stitch(es)
- Sk: Skip
- Rep: Repeat
Understanding these abbreviations will help you follow along with the step-by-step instructions and make your Catherine’s Wheel stitch look perfect.
Step-by-Step Catherine’s Wheel Stitch Tutorial
Let’s start creating this beautiful crochet pattern step by step. Once you get the hang of it, you’ll find the Catherine’s Wheel stitch not only visually appealing but also relaxing to work on. Here’s how to make the Catherine’s Wheel Stitch:
- Foundation Chain: Start by chaining a multiple of 10 plus 6. For instance, if you want a small swatch, chain 26 (20 + 6). This number ensures the wheels align properly across your work.
- Row 1: Start by working 1 single crochet (sc) in the second chain from the hook. Continue to work one single crochet in each chain across the row. When you reach the end, chain 3 and turn your work.
- Row 2: In this row, you’ll start building the “wheels.” Skip the next 3 stitches, and in the 4th stitch, work 7 double crochets (dc) all in the same stitch. Skip the next 3 stitches and single crochet in the next stitch. Repeat this pattern across the row. When you reach the end, chain 3 and turn.
Mastering the Repeat Pattern
Now that you’ve established the base, the next rows will form the repeated pattern that creates the wheel effect. Mastering these rows is key to creating an even, beautiful Catherine’s Wheel stitch.
- Row 3: Chain 3 and turn your work. Skip the first double crochet and work 1 double crochet into the next 3 stitches. Then, work 7 single crochets into the middle stitch of the previous row’s shell. Skip 3 stitches, then work 1 double crochet into each of the next 3 stitches. Repeat this pattern across the row.
- Row 4: Chain 1 and turn your work. Work 1 single crochet into the first stitch, then skip 3 stitches. In the next stitch, work 7 double crochets, forming another shell. Skip 3 stitches and work 1 single crochet into the next stitch. Repeat this across the row.
- Row 5 and Beyond: Once you’ve established the wheel pattern, repeat rows 3 and 4 to continue growing your project. Each row alternates between the shell rows and single crochet rows, which helps the wheels form in a neat, organized pattern.
Tips for Perfecting Your Catherine’s Wheel Stitch
The Catherine’s Wheel stitch is not difficult once you get the rhythm of the pattern, but there are a few things to keep in mind to ensure your crochet work comes out looking even and professional. Follow these tips to improve your results.
Keep Your Tension Consistent: One of the most important aspects of working with crochet patterns like the Catherine’s Wheel is maintaining even tension. If your tension changes from one row to the next, the wheels may appear uneven or bunched up. Pay attention to how tightly or loosely you are holding the yarn, and adjust as needed.
Practice Counting Your Stitches: The Catherine’s Wheel stitch relies heavily on counting stitches. Make sure that you have the correct number of stitches in each row. You can use stitch markers to mark the beginning and end of each shell if you find it difficult to keep track.
Use a Larger Hook for a Looser Fabric: If you prefer a looser, more open look for your Catherine’s Wheel stitch, consider using a crochet hook that is one size larger than the recommended hook size for your yarn. This will create larger, more defined wheels and give your project a more delicate appearance.
Projects You Can Make with Catherine’s Wheel Stitch
Once you’ve mastered the Catherine’s Wheel stitch, the possibilities are endless. This crochet pattern is perfect for a variety of projects, particularly those that benefit from added texture and visual interest. Here are a few ideas to get you started.
Blankets and Throws: The Catherine’s Wheel stitch works beautifully for blankets and throws. The thick, textured fabric created by this stitch makes it perfect for cozy, warm blankets that are both functional and visually stunning.
Scarves and Cowls: If you’re looking for a smaller project, consider making a scarf or cowl. The repetitive nature of the Catherine’s Wheel stitch makes it ideal for long, narrow items like scarves. You can also play with color changes to make the wheel pattern stand out even more.
Bags and Totes: The dense texture of the Catherine’s Wheel stitch makes it a great choice for bags and totes. This stitch creates a sturdy fabric that can hold its shape, making it ideal for carrying heavier items.
Final Thoughts
The Catherine’s Wheel stitch is a wonderful addition to any crocheter’s repertoire. With its elegant, circular design, this stitch can elevate even the simplest crochet patterns into something truly unique. Whether you’re working on a blanket, scarf, or bag, the Catherine’s Wheel stitch will add beauty and texture to your work.
If you’re just starting, take your time to practice this pattern, and don’t hesitate to experiment with different yarns and hook sizes. With patience and practice, you’ll soon be a pro at creating stunning Catherine’s Wheel stitch projects. Happy crocheting!