
Quilting is a beautiful and timeless craft that not only allows you to express your creativity but also gives you the chance to create something truly special and personalized.
One popular design for those who are just getting started is the Easy Hugs and Kisses quilt pattern. In this blog post, we’ll break down everything you need to know about creating this simple yet stunning quilt, from fabric selection to sewing techniques.
Plus, we’ll use SEO-optimized strategies to make sure that this tutorial helps as many aspiring quilters as possible.
What is the Easy Hugs and Kisses Quilt Pattern?
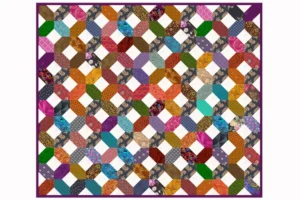
The Easy Hugs and Kisses quilt pattern is a beginner-friendly design that is perfect for those who are new to quilting. The design itself is inspired by the “X” (kisses) and “O” (hugs) symbols, which are pieced together in a striking pattern that’s sure to impress. The combination of straight lines and simple shapes makes this quilt ideal for those who are just learning the basics of sewing and piecing.
The pattern primarily uses two basic quilt blocks: the “X” block and the “O” block. These blocks are easy to make and can be customized using various fabric patterns and colors, giving you plenty of room for creativity. This makes it a favorite among quilters who enjoy experimenting with different color combinations.
In addition to its visual appeal, the Easy Hugs and Kisses quilt is also a great way to practice essential quilting techniques such as cutting fabric, piecing, and sewing straight seams. This project will leave you with not only a beautiful finished quilt but also a solid foundation of quilting skills.
Choosing the Right Fabrics for Your Quilt
Before diving into the process of creating the Easy Hugs and Kisses quilt, the first step is to choose the right fabrics. When selecting your materials, you’ll want to focus on fabric that is 100% cotton. Quilting cotton is ideal because it is sturdy, easy to work with, and has a lovely texture once finished.
For the Easy Hugs and Kisses quilt pattern, you’ll need three types of fabric: a fabric for the “X” blocks, one for the “O” blocks, and a third fabric for the background. Many quilters opt for bold, contrasting colors to make the “hugs” and “kisses” stand out. You can choose fabrics with different prints or textures to add depth and interest to your design.

It’s also a good idea to prewash your fabric to prevent any shrinkage after your quilt is complete. This is particularly important if you’re using a mix of colors, as it helps to avoid any unwanted bleeding of dyes during the first wash.
Tools You Will Need for This Quilt Pattern
Having the right tools is essential when working on any quilting project, and the Easy Hugs and Kisses quilt is no exception. While this is a beginner-friendly quilt pattern, you’ll still need to make sure you have all the necessary tools before you get started.
First, you’ll need a rotary cutter, cutting mat, and quilting ruler to help you accurately cut your fabric into the necessary pieces. Accuracy is key in quilting, so be sure to invest in high-quality cutting tools.
Additionally, a sewing machine with a quarter-inch foot attachment will be helpful, as most quilt patterns, including this one, use quarter-inch seam allowances. If you don’t have a quarter-inch foot, don’t worry — you can still use a standard foot, but it will require extra attention to ensure your seams are accurate. Finally, you’ll need quilting pins, thread, and a good iron to press your fabric as you go.
Cutting the Fabric: Measurements for the Easy Hugs and Kisses Quilt
Now that you have your fabrics and tools ready, it’s time to cut the fabric. For this pattern, you’ll need to cut several different sizes of squares and rectangles. Here are the basic fabric cutting measurements for a lap-sized quilt:
- “X” Blocks: Cut twenty 5.5-inch squares of fabric for the “X” blocks.
- “O” Blocks: Cut twenty 5.5-inch squares of fabric for the “O” blocks.
- Background Fabric: Cut forty 5.5-inch squares and forty 3-inch squares of background fabric.
- Binding: Cut six 2.5-inch strips of fabric for the binding (you will attach this at the end of your project).
Accuracy is critical when cutting fabric for a quilt. Double-check your measurements and make sure all your fabric pieces are cut squarely. Once all your fabric is cut, you’re ready to start piecing the quilt together.
Step-by-Step: Creating the X Blocks
The first step in piecing together your Easy Hugs and Kisses quilt is to create the “X” blocks. Here’s a simple guide to follow:
- Step 1: Take two of your background fabric squares (5.5 inches) and two “X” block squares. Place one background square on top of one “X” square, right sides facing each other.
- Step 2: Sew a diagonal line from one corner to the opposite corner on each pair of squares. Use your rotary cutter to trim away the excess fabric, leaving a quarter-inch seam allowance.
- Step 3: Open and press your squares, then repeat this process until you have enough “X” blocks to complete your quilt. Be sure to iron each piece carefully for a smooth, professional look.
Step-by-Step: Creating the O Blocks
Now that your “X” blocks are complete, it’s time to move on to the “O” blocks. The “O” blocks are a little more intricate but still very beginner-friendly.
- Step 1: Take one of your 5.5-inch “O” fabric squares and place a 3-inch background fabric square in each corner. The small background squares should be right sides facing the “O” fabric.
- Step 2: Sew diagonally across each small square from corner to corner, just like you did with the “X” blocks. Trim away the excess fabric, leaving a quarter-inch seam allowance.
- Step 3: Press open the small squares, and you’ll start to see the “O” shape form. Repeat this process until you have all of your “O” blocks completed.
Assembling the Quilt Top
With your “X” and “O” blocks now complete, it’s time to assemble your quilt top. This part of the process is exciting because you’ll start to see your design come together!
- Step 1: Arrange your blocks in alternating rows of “X” and “O” blocks. Play around with the layout until you’re happy with how it looks.
- Step 2: Begin sewing the blocks together in rows, using a quarter-inch seam allowance. Once all your rows are sewn, press the seams flat.
- Step 3: Finally, sew the rows together to complete the quilt top. Again, press your seams carefully to ensure a smooth finish.
Quilting and Binding Your Quilt
Once your quilt top is assembled, it’s time to quilt the layers together. First, layer your quilt top, batting, and backing fabric together, then pin them in place. You can choose to quilt in straight lines, following the grid of your blocks, or you can opt for free-motion quilting for a more organic look.
After quilting, it’s time to add the binding. Use the 2.5-inch strips you cut earlier to bind the edges of your quilt. Sew the binding in place, then fold it over to the back of the quilt and hand-stitch it down for a clean finish.
Enjoy Your Finished Easy Hugs and Kisses Quilt
Congratulations! You’ve successfully completed your Easy Hugs and Kisses quilt. This beautiful and heartfelt pattern is a perfect gift for a loved one or a cozy addition to your home. With its beginner-friendly design and versatility, it’s a great way to practice essential quilting skills while creating something truly unique.
By using this easy quilt pattern, you’ve also gained valuable experience that will help you with future quilt projects. So, what’s next on your quilting journey? Keep experimenting with different quilt patterns, fabrics, and techniques to continue honing your skills!