
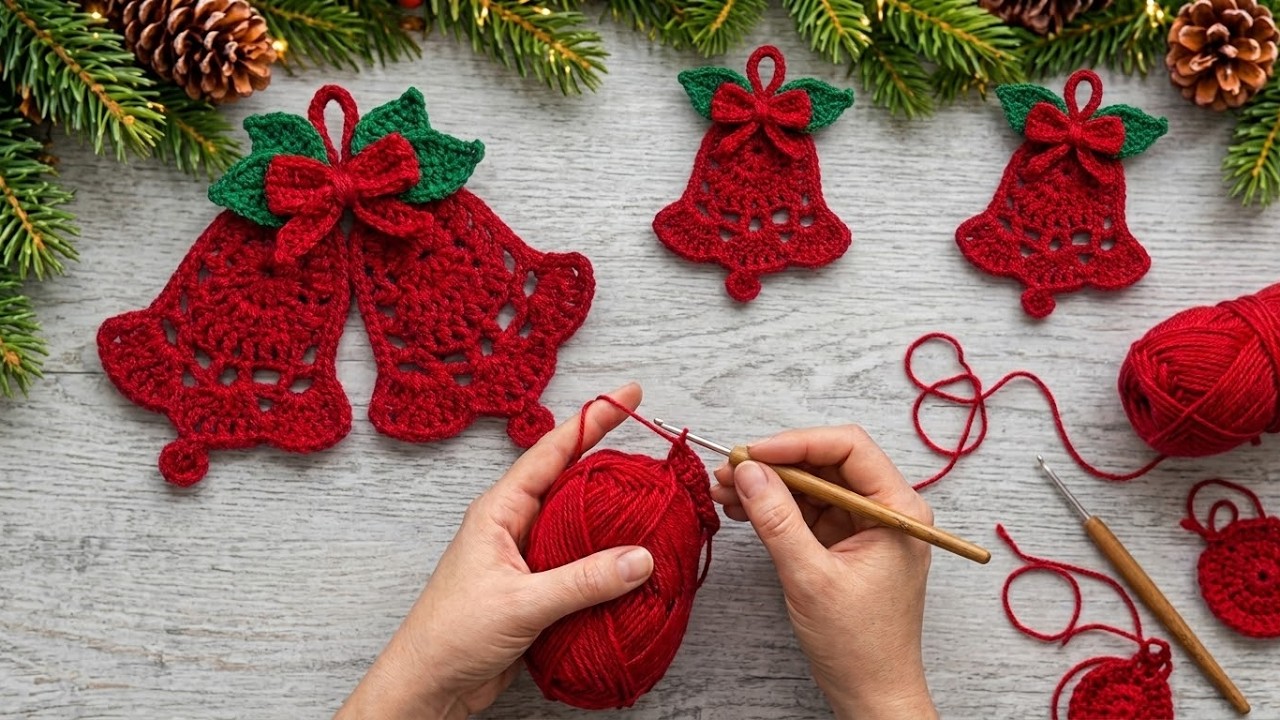
This Easy Christmas decorations Pattern shows you how to crochet the red bell ornaments in the photo, complete with green leaves, a red bow, and a little clapper.
The bell starts at the narrow top and widens as you work down toward the rim.
A row of chain spaces gives the lower half its lacy look, and three crochet shells make the rim flare outward.
You can make one bell for a tree branch or join two at an angle for a larger decoration.
Each piece is small enough to make with leftover yarn from another project.
The instructions use US crochet terms and include stitch counts so you can check your work as you go.
The word easy in this pattern refers to the short rows, repeated stitches, and forgiving assembly.
Once you know how to make a chain, a single crochet, and a double crochet, you can work through most of the bell.
The leaves use several stitch heights to create a pointed shape around a single foundation chain.
The bow starts as a small rectangle that you pinch and wrap in the middle.
If this is your first crochet ornament, make a single bell and finish it before starting a matching one.
Seeing the first bell assembled will help you decide how long to make the loop and where to place the leaves on the next one.
These Christmas decorations work as tree ornaments, reusable gift toppers, or accents on a holiday wreath.
Red yarn and dark green leaves give the strongest match to the reference photo.
A smooth cotton yarn makes the open stitches easy to see and helps the finished bell hold its outline.
Soft acrylic also works well, especially if you want a lighter ornament for a delicate tree branch.
The pattern gives you one bell at a time, with instructions for assembling a pair under a shared bow.
Use the photo as a guide for the arrangement and the written stitch counts to build each piece.
Gather the Yarn and Learn the US Crochet Stitch Key
Choose smooth DK-weight cotton or acrylic yarn in red and dark green. Red makes the bell, bow, clapper, and hanging loop. Green makes the two leaves. Start with a 3.5 mm crochet hook and have scissors, a tapestry needle, a removable stitch marker, and a ruler handy. A stitch marker helps you spot the first stitch when the turning chain sits close beside it.
DISCOVER MORE FREE PATTERNS HERE!
Gauge is flexible for this crochet Christmas bell ornament. Make one bell first and measure it from the top row to the bottom of the scallops before adding the clapper. If you want a matching pair, use the same yarn, hook, and tension for both. Try a slightly smaller hook if the bell feels floppy, or move up a size if you have trouble inserting the hook into your stitches.
The US crochet stitch key is ch for chain, sl st for slip stitch, sc for single crochet, hdc for half double crochet, dc for double crochet, st for stitch, and sk for skip. A ch-1 sp is the gap beneath a chain of one. For this pattern, a shell consists of five double crochet stitches worked into the same stitch.
To make a sl st, insert your hook into the indicated stitch, yarn over, and pull through both the stitch and the loop already on your hook. For sc, insert the hook, yarn over and pull up a loop, then yarn over and pull through both loops. For hdc, yarn over before inserting the hook, pull up a loop, then yarn over and pull through all three loops.
To make a dc, yarn over, insert your hook, and pull up a loop. Yarn over and pull through two loops, then yarn over and pull through the remaining two. When the pattern calls for 2 dc in one stitch, finish the first double crochet and insert your hook into the same stitch again. Those increases widen the bell along both sides.
The bell is worked flat and turned at the end of each row. Throughout the bell body, the turning chains do not count as stitches. Begin in the first actual stitch unless the row gives a different starting point. For the foundation row, count chains from the hook and leave the loop on your hook out of that count. Place a marker in the first double crochet if you tend to lose track of the edge.
Crochet the Bell Body, Openwork, and Scalloped Rim
Row 1. With red yarn, ch 7. Work 1 dc in the third ch from the hook, then 1 dc in each of the next 4 ch. You should have 5 dc. This narrow row becomes the top of the bell, where you will attach the hanging loop. Leave a starting tail long enough to weave in securely after assembly.
Row 2. Ch 2 and turn. Work 2 dc in the first st, 1 dc in each of the next 3 sts, and 2 dc in the last st for 7 dc. For Row 3, ch 2 and turn. Work 2 dc in the first st, 1 dc in each of the next 5 sts, and 2 dc in the last st for 9 dc.
Row 4. Ch 2 and turn. Work 2 dc in the first st, 1 dc in each of the next 7 sts, and 2 dc in the last st for 11 dc. Lay the bell flat for a quick check. Both sides should slope outward from the five-stitch top. If one side looks straighter, recount the end stitches and check that you placed an increase at each end.
Row 5. Ch 2 and turn. Work 1 dc in the first st, then repeat ch 1, sk 1 st, 1 dc in the next st five times. You should have 6 dc and 5 ch-1 spaces. Each space sits between two double crochet stitches. Keep the chains relaxed so the openings stay visible when the lower edge fans outward.
Row 6. Ch 2 and turn. Work 3 dc in the first dc. Repeat 1 dc in the next ch-1 sp, 1 dc in the next dc four times. Work 1 dc in the final ch-1 sp, then 3 dc in the last dc. You now have 15 dc. This solid row gives you an even edge for placing the three shells.
Row 7. Ch 1 and turn. Count the 15 stitches from the edge where you start. Work sc in stitch 1, skip stitch 2, work 5 dc in stitch 3, skip stitch 4, and work sc in stitches 5 and 6. Skip stitch 7, work 5 dc in stitch 8, skip stitch 9, and work sc in stitches 10 and 11. Skip stitch 12, work 5 dc in stitch 13, skip stitch 14, and work sc in stitch 15. Fasten off. The middle shell will sit directly above the clapper.
Make the Green Leaves, Red Bow, and Hanging Loop
First side of the leaf. With green yarn, ch 8. Starting in the second chain from the hook, work sl st, sc, hdc, dc, dc, hdc, sc, placing one stitch in each chain in that order. The slip stitch marks the narrow base, and the taller middle stitches give the leaf its width. Keep the foundation loose enough to work back along its other side.
Second side of the leaf. At the tip, ch 2 and work 1 sc into the same foundation chain as the last sc. Rotate the piece so you can work into the unused loops on the other side of the foundation. In the next six chains, work hdc, dc, dc, hdc, sc, sl st. Join with a sl st to the first slip stitch. Fasten off, leaving a sewing tail, and make a second leaf.
Bow. With red yarn, ch 13. Work 1 sc in the second ch from the hook and 1 sc in each remaining ch for 12 sc. Ch 1, turn, and work 1 sc in each st across. Repeat that row twice more for 4 rows total. Fasten off with a tail long enough to wrap the center, then pinch the middle and wrap it several times with the yarn tail. Secure the wrap on the back.
Bow tails. For the shape shown in the photo, add two narrow chains beneath the bow. With red yarn, make ch 7 for the first tail. Starting in the second chain from the hook, sl st in each ch back to the base. Repeat for the other tail. Sew both ends behind the bow’s center so the tails angle down over the bell body. Use ch 9 if you want the tails slightly longer for a paired ornament.
Clapper. With red yarn, make an adjustable ring, ch 1, and work 6 sc into the ring. Pull the center closed and join with a sl st to the first sc. Leave a sewing tail. Place the circle behind the middle shell so most of it extends below the rim. Sew through the top of the circle and the back of the shell, keeping your attachment stitches out of sight from the front.
Hanging loop. Join red yarn at the center of Row 1, ch 16, and sl st back into the same attachment point to close the loop. Fasten off and weave the ends through several stitches at the top. Before trimming, slip the loop over a branch tip or ornament hook to check its length. If you plan to hang two bells together, leave the individual loops off and add one shared loop during assembly.
Assemble, Shape, and Display the Christmas Bell Ornaments
For a single crochet bell, lay the bell face up and tuck the bases of both leaves behind its top edge so their tips point out to either side. Let the green tips extend beyond the bell’s outline. Sew the bases in place with matching yarn through the back of the top row. Then center the red bow beneath the hanging loop and stitch it in place through the wrapped center. Leave the ends of the bow free so they keep their shape.
For a double bell ornament, make two matching bells with a clapper on each. Angle the lower rims outward and overlap the narrow tops slightly. Sew through both tops several times with red yarn, keeping the seam near the area the bow will cover. Add a shared loop with ch 18, then sl st back into the joined top. Lift the bells by the loop to check that the pair hangs evenly before sewing on the leaves and bow.
The paired ornament in the reference photo has a fuller cluster of green behind the bow. To get that look, make four leaves and layer two on each side. Angle one leaf slightly upward and the other outward so you can see both pointed tips. Sew through all four bases, then attach the bow over the join. If the bow looks small against two bells, work its rectangle from ch 17 for 16 sc per row and make 5 rows.
If the bell curls, wet block it before adding the bow and leaves. Moisten the bell as directed on the yarn label, blot it in a towel, and lay it flat. Adjust both sides until the flare looks even, then spread out the three shells with your fingers. Pin the edges with rustproof pins if needed and let the piece dry completely. Handle the rim gently so the openwork row keeps its shape.
For a set of handmade Christmas tree ornaments, crochet all the bell bodies first and compare them before making the finishing pieces. Then work the leaves, bows, and clappers in small batches. A simple way to vary the set is to use deep red for some bells and a brighter cranberry shade for others while keeping the same green leaves. Consistent yarn weight and loop length will keep the set looking cohesive.
You can thread the finished loop over a tree branch, tie it onto a gift with ribbon, or hang several bells from a length of cord for a crochet Christmas garland. Leave enough room between ornaments for the scalloped rims to show. When the season ends, lay the bells flat for storage and tuck tissue paper between the layers if you want to preserve the bows’ shape.
Frequently Asked Questions
Is this Easy Christmas decorations Pattern suitable for beginners?
Yes. The bell body uses short rows and repeats the same increase at each edge. Make the main bell first, then practice one leaf on a scrap of yarn. The leaf is the only piece you work on both sides of a foundation chain. Rotating it so the unused loops face you makes the return side easier to see.
Can I use worsted-weight yarn for these crochet bells?
Yes. A worsted-weight yarn will usually make a larger ornament with a thicker rim. Start with a hook around 4.0 mm to 4.5 mm and adjust after the first few rows. If the stitches are too tight to work into, increase the hook size. A larger bell also gives you more room to position the bow tails and layer the leaves.
Why is my bell wider on one side?
Check Rows 2 through 4 for two double crochets in both the first and last stitch. A turning chain can look like the last stitch, especially in dark yarn. Mark the first actual stitch after turning. When you work back across the next row, the marker shows you exactly where the final increase belongs.
Why does the scalloped rim look uneven?
Recount Row 6 before starting the shells. It should have 15 dc, including three double crochets at each end. The shells go into stitches 3, 8, and 13, which places the middle shell halfway across. Mark those three stitches before starting Row 7 if you want to check their placement while you crochet.
Can I make the ornaments stiffer?
Start with cotton yarn and block the bell flat. If you want a firmer decoration for a wreath or tabletop display, use a light application of fabric stiffener according to its label. Test it on a leftover swatch first. Apply it to the bell body before attaching the leaves and bow so those pieces can keep their soft folds.
How do I turn the bell into a flat appliqué?
Skip the hanging loop and sew the bell directly onto your project using matching yarn and small stitches around the outside edge. Make the bow from a shorter rectangle if you want less bulk. On a gift bag or pillow cover, attach the clapper to the background fabric as well so it stays in place when the item is handled.
Conclusion
With this Easy Christmas decorations Pattern, you’ve learned to widen a flat crochet bell, space an openwork row evenly, and finish the rim with three shells. You can add the clapper, make pointed green leaves and a gathered bow, and use the same bell pieces for a single ornament or a pair. Once you’ve made one, it’s easy to see where a different yarn, a longer loop, or a fuller leaf arrangement would change the finished piece.
EASILY FIND THE FREE VIDEO FOR THIS PATTERN HERE!
If you try the pattern, please leave an honest opinion and share any suggestions. Which row was easiest to follow, and where would an extra stitch count or a close-up help? I’d also love to hear which colors you chose and whether you made a single bell or a pair.