
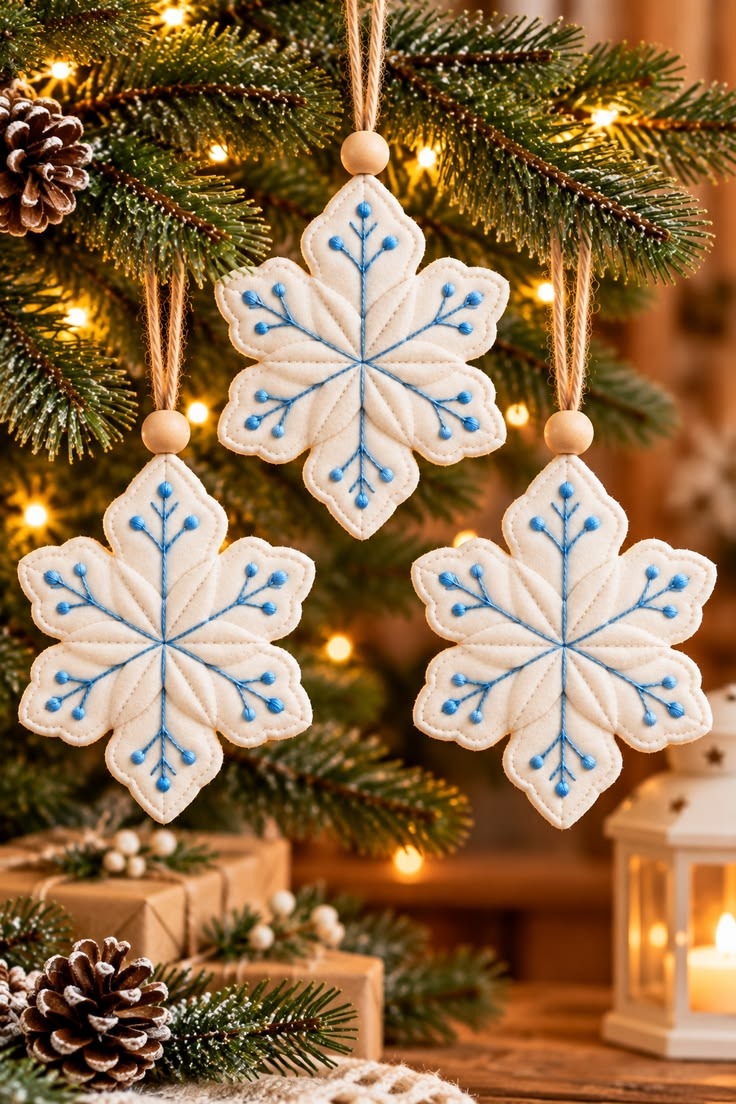
The Fabric snowflake ornament Pattern is a beautiful Christmas sewing project that combines soft fabric, delicate embroidery, and timeless winter-inspired details. Handmade snowflake ornaments bring warmth and personality to holiday decorations, especially when they feature elegant stitching and carefully selected materials. The design shown in the reference image features lovely six-pointed snowflakes made from ivory-colored fabric, decorated with blue embroidered branches and small decorative stitches. Each ornament hangs from a natural twine loop accented with a wooden bead, creating a charming combination of rustic and traditional Christmas styles. These handmade decorations look especially attractive when displayed on a Christmas tree surrounded by warm lights, evergreen branches, and natural ornaments. Whether you enjoy sewing seasonal decorations or want to explore a new creative hobby, this project offers a wonderful opportunity to make something memorable.
One of the most appealing aspects of the Fabric snowflake ornament Pattern is its versatility. You can create ornaments using cotton fabric, wool felt, linen, or other lightweight materials that hold their shape and allow decorative embroidery. The original design uses a soft neutral background that highlights the contrasting blue embroidery, but the same technique can be adapted to many Christmas color combinations. White and silver create an elegant winter appearance, while red and gold produce a more traditional holiday decoration. Beginners can simplify the embroidery and use basic hand stitches, while experienced sewists can experiment with additional decorative details. Because the ornaments are relatively small, they are also practical projects for using leftover fabric and embroidery thread from previous sewing activities.
Creating your own Fabric snowflake ornament Pattern is also a meaningful way to personalize your holiday decorations without relying on complicated sewing equipment. Most of the construction can be completed by hand, although a sewing machine may help produce consistent edges and decorative seams. This tutorial explains how to prepare the snowflake template, cut the fabric accurately, create the embroidered branches, assemble the padded ornament, and attach the hanging loop. The instructions use sewing techniques familiar to crafters in the United States, with measurements provided in centimeters for accurate pattern preparation. By following each stage carefully, you can create a coordinated collection of snowflake ornaments inspired by the reference photograph. The finished decorations can be displayed on Christmas trees, incorporated into holiday wreaths, attached to wrapped presents, or arranged as handmade seasonal decorations throughout your home.
1. Materials and Preparation for the Fabric Snowflake Ornament Pattern
The first step in creating the Fabric snowflake ornament Pattern is selecting materials that will produce a soft yet structured decoration. The snowflake in the reference image has six rounded, pointed arms arranged symmetrically around the center. Its ivory-colored surface appears slightly padded, while blue embroidered branches extend outward along each arm. To recreate this appearance, choose a fabric that is easy to cut, sew, and embroider. Wool-blend felt is particularly convenient because it does not fray easily, while cotton fabric can produce an equally attractive result when combined with lightweight interfacing.
DISCOVER MORE FREE PATTERNS HERE!
For three ornaments measuring approximately 14 cm from tip to tip, prepare 35 × 45 cm of ivory wool-blend felt or stable cotton fabric, a small amount of lightweight polyester stuffing, blue embroidery floss, matching sewing thread, and embroidery needles. You will also need sharp fabric scissors, paper for making the template, a removable fabric marker, straight pins or sewing clips, and a ruler. For the hanging details, prepare three pieces of natural jute twine measuring approximately 25 cm each and three wooden beads with holes large enough to accommodate the folded twine. If using cotton fabric, include lightweight fusible interfacing to reinforce the ornament pieces.
Choosing the correct fabric thickness makes an important difference in the final appearance. A medium-weight felt approximately 1.5–2 mm thick works well for a soft ornament that maintains its outline without excessive stuffing. If you prefer woven cotton, select a tightly woven material and reinforce the wrong side before cutting. Thin cotton without reinforcement may wrinkle around the embroidery, particularly when multiple stitches meet at the center. The goal is to create a smooth surface that supports decorative stitching while allowing the snowflake to retain its gentle padded appearance.
The embroidery colors are another defining feature of this handmade fabric snowflake ornament. The reference design uses medium blue thread for the branching lines and slightly brighter blue stitches at the ends of each branch. A six-strand cotton embroidery floss is suitable for this project because you can separate the strands to control the thickness of the stitches. Use two strands for delicate branch lines and three strands for fuller decorative tips. Matching ivory sewing thread will keep the outer seams discreet and preserve the elegant appearance of the snowflake.
Before cutting your fabric, organize the materials on a clean work surface with good lighting. Press woven fabric gently to remove wrinkles, following the manufacturer’s care instructions, and make sure felt lies flat without stretching. If you are using fusible interfacing, apply it to the wrong side of the cotton according to the product instructions before tracing the snowflake shapes. Keep the embroidery floss separated by color and prepare a small container for needles, pins, and wooden beads. Careful preparation reduces interruptions and makes the entire sewing process more enjoyable.
It is also helpful to decide how many ornaments you want to make before beginning. A single DIY Christmas snowflake ornament is a pleasant afternoon project, but preparing several at once can save time. You can trace and cut all the fabric pieces together, embroider the front panels in a group, and complete the assembly afterward. For a coordinated collection, keep the same snowflake dimensions and embroidery arrangement while introducing subtle variations in thread colors. This approach creates handmade ornaments that look consistent without appearing identical.
2. Creating and Cutting the Six-Pointed Snowflake Template
The shape is the foundation of the Fabric snowflake ornament Pattern, so accurate measurements are essential. Begin by drawing a circle approximately 14 cm in diameter on a piece of paper. Mark its center and divide the circle into six equal sections, with each section measuring 60 degrees. Draw six straight guidelines extending from the center toward the outer edge. These guidelines establish the positions of the snowflake arms and help maintain the balanced symmetry visible in the reference image. A ruler and protractor will make this process easier, although a printable six-pointed snowflake outline can also serve as a starting guide.
Next, transform the guidelines into six rounded, pointed snowflake arms. Each arm should widen gradually as it extends from the center and finish in a softly pointed, petal-like shape. The spaces between neighboring arms should curve inward, creating a recognizable snowflake silhouette rather than a simple six-pointed star. Aim for arms approximately 4–4.5 cm wide at their broadest sections, adjusting the curves so they meet smoothly. Keep the six arms as similar as possible, because consistent proportions will make the embroidered design appear balanced when the ornament is finished.
Once the outline is complete, cut out the paper template carefully. Fold the template along its central guidelines to compare the arms and make small adjustments if necessary. The finished paper shape should measure approximately 14 cm across opposite tips. This measurement represents the intended finished size, so the cutting dimensions depend on the fabric construction method you choose. For felt ornaments with exposed decorative edges, the fabric can be cut directly to the finished outline. For woven cotton ornaments with enclosed seams, an additional 0.7 cm seam allowance should be added around the entire shape.
Place the template on the fabric and trace around it using a removable fabric marker. Cut two identical snowflake pieces for each ornament: one for the embroidered front and one for the plain back. If using felt, keep your scissors perpendicular to the material so the edges remain neat and consistent. For woven cotton, trace the seam allowance separately and cut outside the finished outline. Make small reference marks at the center and along the six arm guidelines, but avoid using permanent ink that might remain visible through the light-colored fabric.
The snowflake sewing pattern can also include a decorative inner outline that follows the shape of each arm. In the reference image, subtle ivory stitching creates a soft quilted appearance around the edges and along the divisions between the six sections. To reproduce this effect, draw a secondary outline approximately 0.4 cm inside the finished edge. Add six lightly curved lines extending from the center toward the inner sides of the arms. These lines will guide the decorative stitching and help create the dimensional, layered appearance that makes the ornament visually interesting.
Before moving on to embroidery, check that the two fabric pieces align correctly. Stack them with their edges together and inspect the tips and inward curves. If necessary, trim small irregularities so both pieces match. Set the backing piece aside and place the front panel on a clean surface. At this stage, the Fabric snowflake ornament Pattern should have a clear six-pointed silhouette, visible embroidery guidelines, and enough space around the edges for the final seams. Accurate preparation will make the following steps easier and improve the overall quality of the finished ornament.
3. Embroidering the Blue Snowflake Design Step by Step
The embroidery is the most distinctive decorative feature of this Fabric snowflake ornament Pattern. The design consists of six primary blue lines extending from the center toward the tips of the snowflake arms. Smaller branches extend diagonally from these main lines, creating a botanical pattern that resembles delicate winter frost. To begin, thread an embroidery needle with two strands of medium blue cotton floss and secure the thread on the wrong side of the front panel. Avoid large knots that could create visible bumps beneath the fabric. Instead, use a small anchoring stitch or weave the thread beneath existing stitches whenever possible.
Start at the exact center of the snowflake and work toward the tip of the first arm using a stem stitch or a neat backstitch. Both stitches are suitable for creating continuous embroidered lines, although stem stitch produces a slightly softer, rope-like appearance. Keep each stitch approximately 0.3–0.4 cm long and maintain even tension so the fabric remains flat. The main line should follow the central guideline of the arm, stopping approximately 0.8 cm before the outer tip. Repeat this process for all six arms, returning to the center each time to maintain the radial arrangement.
After completing the six main lines, add the smaller branches that give the embroidery its characteristic snowflake appearance. On each main line, mark two or three branching points at different distances from the center. Stitch short diagonal lines extending outward toward both sides of the arm. Use the same blue floss and maintain a similar stitch length throughout the design. The branches should gradually become shorter toward the outer tip, creating a balanced arrangement that fits comfortably inside the rounded fabric shape. The reference image uses delicate, symmetrical branching patterns rather than heavily filled embroidery.
The decorative blue tips can be recreated with French knots, detached chain stitches, or short satin-stitched teardrops. For a result similar to the photograph, use three strands of brighter blue embroidery floss and form small teardrop shapes approximately 0.4–0.5 cm long. Position these details at the ends of the diagonal branches and at selected points along the main stems. If you prefer French knots, wrap the floss around the needle two or three times before inserting it close to the original entry point. Keep the knots consistent in size and avoid pulling too tightly, as excessive tension can distort the fabric.
To create the subtle dimensional lines visible between the embroidered arms, use matching ivory thread to sew gentle decorative curves from the center toward the spaces between the six points. A simple running stitch works well for this detail, especially when the stitches are small and evenly spaced. You may also follow the inner outline drawn near the edge of the snowflake. These pale stitches should remain understated so the blue embroidery continues to be the main visual feature. The combination of colored embroidery and neutral quilting lines gives the embroidered fabric snowflake ornament its soft, handcrafted appearance.
Once all six arms are embroidered, inspect the front panel carefully. Make sure the branch patterns are balanced and that the center does not contain excessive thread buildup. Secure the thread ends on the wrong side using small anchoring stitches, then trim any loose floss. If the fabric has developed slight wrinkles, gently smooth it with your fingers rather than stretching the embroidery. For suitable fabrics, light pressing from the wrong side over a soft towel can help, but avoid crushing raised decorative stitches. The embroidered panel is now ready to become a beautiful padded Christmas ornament.
4. Assembling, Stuffing, and Finishing the Christmas Snowflake Ornament
The final construction stage transforms the embroidered fabric pieces into a finished Fabric snowflake ornament Pattern. Place the embroidered front panel over the backing piece, keeping the wrong sides together if you are using felt with exposed edges. Align all six points and the inward curves, then secure the layers with sewing clips or a few carefully positioned pins. If using woven cotton with enclosed seams, place the right sides together instead and sew around the outline using the 0.7 cm seam allowance. Leave a turning opening of approximately 3 cm along one of the straighter sections.
For the felt version, sew around the perimeter using a small blanket stitch or a straight running stitch positioned approximately 0.3 cm from the edge. Matching ivory thread will create the delicate border seen in the reference image. Work slowly around the rounded tips and inward curves to maintain consistent spacing. Leave a small opening along one side for stuffing. If you are making the cotton version, stitch the layers with a short machine straight stitch, clip the seam allowances carefully at the inward curves without cutting the stitches, and turn the ornament right side out through the opening.
Add small amounts of lightweight polyester stuffing to create the soft, padded appearance. Begin by placing tiny portions of stuffing into each of the six arms, using a blunt turning tool or the rounded end of a wooden stick to distribute the filling. Avoid overstuffing because the ornament should remain relatively flat rather than becoming a thick cushion. Concentrate on keeping the points gently rounded while maintaining a smooth central area. A finished thickness of approximately 1–1.5 cm is a useful target, although the exact dimension depends on the fabric and amount of filling.
After distributing the stuffing evenly, close the opening with small, nearly invisible stitches. For felt, continue the decorative edge stitching until the perimeter is completely sealed. For woven cotton, fold the seam allowances inward and use a ladder stitch to close the opening neatly. If you want additional quilted definition, carefully work small stitches along the previously marked ivory guidelines, catching the backing fabric without pulling the ornament too tightly. This technique can create gentle depressions between the arms and emphasize the dimensional snowflake shape.
The hanging loop completes the rustic Christmas appearance. Fold a 25 cm length of natural jute twine in half and tie the loose ends together securely. Thread the folded loop through a wooden bead approximately 1.2–1.5 cm in diameter, positioning the bead close to the top of the ornament. Attach the knotted end to the upper snowflake tip with several strong hand stitches, passing through the backing and a reinforced section of the ornament. Alternatively, the loop can be secured between the fabric layers before the final opening is closed. Check that the bead sits neatly above the snowflake and that the loop is strong enough to support its weight.
Your handmade Christmas fabric ornament is now ready for display. Hang it from a sturdy Christmas tree branch and adjust the twine so the snowflake faces forward. For a coordinated arrangement similar to the reference image, create three ornaments using the same ivory fabric and blue embroidery, then hang them at slightly different heights. Warm white Christmas lights will emphasize the soft fabric texture and delicate decorative stitching. You can also use these snowflakes as holiday gift toppers, wreath accents, or seasonal wall decorations. With careful cutting, balanced embroidery, and neat finishing, the completed ornaments will bring a beautiful handmade touch to your Christmas decorating.
Frequently Asked Questions About the Fabric Snowflake Ornament Pattern
1. What is the best fabric for making snowflake Christmas ornaments?
Wool-blend felt is one of the easiest materials for this project because it holds its shape, resists fraying, and supports decorative embroidery. Cotton fabric is another excellent option, especially when reinforced with lightweight interfacing. Linen can create a rustic appearance, but it may require additional stabilization to prevent distortion around the embroidered details. For beginners, medium-weight felt is generally the most forgiving choice.
2. Can beginners make the Fabric snowflake ornament Pattern?
Yes. The Fabric snowflake ornament Pattern is suitable for beginners who are comfortable using scissors, needles, and basic hand-sewing techniques. The most important skills are cutting symmetrical fabric shapes, sewing around curved edges, and creating simple embroidery lines. Beginners can start with backstitch and running stitch before experimenting with French knots or decorative teardrop stitches. Working slowly and practicing the embroidery on scrap fabric can help produce more consistent results.
3. What size should a handmade fabric snowflake ornament be?
A finished diameter of approximately 12–15 cm works well for most Christmas trees. The tutorial uses a 14 cm snowflake because this size provides enough room for decorative embroidery without making the ornament excessively heavy. Smaller versions measuring 8–10 cm can be used as gift decorations, while larger versions measuring 18–20 cm may be suitable for wreaths or wall displays. Adjust the embroidery proportions and hanging loop according to the finished size.
4. Do I need a sewing machine to complete this project?
No. This DIY fabric Christmas ornament can be made entirely by hand. Blanket stitch, running stitch, backstitch, and ladder stitch are sufficient for assembling and decorating the snowflake. A sewing machine can make construction faster when using woven cotton, but hand sewing offers greater control around the pointed arms and inward curves. The embroidered details are particularly well suited to hand stitching.
5. How can I make the embroidered branches look symmetrical?
Begin by dividing the snowflake into six equal sections and drawing a central guideline along each arm. Mark the branch positions before threading the needle, keeping the same distances and angles whenever possible. Complete one arm first and use it as a reference for the remaining five. Slight differences are natural in handmade embroidery, but consistent placement will help the overall design look balanced.
6. Which embroidery stitches work best for the blue snowflake design?
Backstitch and stem stitch are excellent for the main branches because they create continuous lines. French knots add small raised dots, while detached chain stitches and satin stitches can create the teardrop-shaped accents visible in the reference image. Running stitch is useful for the subtle ivory quilting lines. Combining these simple techniques produces a decorative result without requiring advanced embroidery skills.
7. How much stuffing should I use inside the snowflake ornament?
Use only enough polyester stuffing to create a gently padded surface. The ornament should retain its six-pointed shape and remain relatively flat. Excessive stuffing can distort the embroidery, stretch the fabric, and make the outer seams appear uneven. Add small amounts gradually, concentrating on the tips before filling the center.
8. Can I wash handmade fabric snowflake ornaments?
Cleaning depends on the materials used. Many felt and embroidered ornaments are best maintained by gently removing dust with a soft brush or dry cloth. If the fabric and embroidery floss are washable and colorfast, careful spot cleaning with a slightly damp cloth may be possible. Avoid soaking ornaments containing wooden beads, jute twine, or materials that may shrink or lose their shape. Always test the materials before applying moisture.
9. How can I personalize the Fabric snowflake ornament Pattern?
You can personalize the design by changing the fabric color, embroidery floss, bead style, or hanging cord. White fabric with silver thread creates a classic winter look, while cream fabric with gold embroidery produces a warmer appearance. Pastel blue, blush pink, and soft green are also attractive alternatives. You can add small initials or a year to the back of the ornament, making it a thoughtful handmade keepsake.
10. How long does it take to make one fabric snowflake ornament?
A beginner may need approximately two to three hours to complete one ornament, depending on the embroidery details and sewing method. Experienced crafters may finish a simpler version in about one hour. Preparing several fabric pieces together can reduce the overall production time when making a matching set. The embroidery generally requires the most patience, especially when adding individual decorative tips.
11. Can these fabric snowflakes be used for decorations other than Christmas trees?
Absolutely. These embroidered snowflake decorations can be incorporated into holiday wreaths, winter garlands, decorative baskets, seasonal centerpieces, and handmade gift packaging. They can also be attached to fabric wall hangings or displayed from decorative branches. For arrangements accessible to young children or pets, omit detachable beads and secure all hanging components carefully.
12. How should I store handmade snowflake ornaments after Christmas?
Store the ornaments in a clean, dry container away from direct sunlight and excessive humidity. Wrap each snowflake loosely in acid-free tissue paper or place it inside a breathable fabric pouch to protect the embroidery. Avoid stacking heavy decorations on top of the fabric pieces, as this may flatten the stuffing or distort the shape. Proper storage will help preserve the ornaments for future holiday seasons.
13. Can I make the snowflake ornament without embroidery?
Yes. You can create a simpler version by sewing the snowflake shape from patterned cotton, textured felt, or decorative fabric. A few ivory quilting stitches can provide dimension without the blue branches. However, the embroidery is an important part of the design shown in the reference image, and including it will produce a closer visual match.
14. What is the difference between a felt snowflake ornament and a cotton snowflake ornament?
Felt ornaments can usually be assembled with exposed edges because the material does not fray easily. Cotton ornaments typically require enclosed seams or another edge-finishing technique to prevent fraying. Felt also provides natural structure, while cotton may need interfacing and light stuffing. Both materials are suitable for the Fabric snowflake ornament Pattern, so the choice depends on your preferred appearance and sewing experience.
Conclusion
The Fabric snowflake ornament Pattern is a rewarding handmade Christmas project that brings together traditional sewing, delicate embroidery, and thoughtful seasonal design. Throughout this tutorial, you learned how to select suitable fabrics, prepare a symmetrical six-pointed template, cut the ornament pieces, embroider elegant blue snowflake branches, and assemble a softly padded decoration. You also discovered how to finish the edges neatly, attach a rustic twine hanging loop with a wooden bead, and adapt the design for different holiday color palettes.
The finished snowflakes offer a lovely combination of simplicity and detail. Their soft ivory fabric, carefully arranged blue embroidery, and natural hanging accents create decorations that feel both timeless and personal. Whether you make a single ornament or a coordinated collection, this project provides an opportunity to practice useful sewing skills while creating something special for the Christmas season.
One of the greatest pleasures of handmade holiday decorations is the freedom to make each piece your own. You can experiment with different embroidery stitches, adjust the snowflake dimensions, combine traditional Christmas colors, or add personalized details to create unique keepsakes. With patience and attention to the small finishing touches, even a beginner can achieve an attractive result.
EASILY FIND THE FREE PDF FOR THIS PATTERN HERE!
What do you think of this Fabric snowflake ornament Pattern? We would love to hear your sincere opinion about the project, including which details you enjoyed most and which techniques you found challenging. Feel free to share your suggestions, creative ideas, and favorite color combinations. Your feedback can inspire new handmade Christmas decorations and help other sewing enthusiasts discover enjoyable ways to bring creativity into their holiday traditions.