
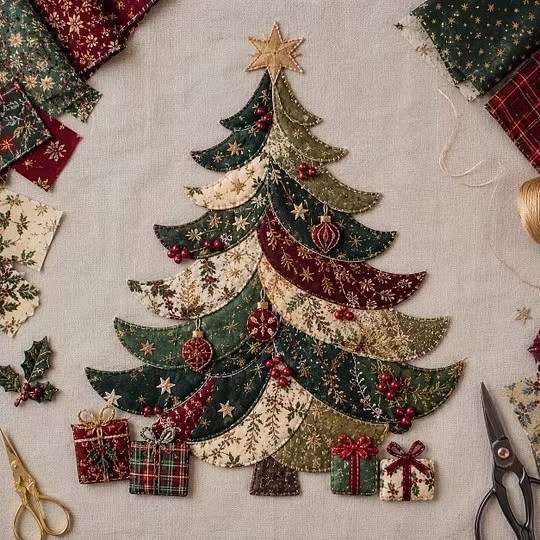
The Appliqué in the shape of a Christmas tree Pattern is a beautiful way to bring the warmth of handmade Christmas decorations into your home. Combining traditional fabric appliqué techniques with festive colors, delicate embroidery, and charming decorative details, this project transforms simple fabric scraps into an elegant Christmas tree. The layered branches create a graceful silhouette, while miniature ornaments, a golden star, and colorful wrapped presents complete the holiday scene. Whether you enjoy Christmas sewing projects, fabric appliqué patterns, or creative seasonal decorations, this design offers an opportunity to explore different textures and sewing techniques. It is especially appealing to quilters who love combining patterned cotton fabrics into detailed compositions. With patience, careful cutting, and a few essential sewing supplies, you can recreate this festive decoration and personalize it with your favorite Christmas fabrics.
One of the most attractive features of this Christmas tree appliqué pattern is its layered construction. Instead of creating a tree from one large piece of fabric, the design uses several curved fabric sections arranged in overlapping rows. These sections resemble flowing evergreen branches and create movement throughout the composition. Deep green, burgundy, cream, and muted gold fabrics work together to produce a traditional Christmas color palette. Small embroidered stars, hanging ornaments, red berry clusters, and decorative stitching introduce additional dimension. The result is a handcrafted decoration that looks detailed without requiring complicated quilting equipment. Beginners can simplify the embellishments, while experienced sewists can experiment with decorative stitches, hand embroidery, and fabric combinations. This flexibility makes the project suitable for different skill levels and creative preferences.
Creating an Appliqué in the shape of a Christmas tree Pattern is also a wonderful opportunity to use leftover quilting cotton, seasonal fabric collections, and treasured scraps from previous projects. The finished design can become the centerpiece of a Christmas wall hanging, a decorative pillow front, a framed textile artwork, or a festive quilt block. Because the construction is based on individual appliqué pieces, the size and arrangement can be adjusted to suit different decorating needs. This tutorial explains how to select appropriate materials, prepare a practical pattern, cut and arrange the fabric branches, attach the appliqué pieces, and finish the decorative details. The measurements are provided in centimeters, making it easy to follow the instructions with a standard sewing ruler. By following each stage carefully, you can create a beautiful handmade fabric Christmas tree inspired by the reference image while adding your own artistic touches.
1. Materials and Fabric Preparation for the Christmas Tree Appliqué Pattern
The first step in creating your Appliqué in the shape of a Christmas tree Pattern is gathering suitable fabrics and sewing supplies. For a design inspired by the reference image, choose high-quality quilting cotton in traditional Christmas colors. Deep forest green, burgundy red, warm ivory, and antique gold provide a harmonious foundation. Fabrics with small stars, botanical prints, snowflakes, and delicate metallic accents are particularly effective because they introduce visual interest without overwhelming the overall composition. Choose approximately six to ten coordinating fabric prints to create variety among the overlapping branches. Small fabric scraps are often sufficient for individual sections, making this an excellent scrap fabric sewing project. Before cutting, arrange your fabrics together and check that the colors complement one another.
DISCOVER MORE FREE PATTERNS HERE!
For the background, prepare a piece of natural cotton, linen, or cotton-linen blend measuring approximately 55 cm × 65 cm. This provides enough space for a Christmas tree design measuring about 40 cm wide × 50 cm tall, including the star, trunk, and decorative presents. These are suggested dimensions for recreating the appearance of the photograph rather than measurements taken from an original commercial pattern. A neutral background works especially well because it allows the richly patterned branches to stand out. Light beige, ivory, oatmeal, and soft cream are excellent choices. If you prefer a more structured textile panel, use lightweight woven interfacing or a thin layer of quilt batting behind the background. Press the fabric before beginning to eliminate wrinkles and improve cutting accuracy.
The basic sewing supplies include sharp fabric scissors, small embroidery scissors, a rotary cutter, a cutting mat, a quilting ruler, sewing pins or fabric clips, a washable fabric marker, and matching sewing thread. You will also need a hand-sewing needle, embroidery needles, and an iron. A sewing machine with a zigzag or blanket-stitch setting can make the appliqué process faster, although the entire project can be completed by hand. For the fabric appliqué technique, lightweight fusible web is particularly helpful because it temporarily secures each fabric shape before stitching. Choose a product suitable for cotton fabric and follow its manufacturer’s temperature and pressing instructions. Avoid excessively heavy stabilizers, which can make the finished decoration stiff and difficult to quilt.
Decorative materials help reproduce the intricate Christmas atmosphere visible in the reference image. Prepare gold embroidery floss for the star, branch details, and hanging ornament strings. Red embroidery floss or small red fabric circles can be used to create berry clusters. Small pieces of burgundy and cream fabric are ideal for miniature Christmas baubles. For the presents beneath the tree, use green, red, cream, and plaid fabric scraps. Narrow fabric ribbons or embroidered bows can add a charming finishing touch. If the panel will be displayed where young children or pets can reach it, securely stitch embellishments and avoid loose beads or detachable decorations. The goal is to create a durable Christmas fabric decoration that remains attractive throughout many holiday seasons.
Fabric preparation is an important part of achieving professional-looking results. If you normally prewash quilting cotton, wash all compatible fabrics before cutting so they shrink consistently. Dark red and green fabrics should be tested for color bleeding, especially when they will be placed against a light background. After washing, press each fabric carefully with an iron appropriate for its fiber content. Smooth, wrinkle-free fabric is easier to trace, cut, and position accurately. For very small appliqué shapes, consider using a light stabilizer to prevent stretching. Organize your prepared fabric pieces by color and pattern before starting the cutting process. This simple preparation makes the later stages more enjoyable and reduces the likelihood of mistakes.
Before constructing the tree, create a comfortable and organized sewing area with adequate lighting. Place your cutting mat on a stable surface and keep your fabric scraps within easy reach. Separate the background fabric from the appliqué materials to prevent accidental cutting. Prepare a small container for needles, pins, embroidery floss, and decorative accessories. It is also helpful to keep a printed photograph or a simple sketch of your intended design nearby. The image serves as a visual guide for arranging the branches and decorations. Taking time to prepare your workspace supports better accuracy and helps you enjoy the creative process of making a DIY Christmas tree appliqué from beginning to end.
2. Creating and Cutting the Layered Christmas Tree Appliqué Pieces
The defining characteristic of this Appliqué in the shape of a Christmas tree Pattern is its arrangement of curved, overlapping branches. To reproduce this appearance, begin by drawing a tree silhouette on a large sheet of paper. For the suggested project, create a tree approximately 40 cm wide and 43 cm tall, excluding the star and trunk. Mark a vertical centerline to keep the design balanced. Divide the silhouette into five overlapping horizontal levels, with shorter branches near the top and progressively wider branches toward the bottom. Unlike a conventional triangular Christmas tree, the branches should curve gently downward, resembling decorative ribbons or scalloped evergreen foliage. This flowing structure is essential to achieving the elegant appearance shown in the photograph.
Create individual paper templates for the curved branches before cutting your fabric. Start with smaller upper branches approximately 12–18 cm wide, then gradually increase the width of the lower branches to approximately 25–32 cm. Some branches can extend farther than others to create an organic, asymmetrical appearance. Each branch template should have a gently curved upper edge and a more pronounced sweeping lower edge, ending in a pointed tip. Prepare approximately 15–18 separate branch shapes for a richly layered design. The exact number can vary depending on the size and overlap you prefer. Label the paper templates according to their intended position, such as upper left, center middle, or lower right, so the assembly process remains organized.
Once the paper templates are ready, arrange them on the selected Christmas fabrics. Alternate dark green, burgundy, cream, and gold prints to create contrast between neighboring pieces. For a balanced composition, avoid placing too many identical colors directly beside one another. Trace each template onto the wrong side of the fabric using a removable marking tool. If you are using raw-edge fusible appliqué, trace the finished shape directly and cut along the marked line because the edges will be secured with stitching. If you prefer turned-edge appliqué, add approximately 0.5 cm seam allowance around each shape. These two methods produce different finishes, so choose one before cutting. Raw-edge appliqué is generally easier for beginners and works particularly well with the detailed layered design.
Prepare the fusible appliqué pieces by tracing the branch templates onto the paper side of lightweight fusible web. Follow the manufacturer’s instructions regarding orientation, particularly if any shapes are directional. Cut the fusible web slightly outside the traced lines and attach it to the wrong side of the chosen fabrics. After the pieces have cooled, cut carefully along the final outlines. Remove the paper backing only when you are ready to arrange the branches on the background. Using fusible web helps maintain the curved shapes and prevents unwanted movement during sewing. For an especially soft finish, select a lightweight adhesive and avoid applying excessive heat. The resulting pieces should remain flexible enough for decorative stitching and gentle quilting.
The Christmas tree fabric pattern also requires several smaller shapes to complete the composition. Cut a trunk approximately 5 cm wide × 6 cm tall from brown cotton fabric, adjusting the upper portion so it can be concealed beneath the lowest branches. Create a five-pointed or six-pointed star approximately 7 cm wide using gold fabric. The reference design features a textured golden star, so a fabric with subtle metallic details is particularly suitable. Prepare several small oval or teardrop shapes measuring approximately 2–3 cm for hanging ornaments. For the gifts, cut four small rectangular or square shapes ranging from 4 cm to 6 cm wide. These pieces will be positioned beneath the tree after the main appliqué has been attached.
Before sewing, place all the cut fabric pieces onto the background to test the composition. Begin with the trunk and the lowest branch level, then work upward until the tree has a balanced silhouette. Overlap the branch pieces by approximately 1–2 cm, ensuring that their edges remain visible and their pointed ends create a natural cascading effect. Step back occasionally to evaluate the overall arrangement. The top should appear narrow, while the lower branches should spread outward in a graceful shape. Photograph the layout before removing any pieces so you can refer to it during assembly. This planning stage is especially important for a layered fabric Christmas tree, because the arrangement of colors and curved edges determines the final visual impact.
3. Step-by-Step Sewing Instructions for the Christmas Tree Fabric Appliqué
Begin assembling your Appliqué in the shape of a Christmas tree Pattern by marking the center of the prepared background fabric. Fold the fabric gently in half vertically and press a temporary crease, or use a removable fabric marker to draw a light centerline. Position the brown trunk near the bottom center, leaving enough space for the decorative presents and any future border. Secure it with fusible web or temporary fabric adhesive. If you are using a sewing machine, stitch around the trunk with a narrow zigzag or blanket stitch. A stitch width of approximately 2 mm and a stitch length of 2 mm can serve as a starting point, although the ideal settings depend on your machine and fabric. Test the stitch on a scrap before sewing the actual project.
Next, attach the lowest branch level. Arrange the large curved pieces so that they partially cover the upper edge of the trunk. If using fusible web, lightly press each piece in place according to the adhesive instructions. For overlapping pieces, secure and stitch the lower layers first, then add the upper layers in sequence. This approach prevents exposed edges from becoming trapped in awkward positions. Stitch around each branch using a matching thread or a contrasting decorative thread. A narrow blanket stitch gives the design a traditional handcrafted appearance, while a small zigzag stitch provides a neat, secure edge. Keep your sewing speed slow around tight curves and lift the presser foot with the needle down whenever you need to adjust the fabric.
Continue attaching the middle branch levels, gradually working toward the top of the tree. Alternate fabric colors to create the layered effect visible in the reference image. Deep green pieces can form the visual foundation, while burgundy, cream, and gold sections provide contrast and brightness. Position each new branch so it overlaps the previous level without completely hiding the decorative fabric beneath it. Maintain the gently sweeping curves and pointed ends that give the design its distinctive shape. If you prefer hand sewing, use small blanket stitches or an invisible appliqué stitch to secure the pieces. Hand stitching takes longer but allows greater control around delicate curves. Whichever method you choose, aim for consistent stitches and smooth fabric surfaces.
After the main tree silhouette is complete, attach the golden star at the top. Center it above the narrowest branch and secure it with fusible web or small hand stitches. Outline the star with gold embroidery floss to emphasize its shape. A simple running stitch, backstitch, or blanket stitch works beautifully for this detail. For additional texture, add a few straight embroidery stitches radiating from the center of the star. The reference image features a rustic, dimensional star, which can be imitated by using textured cotton, linen, or lightly padded fabric. If adding padding, keep it thin enough that the star remains securely attached. The star should complement the tree without overpowering the delicate fabric patterns.
Now create the hanging ornaments that decorate the branches. Position small burgundy and red fabric baubles at different heights, preferably near the tips of selected branches. Attach each ornament with tiny hand stitches or fusible appliqué. Use gold embroidery floss to create a short hanging string connecting the ornament to the branch above it. Decorative vertical stitches can imitate the appearance of traditional glass Christmas ornaments. Add small berry clusters by stitching French knots with red embroidery floss or by appliquéing tiny circles of red fabric. Distribute the decorations unevenly but thoughtfully, allowing some areas of the tree to remain simple. This creates a natural balance between the patterned fabrics and the decorative details.
Finish the main sewing process by attaching the miniature presents beneath the tree. Arrange the fabric squares and rectangles on either side of the trunk, leaving small gaps between them. Use contrasting fabrics to imitate wrapped Christmas gifts. Stitch narrow strips of fabric vertically and horizontally across each present to represent ribbon. Small embroidered bows or securely attached fabric bows can complete the packages. The reference design includes several presents in coordinated Christmas prints, adding a playful finishing touch to the composition. Once all pieces are attached, inspect the entire Christmas appliqué sewing project for loose threads, unsecured corners, or uneven stitching. Make any necessary corrections before moving on to the final embellishments and finishing techniques.
4. Decorative Embroidery, Finishing Techniques, and Creative Christmas Project Ideas
Decorative embroidery adds character and depth to your Appliqué in the shape of a Christmas tree Pattern. The reference image includes delicate gold stitching scattered across the branches, creating the impression of stars and festive lights. To recreate this effect, use two or three strands of gold embroidery floss and stitch small starbursts at selected points. A starburst can be formed with several straight stitches radiating from a central point. Vary the size of these details so they appear natural rather than repetitive. You can also add short curved lines to emphasize the flowing movement of the branches. Avoid covering every fabric section with embroidery, because the printed Christmas cottons already provide substantial visual interest. A thoughtful balance between fabric patterns and stitched decorations produces the most attractive result.
Additional texture can be introduced through simple hand embroidery techniques. French knots are useful for creating small berries, while backstitches can outline hanging ornaments or emphasize curved branch edges. A running stitch in cream or gold thread can provide a subtle decorative border around selected appliqué shapes. For a more rustic appearance, consider using cotton embroidery floss in muted colors rather than highly reflective metallic thread. If you prefer a sparkling holiday design, add a few securely attached sequins or decorative beads to the star and ornaments. Keep these embellishments minimal, particularly if the panel will be used as a pillow or handled frequently. The purpose of embroidery is to enhance the handmade Christmas tree decoration, not to distract from the carefully arranged fabric layers.
Once the decorative stitching is complete, decide how you want to finish the textile panel. For a quilted wall hanging, prepare a backing fabric and a thin layer of quilt batting slightly larger than the appliqué background. Place the backing fabric wrong side up, add the batting, and position the decorated top right side up. Smooth the layers carefully and secure them with quilting pins or temporary basting stitches. Quilt around the outside of the Christmas tree and along selected branches using matching thread. You may also add simple background quilting, such as widely spaced straight lines or gentle curves. Keep the quilting light so the appliqué remains the main feature. Trim the completed quilt sandwich to the desired rectangular size after the quilting is finished.
To finish the edges of a wall hanging, prepare fabric binding approximately 6 cm wide and long enough to surround the panel with additional length for joining the ends. Fold the binding lengthwise with wrong sides together and press. Attach it to the front edge of the quilt using a 0.6 cm seam allowance, mitering the corners as you work. Fold the binding around to the back and secure it with hand stitches or machine stitching. If the finished panel measures approximately 50 cm × 60 cm, you will need roughly 240 cm of binding, including extra length for joining and finishing. Add a fabric hanging sleeve or two sturdy hanging loops to the back if you plan to display the decoration on a wall. Make sure the hanging method can support the finished panel securely.
This Christmas tree appliqué pattern can also be adapted into several other decorative projects. For a holiday pillow, reduce the tree dimensions and place the appliqué on a square fabric panel measuring approximately 45 cm × 45 cm before constructing the pillow cover. For a table runner, create two smaller Christmas trees facing opposite ends of a long rectangular background. Miniature versions can become fabric ornaments, gift bag decorations, or seasonal greeting card embellishments. Experienced quilters may enjoy incorporating the tree into a larger Christmas quilt featuring stars, presents, and traditional patchwork blocks. The same curved branch templates can be reused with different fabrics, making it possible to create several coordinated decorations. This versatility is one of the greatest advantages of working with fabric appliqué.
Proper care will help preserve the beauty of your finished DIY fabric Christmas tree for many holiday seasons. If the decoration contains delicate embroidery, metallic threads, beads, or dimensional ornaments, gentle spot cleaning is generally preferable to machine washing. For a washable quilted panel made entirely from compatible cotton materials, follow the care instructions for the fabrics, threads, batting, and adhesives used. Avoid aggressive scrubbing or excessive heat, which may damage decorative stitching. When the Christmas season ends, store the panel flat or loosely rolled in a clean, dry location away from direct sunlight. If folding is necessary, place acid-free tissue paper between delicate embellished sections to reduce creasing. With careful handling and storage, your handmade appliqué can become a cherished part of your family’s annual Christmas decorating traditions.
Frequently Asked Questions (FAQ) About the Appliqué in the Shape of a Christmas Tree Pattern
1. Is the Appliqué in the shape of a Christmas tree Pattern suitable for beginners?
Yes. This project is suitable for beginners who have basic sewing knowledge and are comfortable cutting fabric shapes. The layered design may look complicated, but each branch is constructed and attached separately. Beginners can simplify the pattern by using fewer branches, larger fabric pieces, and minimal embroidery. Fusible web is particularly helpful because it holds the appliqué pieces in position before stitching. Practicing a blanket stitch or narrow zigzag stitch on scrap fabric will make the assembly process easier.
2. What is the best fabric for making a Christmas tree appliqué?
Quilting cotton is one of the best choices for this project because it is stable, easy to cut, and available in countless Christmas prints. Cotton-linen blends also work well for the background. Avoid highly stretchy fabrics unless you have experience using stabilizers. For the branches, choose fabrics with small-scale patterns that remain visible after cutting. Traditional green, burgundy, cream, and gold fabrics are especially effective for reproducing the vintage Christmas appearance.
3. Do I need a sewing machine to complete this Christmas appliqué project?
No. The entire design can be sewn by hand using blanket stitches, running stitches, and small invisible stitches. Hand sewing is particularly useful for curved branches and decorative details. A sewing machine can speed up the construction process, but it is not essential. If you enjoy slow stitching and traditional textile crafts, making the project by hand can be a relaxing and rewarding experience.
4. How long does it take to make a fabric Christmas tree appliqué?
The time required depends on your sewing experience, the size of the design, and the number of decorative details. A simplified version may take approximately four to six hours, while a more elaborate project with hand embroidery and multiple ornaments may require eight to twelve hours or longer. Preparing the templates and arranging the fabrics carefully can reduce mistakes and make the sewing process more efficient.
5. Can I make this Christmas tree appliqué without fusible web?
Yes. Fusible web is convenient but not mandatory. You can secure the appliqué pieces with temporary basting stitches, fabric clips, or suitable temporary fabric adhesive. Another option is traditional needle-turn appliqué, where the seam allowance is folded under and stitched by hand. This method produces smooth finished edges and is especially popular among traditional quilters. However, it requires more time and careful handling around curved shapes.
6. What is the difference between raw-edge appliqué and turned-edge appliqué?
Raw-edge appliqué involves cutting fabric pieces to their finished dimensions and securing the exposed edges with stitching. It is generally faster and works well for decorative wall hangings. Turned-edge appliqué involves folding the seam allowance underneath each piece before stitching, creating a smoother finish with no exposed raw edges. Both techniques can be used for this Christmas tree design. The best choice depends on your preferred appearance and sewing experience.
7. How can I prevent the appliqué fabric from fraying?
To reduce fraying, use a narrow zigzag or blanket stitch around the fabric edges. Lightweight fusible web can also help stabilize the fabric. If you want a completely enclosed edge, choose turned-edge appliqué. For raw-edge designs, avoid handling the cut pieces excessively before sewing. Use sharp scissors to create clean edges and secure each section carefully.
8. Can I use leftover fabric scraps for this Christmas tree pattern?
Absolutely. This project is ideal for using leftover quilting cotton and small pieces of Christmas fabric. The individual branches do not require large fabric cuts, so scraps from previous sewing projects can be incorporated into the design. Combining different prints gives the tree its distinctive patchwork appearance. For the most harmonious result, choose scraps that share a coordinated color palette.
9. How do I make the Christmas tree appliqué look more dimensional?
You can create additional dimension by using a thin layer of batting beneath selected branches, adding decorative embroidery, and overlapping the fabric pieces at different angles. Small padded ornaments and textured fabric stars can also create visual depth. Avoid using excessive padding because it may distort the shape of the tree or make the panel difficult to finish. Subtle dimension is usually more effective than heavily raised embellishments.
10. Can I resize the Christmas tree appliqué pattern?
Yes. The design can be enlarged or reduced to suit different projects. When resizing, maintain the proportions of the branches, trunk, and star so the composition remains balanced. For smaller projects, simplify the embroidery and reduce the number of branch pieces. For larger wall hangings, add more branches and decorative details to fill the available space. Always test the arrangement on the background before stitching.
11. What stitches work best for decorating the Christmas tree?
Blanket stitches and narrow zigzag stitches are excellent for securing the appliqué edges. Running stitches and backstitches work well for outlining details, while French knots can represent berries or small decorative lights. Straight stitches are particularly effective for embroidered stars and snowflake-inspired accents. Using gold, cream, or burgundy embroidery floss can enhance the traditional Christmas appearance.
12. Can the finished appliqué be washed?
The washing method depends on the materials used. A simple cotton appliqué panel with secure stitching may be gently washed if all fabrics, threads, adhesives, and batting are washable. However, decorations containing metallic embroidery, delicate ribbons, beads, or dimensional embellishments are better suited to careful spot cleaning. Always test fabrics for colorfastness before construction and follow the care recommendations for the materials.
13. How can I personalize the Christmas tree appliqué?
Personalization is one of the most enjoyable aspects of this project. You can use family-favorite Christmas fabrics, embroider initials or a special year onto the trunk, change the star design, or create ornaments in meaningful colors. Some sewists enjoy using small pieces of fabric saved from previous family sewing projects. These thoughtful additions can transform a decorative wall hanging into a meaningful holiday keepsake.
14. What can I do if my curved appliqué branches do not lie flat?
Curved pieces may wrinkle if they stretch during cutting or stitching. To prevent this, avoid pulling the fabric while sewing and use lightweight stabilizer when necessary. Press the fabric gently before attaching it to the background. If using fusible web, allow each piece to cool completely after pressing before continuing. When machine sewing, adjust the presser-foot pressure if your machine allows it and test the stitch settings on scrap fabric.
15. What makes this Christmas tree appliqué different from a traditional patchwork Christmas tree?
A traditional patchwork Christmas tree is often assembled from geometric shapes such as triangles, squares, and rectangles. This Appliqué in the shape of a Christmas tree Pattern uses individual curved branches placed on top of a background fabric. The overlapping shapes create a softer, more decorative appearance. Embroidered ornaments, a golden star, and miniature fabric presents further distinguish the design from a conventional pieced quilt block.
Conclusion: Create a Beautiful Handmade Christmas Tree Appliqué
The Appliqué in the shape of a Christmas tree Pattern combines traditional sewing techniques, colorful quilting cotton, and delicate decorative details to create a charming holiday decoration. Throughout this tutorial, you have learned how to choose coordinating Christmas fabrics, prepare a suitable background, design curved branch templates, cut the appliqué shapes, and assemble the layered tree. You have also explored methods for attaching the fabric pieces, embroidering festive ornaments, creating miniature presents, and finishing the project as a decorative wall hanging or other textile accessory.
One of the most rewarding aspects of this Christmas sewing pattern is the freedom to personalize every detail. From the selection of burgundy and green fabrics to the placement of embroidered stars and hanging ornaments, each decision contributes to a unique finished piece. Whether you are a beginner exploring fabric appliqué for the first time or an experienced quilter looking for a festive seasonal project, this design offers a creative and enjoyable way to celebrate Christmas through handmade sewing.
EASILY FIND THE FREE PDF FOR THIS PATTERN HERE!
A carefully crafted fabric Christmas tree appliqué can become more than a seasonal decoration. It can be a meaningful handmade gift, a treasured family keepsake, or a special addition to your annual holiday traditions. By combining simple sewing techniques with thoughtful embellishments, you can transform ordinary fabric scraps into a beautiful Christmas artwork that reflects your personal style. We would love to hear your sincere opinion about this Christmas tree appliqué project! What do you think of the layered fabric branches and traditional Christmas colors? Would you prefer to make it as a wall hanging, a decorative pillow, or part of a larger Christmas quilt? Share your honest feedback, creative ideas, and suggestions for improving the pattern. Your experiences and recommendations can inspire other sewing enthusiasts to explore new techniques and create their own beautiful handmade Christmas decorations.