
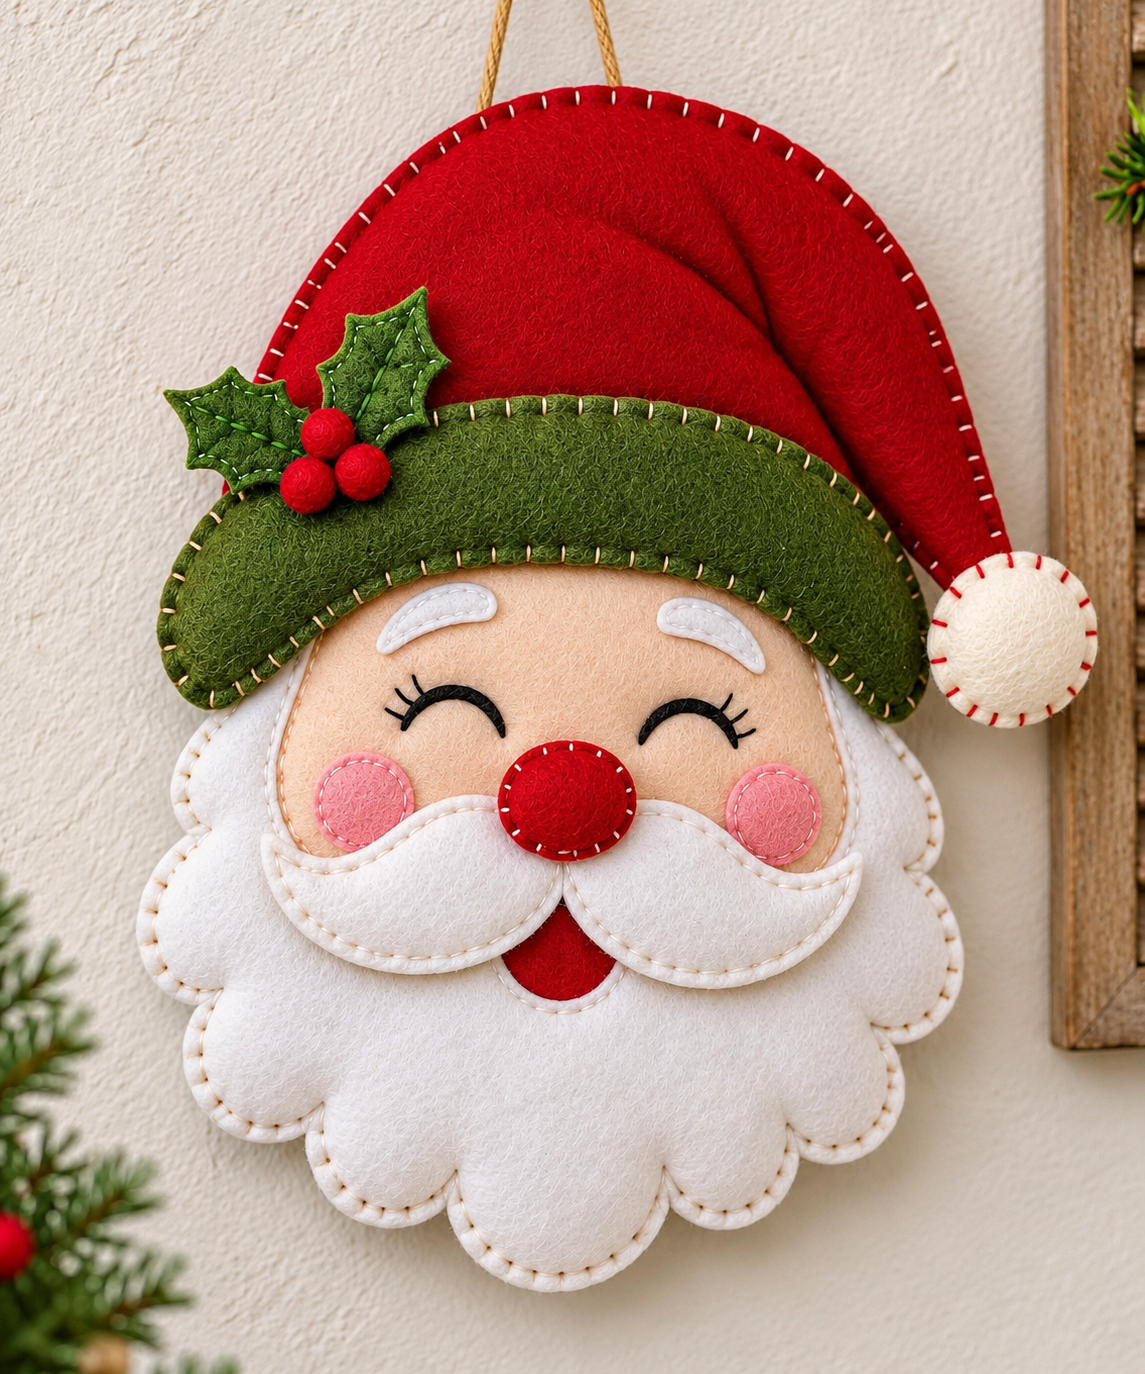
The Felt Santa Claus Face Pattern is a charming Christmas sewing project that brings warmth, creativity, and handmade personality to your holiday decorations. Featuring a cheerful Santa face, a fluffy white beard, a bright red hat, a green felt brim, and delicate holly leaves, this adorable decoration captures the traditional spirit of Christmas. Whether you enjoy making handmade ornaments, decorating your home, or preparing thoughtful gifts for family and friends, this DIY felt Santa Claus decoration is a wonderful project to explore. Its combination of colorful felt, decorative embroidery, and soft dimensional details creates a festive appearance that looks beautiful on walls, doors, and Christmas displays.
One of the most appealing features of this Felt Santa Claus face Pattern is its accessibility to crafters with different sewing experience levels. You do not need an expensive sewing machine or complicated equipment to create a beautiful finished piece. Most of the construction can be completed using basic hand-sewing techniques, including the blanket stitch, running stitch, and backstitch. The materials are affordable, easy to find in American craft stores, and available in a wide variety of colors. Beginners can follow the project step by step, while experienced felt artists can customize the facial expressions, embroidery, and decorative elements to create their own distinctive Christmas ornament.
In this comprehensive tutorial, you will learn how to recreate the handmade felt Santa Claus face inspired by the reference image, from preparing the pattern pieces to assembling the finished Christmas decoration. The project includes a rounded red Santa hat with a green brim, decorative holly leaves and berries, a peach-colored face, embroidered closed eyes, rosy cheeks, a red nose, a curled white mustache, and a layered scalloped beard. You will also discover practical techniques for cutting felt accurately, adding dimension with stuffing, creating neat decorative stitches, and attaching a hanging cord. By the end of this guide, you will understand how to make a festive Christmas felt ornament that can become part of your family’s holiday traditions for years to come.
1. Materials and Preparation for the Felt Santa Claus Face Pattern
The first step in creating your Felt Santa Claus Face Pattern is choosing the appropriate materials. High-quality craft felt provides a soft texture, holds its shape, and makes cutting small decorative pieces easier. Polyester felt is an economical choice for beginners, while wool-blend felt offers a denser texture and a more refined appearance. For this project, select felt in Christmas red, olive green, white, peach or light beige, pink, and black. You will also need small amounts of lighter gray or white felt for the eyebrows. These colors closely reproduce the traditional Santa Claus design shown in the reference image.
DISCOVER MORE FREE PATTERNS HERE!
Before cutting your fabric, gather the necessary felt sewing supplies. You will need sharp fabric scissors, embroidery needles, sewing pins or clips, matching sewing thread, embroidery floss, a fabric marking pen, polyester fiberfill, and a flexible measuring tape. A small amount of fabric glue can help temporarily position decorative pieces, although stitching is recommended for a durable finish. Prepare a piece of natural cotton cord or decorative twine for hanging the ornament. If you plan to make several decorations, organize the felt pieces by color to keep your workspace clean and make the assembly process more efficient.
For a finished decoration measuring approximately 28 cm wide and 32 cm tall, including the Santa hat but excluding the hanging loop, prepare a paper template for each major component. These dimensions are suggested for recreating the photographed design rather than measurements taken from an original printable pattern. Draw a rounded, scalloped beard approximately 27 cm wide and 19 cm tall, a face approximately 19 cm wide and 13 cm tall, and a curved Santa hat approximately 27 cm wide and 17 cm tall. Create separate templates for the green hat brim, mustache sections, nose, cheeks, eyebrows, holly leaves, berries, and pom-pom. Adjust the proportions as needed so the pieces overlap naturally.
Understanding felt pattern cutting is essential for obtaining a symmetrical and professional-looking result. Fold your paper templates in half when drawing symmetrical pieces, especially the beard, face, and nose. Cut along the outline and unfold the paper to check the proportions. For the beard, draw several large, rounded scallops along the lower edge, with smaller curves extending toward the cheeks. The Santa hat should have a broad, rounded upper section and a long curved tip that bends toward one side. The green brim should follow the curve of the forehead and become slightly wider toward its outer ends.
When transferring the Santa Claus felt template onto your material, place the paper pieces flat against the felt and trace them using a removable fabric marker. Cut two pieces for the main beard and two pieces for the red hat to allow for light stuffing. Cut one visible face piece and a second backing piece if you want additional firmness. For the green brim, cut two matching pieces if you prefer a slightly padded effect. Most smaller decorations, such as the cheeks, eyebrows, and mustache, can be made using single felt layers, although doubling the mustache pieces can create a fuller appearance.
Finally, prepare the embroidery thread colors before beginning the assembly. Cream or beige thread works beautifully around the white beard and peach face, while red thread complements the hat and nose. Use green embroidery floss for the holly leaves, black thread for the eyelashes, and pale yellow or cream thread for the green brim. The blanket stitch is particularly useful because it secures two felt layers while creating an attractive decorative border. Keep your stitches evenly spaced, approximately 0.5 cm apart, and work slowly around curves to maintain a neat finish.
2. How to Cut and Assemble the Santa Claus Face and Beard
Begin constructing the Felt Santa Claus Face Pattern by assembling the large white beard. Place the two scalloped beard pieces together, aligning all curved edges carefully. If the felt tends to shift, secure the layers with sewing clips or a few temporary stitches. Using cream-colored embroidery floss, sew around the outer edge with a blanket stitch, leaving a small opening near the upper section. Add a thin layer of polyester fiberfill, concentrating on the rounded lower sections to create gentle volume. Avoid overstuffing, as too much filling can distort the scalloped shape. Close the opening with matching stitches.
Next, prepare the peach-colored face. Position the face template over the upper center of the white beard, allowing the lower edge to overlap the beard slightly. The face should have a broad forehead and softly rounded cheeks. Before sewing it in place, mark the locations of the eyes, eyebrows, nose, and rosy cheeks using small removable dots. This preparation is important because the facial features determine the personality of your handmade Santa Claus ornament. Check that both eyes are positioned at approximately the same height and that the nose sits centrally between the cheeks.
Create the closed, smiling eyes using black embroidery floss or carefully cut black felt shapes. Each eye should form a gentle upward curve, giving Santa a peaceful and joyful expression. Use a backstitch to embroider the curved lines, then add two or three short eyelashes near the outer corners. For beginners, drawing the curves lightly before stitching helps maintain symmetry. The backstitch embroidery technique produces a continuous line that looks clean and expressive. Keep the stitches short around tight curves so the embroidered eyes follow the intended shape.
The eyebrows are another important feature of this Christmas Santa face sewing project. Cut two curved pieces from white or pale gray felt, each approximately 3.5 cm long. Position them above the embroidered eyes, leaving enough space to create a relaxed facial expression. Attach the eyebrows with small, discreet stitches around the edges. For a slightly raised appearance, add a tiny amount of fiberfill beneath each eyebrow before completing the stitching. This simple detail adds dimension and helps the face resemble the soft, layered appearance of the reference design.
To make Santa’s rosy cheeks, cut two circles from pink felt, approximately 2.5 cm in diameter. Place one circle on each side of the face, slightly below the eyes and toward the outer edges. Sew around the circles using pink embroidery thread and small running stitches. The running stitch is one of the easiest hand-sewing methods for beginners because it involves passing the needle in and out of the fabric at regular intervals. You can also add a few subtle embroidery details inside the circles to give the cheeks a handcrafted texture.
Finish this stage by preparing the red nose, mouth, and white mustache. Cut an oval red nose approximately 3.5 cm wide and two large, curved white mustache sections that meet beneath it. Create a small red mouth shape and position it beneath the mustache, allowing the white beard to frame the opening. Stitch the mouth onto the beard first, then attach the mustache pieces so they overlap the lower face. Finally, sew the red nose at the center, adding a tiny amount of fiberfill if desired. The finished felt Santa Claus face should have a balanced, friendly expression with soft layered details.
3. Creating the Red Santa Hat, Green Brim, and Holly Decorations
The bright red hat is one of the most recognizable elements of the Felt Santa Claus Face Pattern. To create its rounded shape, place the two red felt hat pieces together and begin sewing along the outer curved edge using red or cream embroidery floss. The hat should have a broad upper section and a long, curved tip that bends down toward the right side, similar to the reference image. Use a blanket stitch with approximately 0.5 cm spacing to produce a decorative handmade border. Leave the lower edge open temporarily so you can add stuffing and adjust the shape before attaching the hat to the face.
Add a small amount of polyester fiberfill inside the red hat, spreading it evenly across the rounded upper section. The purpose is to create a softly padded appearance rather than a firm, bulky shape. Pay particular attention to the curved tip, which should remain flexible enough to fold naturally toward the side. Once you are satisfied with the shape, secure the opening with temporary stitches. The stuffed felt Santa hat should have enough volume to stand slightly forward from the backing without becoming too heavy for hanging.
Now prepare the green brim, which provides a beautiful contrast against the red hat. Cut two matching pieces from olive-green felt, approximately 25 cm wide and 7 cm tall at the center, adjusting the curve to fit the face. The upper edge should be gently rounded, while the lower edge follows the forehead and dips slightly toward the cheeks. Place the pieces together and stitch around the edges with pale yellow or cream embroidery floss. If you want the brim to appear fuller, insert a very thin layer of fiberfill before closing the seam. The green felt hat brim should overlap the bottom of the red hat and partially cover the upper forehead.
The holly decoration adds a festive botanical detail to this DIY Christmas felt craft. Cut two holly leaves from medium or dark green felt, each approximately 5 to 6 cm long. Draw the traditional pointed leaf shape with several small projections along the edges. For additional texture, cut a second slightly smaller leaf layer and place it over the first. Use green embroidery floss to sew a central vein and several short diagonal lines extending toward the leaf tips. These simple embroidered details make the holly leaves appear more realistic while maintaining the soft, handcrafted character of the ornament.
To complete the holly cluster, make three small red berries. Cut six red felt circles approximately 2 cm in diameter, pairing them together to create three padded berries. Sew around each pair with small stitches, leaving a narrow opening for a tiny amount of stuffing. Close the opening and arrange the berries in a triangular cluster where the two holly leaves overlap. Attach them securely with matching thread. The felt holly leaves and berries should sit toward the left side of the green brim, creating a pleasing visual balance with the curved hat tip on the opposite side.
Finish the hat by creating the white pom-pom at the end of the curved red tip. Cut two white felt circles approximately 5 cm in diameter and sew them together using red embroidery floss for a decorative contrasting edge. Insert a small amount of stuffing before closing the final stitches. Attach the finished pom-pom to the end of the red hat with several secure stitches. Position the completed hat over Santa’s forehead, ensuring the green brim covers the joining seam between the hat and face. This layered construction is an important feature of the Felt Santa Claus face Pattern, giving the finished decoration its recognizable Christmas appearance.
4. Final Assembly, Decorative Stitching, and Christmas Display Ideas
Once all the individual components are prepared, you can begin the final assembly of your Felt Santa Claus Face Pattern. Lay the beard flat on your work surface and position the completed face over its upper center. Arrange the mustache, nose, cheeks, and eyebrows so they remain visible beneath the green hat brim. Before sewing anything permanently, check the overall proportions and adjust the placement of the pieces. The face should appear centered, with the beard extending evenly beneath the cheeks and the hat curving naturally toward one side. Take a moment to compare the arrangement with the reference image.
Secure the face to the beard using small, nearly invisible stitches around the outer edges. Work carefully where the peach felt meets the white beard, keeping the thread tension consistent. Next, position the completed hat over the upper portion of the face and attach it along the overlapping edges. Use reinforced stitches at the corners of the brim because these areas may experience more tension when the decoration is handled. The hand-sewn felt Santa decoration should now have a complete silhouette, with all major elements firmly attached and the layered pieces lying smoothly against one another.
For a more polished finish, add decorative stitching around selected facial details. A cream-colored running stitch along the mustache creates a soft outline, while white stitches around the red nose add contrast. You can also reinforce the scalloped beard with additional blanket stitches where necessary. Decorative embroidery is one of the defining features of felt Christmas ornaments, as it adds visual interest without requiring complicated embellishments. Keep the stitch lengths consistent, especially along curved edges, and avoid pulling the thread too tightly because this can cause the felt to wrinkle.
The next step is attaching the hanging loop. Cut approximately 25 cm of natural cotton cord, fold it in half, and position the ends behind the upper center of the Santa hat. Sew the cord ends securely into the back of the decoration using several reinforced stitches. If the ornament is particularly large or heavily stuffed, attach a small felt reinforcement patch over the cord ends to distribute the weight. For a cleaner appearance, cover the back with an additional felt backing piece cut to the finished silhouette. This optional backing hides the assembly stitches and helps the Christmas wall hanging decoration maintain its shape.
After completing the sewing, inspect the entire ornament for loose threads, uneven seams, or areas that need additional reinforcement. Gently reshape the beard scallops, smooth the green brim, and adjust the red hat so its curved tip falls naturally. If necessary, use your fingers to redistribute the fiberfill inside the padded sections. Avoid applying high heat directly to synthetic felt, as it may shrink or melt. Instead, flatten any minor wrinkles by placing the ornament beneath a lightweight book for a short period, taking care not to crush the stuffed details.
Your finished Felt Santa Claus Face Pattern can be displayed in many creative ways throughout the holiday season. Hang it on an interior door, place it on a decorative wall hook, incorporate it into a Christmas gallery wall, or use it as a focal point in a handmade holiday display. Smaller versions can become Christmas tree ornaments, while larger versions work beautifully as festive door decorations. You can also personalize the project with embroidered initials, alternative hat colors, or additional felt snowflakes. With proper storage in a clean, dry container, this handmade Christmas felt decoration can be enjoyed for many holiday seasons.
Frequently Asked Questions About the Felt Santa Claus Face Pattern
1. Is the Felt Santa Claus Face Pattern suitable for beginners?
Yes. The Felt Santa Claus Face Pattern is suitable for beginners who are comfortable learning a few basic hand-sewing techniques. Most of the project uses simple stitches, including the blanket stitch, running stitch, and backstitch. The individual felt pieces are relatively easy to cut, and the construction does not require a sewing machine. Beginners may find it helpful to practice stitching on a small felt scrap before assembling the ornament. Working slowly and checking the placement of each piece will help produce a neat and attractive result.
2. What type of felt is best for making a Santa Claus face decoration?
Both polyester felt and wool-blend felt work well for this project. Polyester felt is affordable, widely available, and easy to cut, making it a practical choice for beginners. Wool-blend felt generally has a denser texture and can provide a more refined appearance. For the best results, choose felt that is approximately 1 to 2 mm thick. Extremely thin felt may stretch or lose its shape, while very thick felt can make small decorative pieces difficult to sew.
3. Can I make this felt Santa Claus ornament without a sewing machine?
Absolutely. This DIY felt Santa Claus ornament is designed primarily for hand sewing. A sewing machine is not necessary because the decorative stitching is part of the finished appearance. Hand sewing also provides better control when working with small facial features, curved mustache pieces, and holly leaves. A basic embroidery needle, matching thread, and sharp scissors are enough to complete most of the project.
4. How long does it take to make a felt Santa Claus face?
The time required depends on your sewing experience and the level of detail you choose. Beginners may need approximately 5 to 8 hours to prepare the templates, cut the felt, embroider the facial features, assemble the padded sections, and complete the finishing stitches. Experienced crafters may finish the project more quickly. Making several ornaments at once can save time because you can cut all the pieces together and complete similar sewing tasks in batches.
5. Can I change the size of the Felt Santa Claus Face Pattern?
Yes. You can enlarge or reduce the paper templates to create different ornament sizes. For a small Christmas tree decoration, reduce the overall dimensions while maintaining the proportions of the face, beard, and hat. For a larger wall hanging, increase the dimensions and consider using additional felt backing for stability. Remember that very small pieces, such as eyelashes and holly berries, may need to be simplified when creating miniature versions.
6. What can I use instead of polyester fiberfill?
If you do not have polyester fiberfill, you can use small amounts of clean cotton batting or leftover soft fabric scraps. However, polyester fiberfill is generally easier to distribute evenly inside curved shapes. Avoid using large or stiff scraps because they may create visible lumps. The goal is to add gentle dimension while keeping the ornament lightweight and flexible.
7. How do I prevent the felt edges from looking uneven?
The best way to achieve clean felt edges is to use sharp fabric scissors and carefully prepared templates. Cut slowly around curves and avoid pulling the felt while trimming. When sewing two layers together, align the edges before stitching and maintain consistent thread tension. A neatly executed blanket stitch can help conceal minor cutting imperfections while adding an attractive decorative border.
8. Can I use fabric glue instead of sewing the pieces together?
Fabric glue can be useful for temporarily positioning small decorations, such as the cheeks, eyebrows, and holly leaves. However, stitching is generally more durable, especially for padded sections and hanging ornaments. If you choose to use glue, select a product specifically designed for fabric and follow the manufacturer’s instructions. Allow the glue to dry completely before handling the decoration. For the hanging loop and major structural pieces, reinforced sewing is recommended.
9. How should I clean and store handmade felt Christmas decorations?
The safest cleaning method is usually gentle dust removal with a soft brush or a clean, dry cloth. If the ornament develops a small stain, test a lightly dampened cloth on an inconspicuous area before cleaning. Avoid soaking the decoration, particularly if it contains fiberfill or glued components. After the holiday season, store the ornament in a dry, dust-free container with tissue paper around the padded details. Keep it away from excessive moisture, direct sunlight, and heavy objects that could flatten the design.
10. Can I sell handmade ornaments created using this tutorial?
You can generally sell ornaments that you make yourself using your own original templates and construction choices. If you use a purchased or third-party printable pattern, check its licensing terms before selling finished products. When preparing handmade Christmas decorations for sale, pay attention to stitching durability, material quality, and accurate product descriptions. Avoid presenting decorative ornaments as toys unless they meet the applicable safety requirements. Small detachable elements should also be kept away from young children.
11. How can I personalize my Santa Claus felt decoration?
There are many ways to personalize the Felt Santa Claus Face Pattern. You can change the hat from traditional red to burgundy, forest green, or soft pastel colors. You can also add embroidered snowflakes, decorative stars, initials, or a small Christmas message on the back. Changing the shape of the eyebrows and eyes can create different facial expressions. These simple adjustments allow you to make a collection of unique Santa decorations while following the same basic construction method.
12. What are the most common mistakes when making felt Christmas ornaments?
Common mistakes include cutting pieces without checking their proportions, adding too much stuffing, pulling embroidery thread too tightly, and attaching decorative elements before confirming their placement. Another frequent problem is using thread that is too thick for small facial details. To avoid these issues, prepare all templates in advance, arrange the pieces before sewing, and use appropriately sized needles and embroidery floss. Careful preparation makes the final assembly much easier and helps achieve a professional-looking result.
Conclusion: Create a Beautiful Handmade Santa Claus Decoration
The Felt Santa Claus Face Pattern is a delightful way to combine traditional Christmas imagery with the creativity of handmade sewing. Throughout this tutorial, you have learned how to select suitable felt materials, prepare the templates, cut the individual components, and assemble a cheerful Santa Claus face with a soft white beard, embroidered eyes, rosy cheeks, a red nose, and a dimensional mustache. You have also discovered how to construct the curved red hat, add a green brim, create decorative holly leaves and berries, and finish the ornament with a hanging loop.
One of the greatest advantages of this DIY Christmas felt decoration is its versatility. The design can be adapted to different sizes, colors, and decorating styles while preserving its festive character. Whether you are creating a single ornament for your home, preparing handmade gifts, or developing a collection of Christmas sewing projects, the techniques covered in this guide provide a useful foundation for future felt crafts.
Making Christmas decorations by hand is also an opportunity to slow down, enjoy the creative process, and produce something meaningful. Every stitch contributes to the personality of the finished piece, making each handmade felt Santa Claus ornament a little different and special.
EASILY FIND THE FREE PDF FOR THIS PATTERN HERE!
Now it’s your turn! Have you ever made a Santa Claus decoration using felt? Which part of this project did you enjoy most: the embroidered face, the fluffy beard, the colorful hat, or the holly details? Leave your sincere opinion, share your experience, and tell us your suggestions for improving this tutorial or creating new Christmas felt patterns. Your ideas and feedback can inspire more creative projects and help other craft enthusiasts enjoy the wonderful tradition of handmade holiday decorations.