
The Patchwork Butterfly Tutorial Pattern is a delightful sewing project that combines colorful fabrics, decorative stitching, and creative appliqué techniques to produce a beautiful butterfly decoration. With its layered wings, cheerful colors, and charming embroidered details, this handmade butterfly is an excellent example of how traditional patchwork sewing can become a unique piece of fabric art. Whether you enjoy quilting, sewing decorative accessories, or creating handmade gifts, this project offers an enjoyable opportunity to explore different fabric combinations while developing your sewing skills.
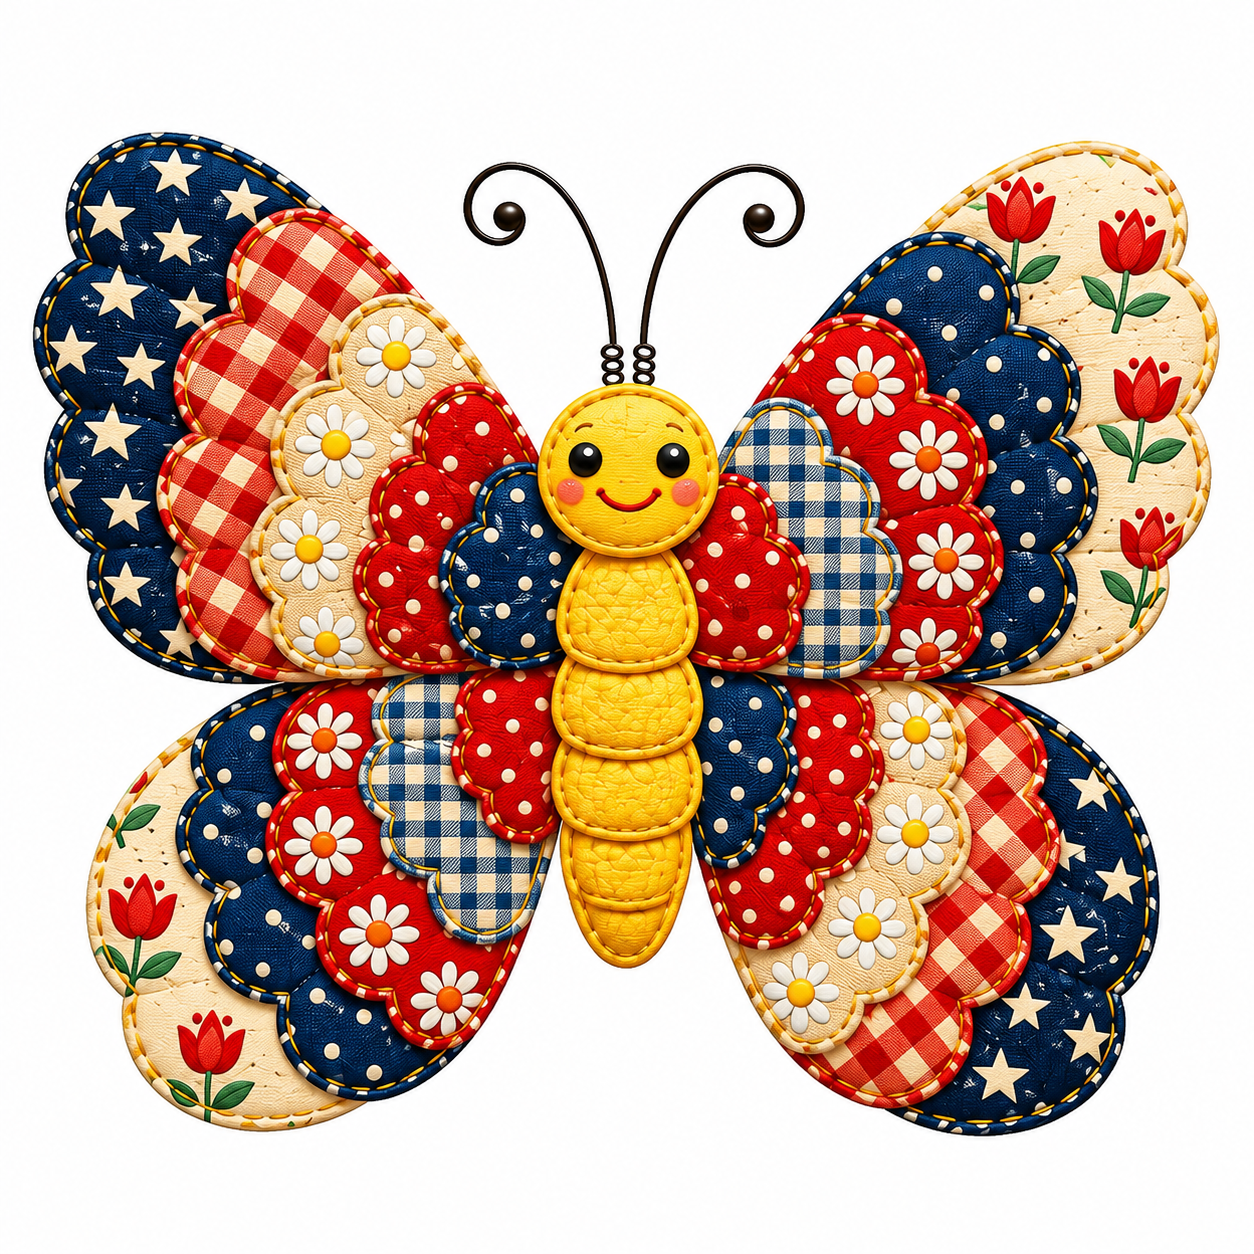
One of the most attractive features of this patchwork butterfly pattern is its combination of fabric textures and carefully arranged wing sections. The butterfly shown in the reference image features overlapping scalloped wings decorated with navy blue stars, red gingham checks, white daisies, floral prints, and playful polka dots. Its bright yellow body creates a cheerful centerpiece, while the delicate curved antennae add personality to the finished design. Although the arrangement looks elaborate, the butterfly can be constructed using relatively simple sewing techniques. By preparing individual fabric pieces, adding lightweight padding, and assembling the layers in the correct order, even beginners can create an impressive decorative butterfly.
This Patchwork Butterfly Tutorial Pattern is particularly suitable for crafters who enjoy transforming fabric scraps into meaningful handmade decorations. The finished butterfly can be displayed as a wall hanging, incorporated into a decorative quilt, attached to a cushion, or used as an embellishment for a fabric tote bag. The design is also highly customizable, allowing you to experiment with seasonal colors, vintage-inspired cotton prints, and different embroidery styles. Throughout this tutorial, you will learn how to select materials, prepare a practical butterfly template, construct padded fabric wings, assemble the central body, and finish the project with professional-looking stitching. The instructions use measurements in centimeters and familiar American sewing terminology, making the process accessible to sewing enthusiasts throughout the United States.
1. Materials and Fabric Preparation for the Patchwork Butterfly Tutorial Pattern
The first step in creating your Patchwork Butterfly Tutorial Pattern is choosing fabrics that complement one another while maintaining the cheerful appearance of the original design. Quilting cotton is an excellent choice because it is easy to cut, press, and sew. For a butterfly similar to the reference image, select several coordinating fabrics in navy blue, red, cream, white, and yellow. Star prints, gingham checks, polka dots, and floral patterns create visual interest without requiring complicated sewing techniques. You can also use leftover pieces from previous quilting projects, making this butterfly an attractive scrap fabric sewing project.
DISCOVER MORE FREE PATTERNS HERE!
For a finished butterfly measuring approximately 35 cm wide and 30 cm tall, prepare six to eight different cotton fabric prints, lightweight fusible interfacing, thin polyester batting, matching sewing thread, embroidery floss, and a small amount of yellow fabric for the body. You will also need fabric scissors or a rotary cutter, sewing pins or clips, a fabric marking pencil, a ruler, an iron, and a sewing machine. A hand-sewing needle is useful for attaching small decorative pieces. For the antennae, choose dark embroidery floss, narrow fabric-covered cord, or another soft decorative material. These dimensions are suggested for a newly drafted pattern inspired by the photograph rather than measurements taken from an existing printable template.
Before cutting any pieces, wash and dry your cotton fabrics according to their care instructions. Prewashing helps reduce the possibility of uneven shrinkage after the project is completed. Press each fabric until it lies flat, paying particular attention to folded edges and wrinkles. Accurate pressing is essential for patchwork appliqué, since small distortions can affect the symmetry of the butterfly wings. If you are working with lightweight cotton, apply fusible interfacing to the wrong side of selected pieces to provide additional stability. Always follow the manufacturer’s temperature and pressing instructions to avoid damaging delicate prints.
Next, prepare a paper template for the butterfly. Draw a vertical centerline and sketch two large upper wings and two smaller lower wings. The upper wings should have rounded, scalloped outer edges, while the lower wings should curve downward into a softer shape. For a butterfly approximately 35 cm wide, the complete wing arrangement can extend about 17.5 cm to either side of the centerline. Use folded paper to create matching left and right outlines. The butterfly in the reference image has multiple overlapping wing layers, so prepare additional smaller scalloped templates that can be arranged inside the main wing shapes. Label each template to prevent confusion during assembly.
When transferring the templates to fabric, remember to include a 0.7 cm seam allowance around pieces that will be sewn and turned. For decorative appliqué pieces that will be attached with a satin stitch or blanket stitch, the cutting method may differ depending on whether you prefer raw-edge or turned-edge appliqué. This tutorial uses turned and padded wing sections for the main butterfly, with smaller decorative fabric pieces layered on top. Mark the right and wrong sides of each fabric when necessary, especially when using prints with directional patterns. Careful preparation will help ensure that the finished butterfly looks balanced and attractive.
Finally, organize the cut fabric pieces before beginning the sewing process. Place the largest navy star-print sections toward the outside of the upper wings, followed by red gingham, cream floral, red polka-dot, and blue checked layers. On the lower wings, reverse or rearrange the sequence to create the playful overlapping appearance shown in the photograph. You do not need to copy every fabric exactly; the important principle is to balance light and dark prints while keeping the yellow body visually prominent. Photographing your arrangement before sewing can also help you remember the intended placement of each piece.
2. How to Cut and Sew the Layered Patchwork Butterfly Wings
Begin constructing the patchwork butterfly wings by working on the largest outer sections first. These pieces provide the foundation for the smaller decorative layers. For each upper wing, cut a front fabric piece, a matching backing piece, and a thin batting piece using the prepared template. Repeat the process for the lower wings. To create a soft quilted appearance, place the batting against the wrong side of the front fabric, then position the backing fabric with its right side facing the front. Pin the layers together, keeping the edges aligned. Sew around the outline using a 0.7 cm seam allowance, leaving a small opening along an inner edge for turning.
After sewing each wing section, carefully trim the excess batting and reduce bulky seam allowances around the curves. Clip into the seam allowance at inward scalloped corners without cutting through the stitching. For outward curves, small notches may help the fabric lie smoothly after turning. Turn the wing right side out through the opening and gently shape the scalloped edges using a blunt turning tool. Avoid pushing too forcefully, as this can damage the seams. Press the wing carefully with a warm iron and a pressing cloth when appropriate. The goal is to achieve smooth, rounded edges that resemble the padded fabric sections in the reference butterfly.
Once the largest wings are complete, prepare the smaller decorative layers using the same method. The Patchwork Butterfly Tutorial Pattern becomes especially attractive when the wing sections decrease gradually in size toward the butterfly’s body. For example, an outer wing may extend 15 cm from the centerline, while successive decorative layers extend approximately 12 cm, 9 cm, and 6 cm. These are suggested dimensions that can be adjusted to match your chosen butterfly silhouette. Each decorative section should overlap the previous layer enough to conceal its inner edge. This creates the dimensional effect that makes the finished butterfly appear rich in texture.
Arrange the padded sections on a flat surface before stitching them together. Begin with the outermost layers and place the smaller pieces on top, keeping the inner edges directed toward the butterfly’s center. Use sewing clips or temporary basting stitches to secure the arrangement. When working with several layers of batting, avoid excessive thickness around the center, where the body will eventually be attached. You can trim batting away from the concealed inner edges if necessary. This technique makes the finished butterfly easier to assemble and prevents uncomfortable fabric bunching beneath the central body.
To secure the overlapping wing sections, use a straight stitch close to the inner edges or attach them with small hand stitches hidden beneath the next layer. For a decorative finish, add contrasting topstitching approximately 0.3 cm from the outer edge of each wing section. Yellow or cream thread looks particularly attractive against navy blue and red fabrics. If you prefer the appearance of hand embroidery, use a running stitch with embroidery floss to imitate the visible decorative stitching in the photograph. Keep the stitch length consistent, approximately 0.3 to 0.5 cm, so the outlines look intentional and neatly finished.
After completing the upper and lower wings, position all four sections around the butterfly’s centerline. The upper wings should extend upward and outward, while the lower wings angle gently downward. Check the symmetry by measuring the distance from the centerline to the outer edges on both sides. Small differences are acceptable in handmade fabric art, but the overall shape should remain balanced. Baste the four wing sections together where they meet beneath the body. At this stage, the butterfly should already resemble the colorful design in the reference image, although the central body and final embellishments have not yet been added.
3. Creating the Butterfly Body, Face, Antennae, and Decorative Details
The bright yellow body is one of the most recognizable elements of this Patchwork Butterfly Tutorial Pattern. To recreate its cheerful appearance, begin by drawing a circular head approximately 5 cm in diameter and a tapered body approximately 13 cm long. The body can be constructed from a single elongated shape or several overlapping rounded segments. The reference image features a smiling circular face and a segmented abdomen, so creating individual padded pieces will produce a similar three-dimensional effect. Cut two fabric pieces for each body component, adding a 0.7 cm seam allowance, along with a matching piece of lightweight batting.
Sew the head and body sections using the same turning technique applied to the wings. Place the fabric pieces right sides together, add batting to the wrong side of one fabric piece, and stitch around the outline while leaving a turning opening. Trim the seam allowances, turn the pieces right side out, and gently press them. For the segmented body, create several overlapping oval or rounded trapezoid shapes that become progressively narrower toward the bottom. Arrange them vertically, allowing each upper segment to overlap the one below. This construction produces the soft, layered appearance visible in the original butterfly design.
Before attaching the head, create the butterfly’s facial features. Two small black fabric circles can represent the eyes, while a curved embroidered line forms the smile. For a more expressive appearance, add tiny pink fabric circles or embroidery stitches to create rosy cheeks. If you prefer machine appliqué, use a narrow zigzag stitch around the eye pieces. Alternatively, hand-sew the details using embroidery floss. Avoid using loose beads or detachable plastic eyes when the decoration may be handled by young children. Securely stitched fabric and embroidered features are more suitable for a decorative project that could occasionally be touched or moved.
The antennae add an elegant finishing touch to the butterfly’s silhouette. Cut two lengths of dark embroidery floss or soft cord measuring approximately 12 to 15 cm each. If using cord, create gentle curls at the tips and secure the shapes with discreet stitches to a small fabric backing. Another option is to embroider the antennae directly onto the background fabric when the butterfly is used as a wall panel or quilt appliqué. For a freestanding hanging decoration, soft fabric-covered cord can be attached securely behind the head. The curved black antennae shown in the reference photograph create a charming contrast against the yellow face and colorful wings.
Decorative flowers can make the fabric butterfly appliqué even more visually appealing. The reference design includes small white daisies with yellow or orange centers, along with red tulip motifs on cream-colored wing sections. These details can be created using printed cotton fabric, embroidery, or tiny fabric appliqué pieces. For handmade daisies, cut five or six small white petal shapes and arrange them around a circular yellow center. Secure each piece using a narrow zigzag stitch or fine hand stitching. For tulips, use simple red petal shapes and embroidered green stems and leaves. Keep the decorations relatively flat so they do not interfere with the layered wing construction.
Once the decorative details are complete, position the yellow body over the center of the butterfly, covering the joined edges of the wings. Begin by attaching the lower body segment, then work upward, overlapping the pieces until the head is positioned at the top. Use small, nearly invisible hand stitches around the edges of each padded section. Make sure the body remains straight and centered. Attach the antennae behind the head before securing the final stitches. When finished, the butterfly should display the same essential characteristics as the inspiration image: colorful layered wings, decorative stitching, a segmented yellow body, and a friendly smiling face.
4. Finishing Techniques, Creative Variations, and Display Ideas
After assembling the main butterfly, inspect the entire Patchwork Butterfly Tutorial Pattern for loose threads, uneven stitching, or areas that need additional reinforcement. Pay special attention to the points where the wings meet the central body, since these sections support several layers of fabric. If necessary, add small hand stitches through the backing layers to improve stability. Avoid pulling the thread too tightly, as this can flatten the padded appearance. A well-finished butterfly should feel soft yet secure, with its wing sections maintaining their rounded shapes when displayed.
For a more polished appearance, consider adding additional decorative quilting stitches to selected wing sections. Simple running stitches, curved quilting lines, or small embroidered accents can enhance the printed fabrics without overwhelming the design. The navy star-print sections look especially attractive with contrasting yellow stitching, while cream-colored floral sections can be outlined with warm golden thread. If you enjoy free-motion quilting, experiment with small swirls or gentle curves inside the larger wing shapes. However, beginners can achieve beautiful results with basic straight stitching and careful hand embroidery.
If you plan to display the butterfly as a wall decoration, attach a sturdy fabric hanging loop to the back near the upper center. A loop approximately 8 cm long can be made from folded cotton fabric or narrow cotton tape. Secure it through the backing layers with reinforced stitches. For additional support, attach the butterfly to a larger quilted fabric panel or a lightweight fabric-covered backing. A removable hanging rod can also be used when the butterfly is incorporated into a rectangular wall hanging. Make sure the hanging method supports the weight evenly so the wings do not droop or twist over time.
The Patchwork Butterfly Tutorial Pattern can also be adapted for pillows, tote bags, table runners, and decorative quilts. When using the butterfly as appliqué on another fabric surface, it is often easier to omit the separate backing pieces and attach the wing shapes directly to the foundation fabric. Fusible web can help hold smaller appliqué pieces in place before stitching. For pillows or items that will be washed frequently, reinforce all decorative sections and avoid bulky embellishments that may become damaged during laundering. Always consider how the finished item will be used before choosing your construction method.
Another enjoyable possibility is creating seasonal versions of the same butterfly sewing pattern. Spring butterflies can feature pastel pink, lavender, mint green, and floral cotton prints. Summer versions look beautiful with sunflower fabrics, bright yellow accents, and cheerful gingham checks. Autumn butterflies can incorporate rust orange, mustard yellow, olive green, and warm brown tones. For a festive holiday decoration, combine red, green, cream, and gold fabrics with delicate embroidered stars. These variations demonstrate how a single butterfly template can become the foundation for an entire collection of handmade decorations.
To care for your finished butterfly, remove dust gently with a soft brush or low-suction vacuum attachment protected by a mesh screen. If the butterfly contains delicate embroidery, layered batting, or decorative cord, spot cleaning is generally preferable to machine washing. When laundering is appropriate for the materials used, follow the care instructions for the most delicate component and test colorfastness first. Store the butterfly flat in a clean, dry location to preserve the shape of its wings. With proper care, this handmade patchwork butterfly can remain a beautiful decorative accent for many years and serve as a reminder of the creativity and patience invested in every stitch.
Frequently Asked Questions About the Patchwork Butterfly Tutorial Pattern
1. Is the Patchwork Butterfly Tutorial Pattern suitable for beginners?
Yes. This butterfly project is suitable for beginners who already understand basic sewing techniques such as cutting fabric, sewing curved seams, turning fabric pieces, and using a sewing machine. Although the layered wings may appear complicated, the construction process is divided into manageable sections. Beginners can simplify the design by using fewer wing layers and replacing elaborate embroidery with printed cotton fabrics. Taking time to prepare accurate templates and practicing curved seams on scrap fabric will make the project easier and more enjoyable.
2. What is the best fabric for making a patchwork butterfly?
Quilting cotton is generally the best choice because it is lightweight, stable, widely available, and easy to sew. Cotton fabrics also come in a tremendous variety of colors and patterns, making them ideal for decorative patchwork projects. For additional structure, lightweight fusible interfacing can be applied to selected pieces. Thin polyester batting provides gentle padding without making the wings excessively bulky. Beginners should avoid very stretchy or slippery fabrics until they become comfortable with the construction process.
3. How large should a finished patchwork butterfly be?
The size depends on the intended use. A decorative wall butterfly can measure approximately 35 cm wide and 30 cm tall, while a smaller appliqué butterfly for a cushion or tote bag may measure 12 to 20 cm across. Miniature butterflies can also be created for fabric ornaments and decorative accessories. When resizing the template, remember to maintain the proportions between the upper wings, lower wings, head, and body. Keep the seam allowance consistent rather than scaling it proportionally with the design.
4. Can I make this butterfly without a sewing machine?
Absolutely. The entire Patchwork Butterfly Tutorial Pattern can be completed using hand-sewing techniques. A backstitch works well for joining fabric pieces securely, while a running stitch can be used for decorative topstitching. A blanket stitch is particularly attractive around appliqué details. Hand sewing may require more time, especially when working with multiple padded wing sections, but it offers excellent control over small curves and delicate decorations.
5. What is the difference between patchwork and appliqué in this project?
Patchwork traditionally involves sewing separate fabric pieces together to create a larger textile surface. Appliqué involves attaching fabric shapes onto a background or another fabric layer. This butterfly combines elements of both techniques. The individual wing sections create a patchwork-inspired arrangement of colorful fabrics, while the overlapping decorative pieces and body components use appliqué-style construction. Understanding both methods allows you to adapt the design for quilts, pillows, wall hangings, and other sewing projects.
6. How can I make the butterfly wings look more dimensional?
To achieve a dimensional appearance, use thin batting inside the larger wing sections and construct the smaller layers separately before attaching them. Arrange the pieces so that each decorative layer overlaps the one beneath it. Gentle pressing and careful edge stitching will help maintain the scalloped outlines. Avoid using excessively thick batting because it can make the center bulky and difficult to sew. Lightweight padding usually provides the best balance between softness and structure.
7. Can I use leftover fabric scraps for this butterfly pattern?
Yes. This project is an excellent way to reuse leftover quilting cotton and small fabric pieces. The decorative wing sections can be cut from scraps that are too small for larger sewing projects. Try combining fabrics with similar color families while varying the scale of their prints. For example, large floral motifs can be paired with tiny polka dots, checks, and solid-colored fabrics. This approach creates a visually interesting butterfly while reducing fabric waste.
8. How do I prevent the butterfly wings from becoming uneven?
Begin with a symmetrical paper template and mark the centerline before cutting. Cut corresponding left and right wing sections using the same templates, reversing them where necessary. Maintain a consistent seam allowance and avoid stretching the fabric while sewing curved edges. After turning and pressing each section, compare matching pieces before assembly. Pin or baste the complete butterfly arrangement on a flat surface before attaching the body. These simple precautions will help produce balanced wings.
9. What type of thread should I use for decorative stitching?
Standard polyester or cotton sewing thread works well for most construction seams. For visible decorative stitching, choose a contrasting thread that complements the fabric colors. Embroidery floss can be used for hand-stitched outlines, facial features, flowers, and other details. If you want a more pronounced stitched appearance, use two or three strands of embroidery floss, depending on the fabric thickness. Test your stitches on scrap fabric before decorating the finished butterfly.
10. Can this butterfly be used as a quilt block?
Yes, but some adjustments may be necessary. For a traditional quilt block, it is usually best to create a flatter version of the butterfly using appliqué rather than individually padded wing sections. Attach the fabric shapes to a square background panel and secure them with machine or hand stitching. Once the appliqué is complete, the block can be incorporated into a larger quilt top. A flatter construction makes layering, quilting, and binding easier.
11. How long does it take to complete the Patchwork Butterfly Tutorial Pattern?
The amount of time depends on your sewing experience and the number of decorative layers you choose. A simplified butterfly may take approximately three to five hours, while a detailed version with multiple padded sections, embroidered flowers, and hand-stitched outlines may require six to ten hours or more. Preparing all the templates and fabric pieces before sewing can make the process more efficient. Working in separate sessions is also a practical approach for beginners.
12. How can I personalize my patchwork butterfly?
Personalization is one of the most enjoyable aspects of this project. You can select fabrics that match your home décor, incorporate meaningful fabric scraps, embroider initials on the wings, or create a butterfly in someone’s favorite colors. You can also change the expression of the face, experiment with different antenna shapes, or add small embroidered hearts and flowers. The basic construction remains the same, allowing endless opportunities for creative interpretation.
Conclusion: Create Your Own Beautiful Patchwork Butterfly
The Patchwork Butterfly Tutorial Pattern is a wonderful example of how colorful fabrics, thoughtful design, and simple sewing techniques can come together to create a charming handmade decoration. Throughout this tutorial, you have learned how to choose coordinating quilting cottons, prepare symmetrical butterfly templates, cut and sew padded scalloped wings, arrange overlapping fabric layers, and create a cheerful yellow body with embroidered facial features. You have also explored techniques for decorative topstitching, fabric appliqué, antenna construction, and professional finishing.
One of the greatest advantages of this patchwork butterfly sewing project is its versatility. The same basic design can be adapted for wall decorations, quilt blocks, cushions, tote bags, and handmade gifts. By changing the fabrics, colors, and decorative details, you can create butterflies that reflect different seasons, personal styles, and special occasions. Whether you are a beginner practicing your first appliqué techniques or an experienced quilter looking for a creative fabric project, this butterfly offers a rewarding opportunity to develop your skills.
Remember that handmade sewing projects do not need to be perfectly identical to the original inspiration. Small variations in fabric placement, embroidery, and wing shapes can make each butterfly unique. Focus on accurate cutting, secure stitching, balanced layering, and enjoying the creative process. With patience and attention to detail, you can transform ordinary fabric scraps into a beautiful piece of textile art.
EASILY FIND THE FREE PDF FOR THIS PATTERN HERE!
Now we would love to hear from you! What do you think about this Patchwork Butterfly Tutorial Pattern? Would you use bright, colorful fabrics like those shown in the inspiration image, or would you prefer soft pastel tones? Please leave your honest opinion, creative suggestions, and sewing experiences in the comments. Your feedback can inspire new designs, improve future tutorials, and help other sewing enthusiasts discover fresh ideas for their own handmade projects.