
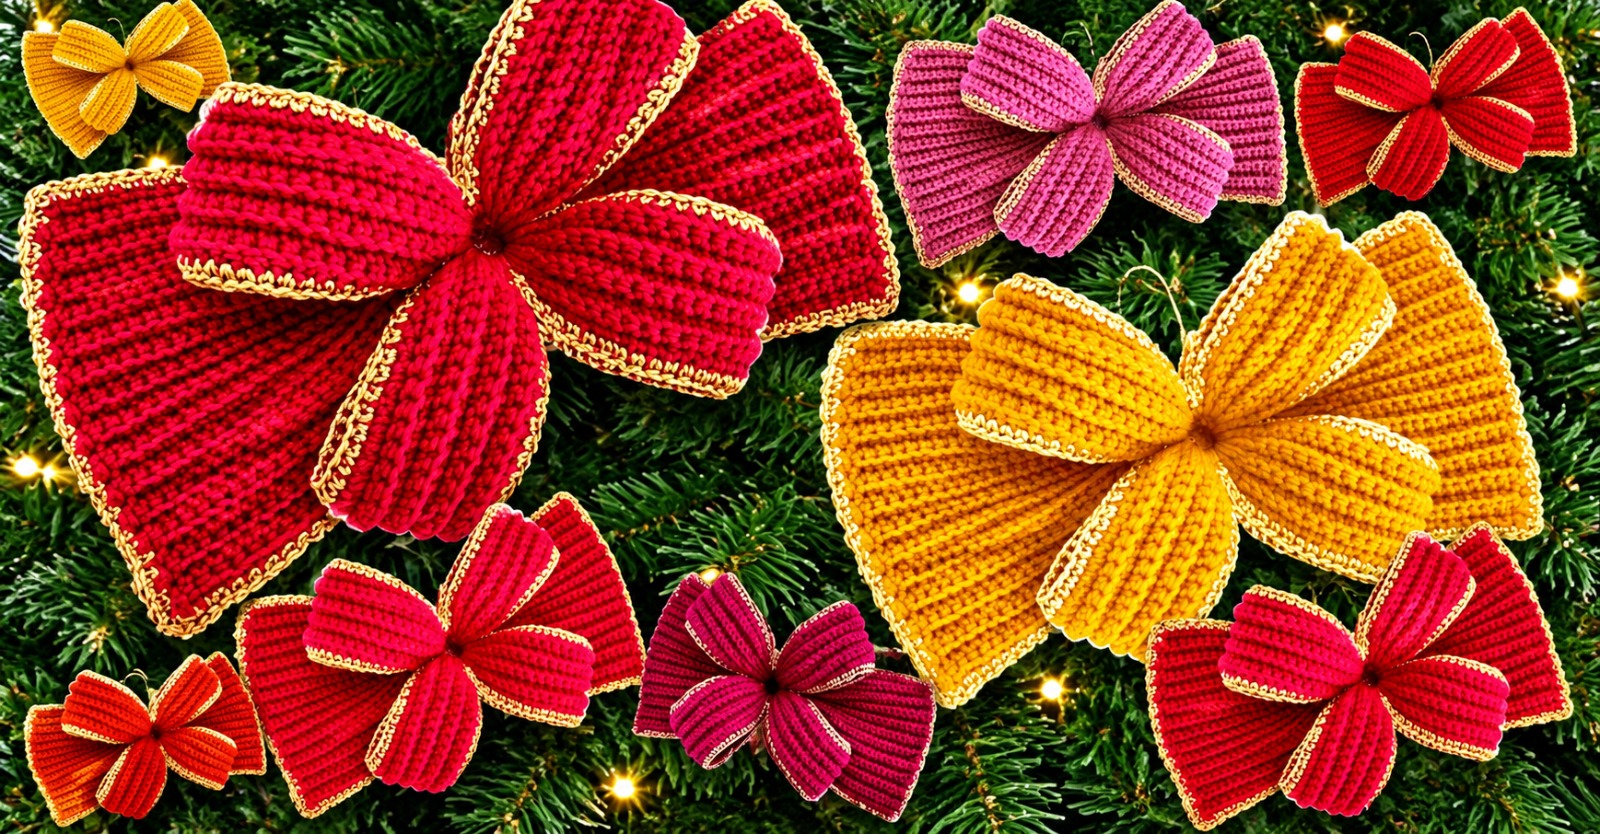
The Christmas decorative bows Pattern is a delightful crochet project that brings warmth, color, and handmade elegance to holiday decorations. Whether you enjoy decorating your Christmas tree, preparing personalized gifts, or creating festive accessories for your home, these beautiful crochet Christmas bows offer endless creative possibilities. Their textured stitches, graceful loops, and delicate contrasting edges make them especially attractive when displayed against evergreen branches. The combination of traditional Christmas red, golden yellow, and cheerful pink creates a festive appearance that can easily be adapted to different decorating styles. One of the most appealing features of this pattern is its versatility, allowing crocheters to create bows in several sizes while maintaining the same charming design. With a little patience and basic crochet knowledge, you can transform simple yarn into decorative pieces that become part of your family’s holiday traditions.
Creating handmade Christmas decorations is a wonderful way to make the holiday season feel more personal and meaningful. Unlike mass-produced ornaments, crocheted decorations reflect the time, creativity, and care invested in every stitch. The bows featured in this project have a dimensional appearance, with broad ribbon-like sections, carefully shaped loops, and neatly gathered centers. Their textured surfaces create visual depth, while the contrasting golden edging emphasizes their beautiful shapes. This Christmas decorative bows Pattern uses approachable crochet techniques that can be practiced by beginners and enjoyed by experienced crafters. The finished bows can decorate Christmas trees, wreaths, garlands, wrapped presents, and seasonal table arrangements. They are also lovely handmade gifts for friends and relatives who appreciate traditional crafts and festive home accessories.
Another reason to explore this crochet bow pattern is the opportunity to experiment with different yarn textures, colors, and decorative finishes. Although red and gold are classic Christmas combinations, soft pink, burgundy, cream, emerald green, and metallic shades can produce equally beautiful results. The pattern is based on crocheting textured rectangular sections that are folded, gathered, and assembled into decorative bows. By changing the dimensions of these sections, you can make small ornaments or impressive statement pieces. This tutorial explains the necessary materials, essential American crochet abbreviations, stitch techniques, shaping methods, and finishing details. Each stage is designed to help you understand not only what to crochet but also why certain construction methods produce a more polished result. By following the instructions carefully, you will be able to create a coordinated collection of Christmas decorative bows for your holiday celebrations.
Materials and Essential Crochet Stitches for the Christmas Decorative Bows Pattern
The first step in making this Christmas decorative bows Pattern is choosing materials that provide structure without making the finished ornament excessively heavy. Medium-weight cotton yarn or a cotton-acrylic blend works particularly well because it creates defined stitches and holds its shape after assembly. Acrylic yarn is another practical option, especially for lightweight Christmas tree decorations. For bows resembling the colorful examples, select bright red, golden yellow, pink, or burgundy yarn for the main sections and a contrasting gold-colored yarn for the decorative borders. A smooth yarn makes it easier to see the stitch definition and maintain consistent tension. If you want a slightly luxurious finish, choose a decorative metallic thread that can be worked around the edges without becoming too stiff or difficult to handle.
EASILY FIND THE FREE VIDEO FOR THIS PATTERN HERE!
For this project, gather approximately 40–80 grams of medium-weight yarn for a large bow, depending on your chosen size, yarn type, and stitch tension. You will also need a 4.0 mm crochet hook, a yarn needle, scissors, stitch markers, and a measuring tape. A smaller 3.5 mm hook may be useful when creating tighter stitches for the center wrapping or decorative edging. Optional materials include thin floral wire, flexible craft interfacing, or fabric stiffener if you prefer a more structured ornament. However, these additional supplies are not essential for completing the pattern. When decorating a Christmas tree, lightweight materials are generally preferable because they help prevent branches from bending under the weight of the ornaments.
Before beginning, become familiar with the US crochet terminology used throughout this tutorial. The following abbreviations will appear in the written instructions:
-
ch (chain): Yarn over and pull the yarn through the loop on your hook.
-
sc (single crochet): Insert the hook into a stitch, yarn over, pull up a loop, yarn over, and pull through both loops.
-
hdc (half double crochet): Yarn over, insert the hook, pull up a loop, yarn over, and pull through all three loops.
-
dc (double crochet): Yarn over, insert the hook, pull up a loop, yarn over and pull through two loops twice.
-
sl st (slip stitch): Insert the hook, yarn over, and pull through the stitch and the loop on your hook.
-
BLO (back loop only): Work into the back loop of the indicated stitch.
-
st/sts (stitch/stitches): Individual crochet stitches.
-
RS/WS (right side/wrong side): The visible front and reverse sides of the crocheted fabric.
-
FO (fasten off): Secure the final loop and cut the yarn, leaving a tail.
The main texture of this crochet Christmas bow tutorial comes from working single crochet stitches through the back loops. This technique creates horizontal ridges across the fabric, giving the crocheted sections a ribbon-like appearance. When the completed fabric is folded and gathered, the ridges help create beautiful dimensional folds. Back-loop single crochet is particularly useful for decorative bows because it produces flexible fabric that can be shaped without losing its textured appearance. Although other stitches can be incorporated into the design, using a consistent sc BLO pattern makes the construction straightforward and provides an attractive surface for the contrasting border.
Understanding crochet tension is also important for achieving balanced and symmetrical bows. If your stitches are too tight, the fabric may become difficult to fold and gather neatly. If they are too loose, the finished loops may appear floppy and lack definition. Make a small practice swatch using your chosen yarn and crochet hook before beginning the full project. For example, crochet 15 chains and work several rows of single crochet through the back loops. Check whether the resulting fabric bends comfortably while maintaining visible ridges. If necessary, adjust your hook size until the fabric feels flexible but stable. This preparation can make the remaining steps much easier, particularly when producing several matching Christmas ornaments.
Finally, decide on the approximate dimensions of your finished Christmas decorative bows. A small bow measuring about 10–12 cm across is suitable for gift wrapping or smaller Christmas trees. Medium bows measuring approximately 15–18 cm across work beautifully on wreaths and garlands. Large bows measuring 22–28 cm across create an impressive decorative statement on Christmas trees, doors, and holiday arrangements. These measurements are approximate because the finished width depends on how tightly the center is gathered and how the loops are arranged. The instructions below provide a practical medium-sized design that can be enlarged or reduced by adjusting the foundation chains and number of rows. This flexibility makes the pattern suitable for many holiday decorating projects.
Step-by-Step Instructions for Crocheting the Main Bow Sections
Begin the Christmas decorative bows Pattern by making the main rectangular ribbon section. This piece will form the broad loops and the outer silhouette of the bow. Using your main yarn color and a 4.0 mm crochet hook, make a foundation chain of 19 stitches. This produces 18 working stitches and creates a ribbon approximately 9–11 cm wide, depending on yarn thickness and tension. The width of the rectangle will determine the height of the finished bow loops. For a smaller ornament, reduce the foundation chain to 13 or 15 stitches. For a larger bow, increase the foundation chain to 23 or 27 stitches while keeping the same basic construction method.
Work the first row by inserting your crochet hook into the second chain from the hook. Make one sc in that chain and continue working one sc into each remaining chain across the foundation. You should have 18 single crochet stitches at the end of Row 1. Chain one and turn your work. For Row 2, work one sc BLO into each of the 18 stitches across. Chain one and turn again. Repeat Row 2 until the rectangular piece measures approximately 42 cm long. The exact number of rows will vary according to your crochet tension, so measuring the fabric is more reliable than relying on a fixed row count. Do not count the turning chain as a stitch.
Once the main rectangle reaches the desired length, fasten off and leave a long yarn tail for assembly. Lay the fabric flat with the ridged side facing upward. You should notice a consistent ribbed texture running across the crocheted surface. The fabric should be flexible enough to fold without creating harsh creases. If the rectangle curls slightly at the edges, gently smooth it with your hands or lightly block it according to the yarn manufacturer’s care instructions. Avoid stretching the fabric excessively because this can distort the proportions of the bow. A well-shaped rectangle provides the foundation for a balanced finished ornament and makes the gathering process easier.
Next, create the additional smaller ribbon section that will give the bow a layered, decorative appearance similar to the ornaments in the reference image. Chain 13 stitches using the same yarn color, then work one sc into the second chain from the hook and each remaining chain. You will have 12 stitches. Chain one, turn, and work sc BLO across every subsequent row. Continue until the smaller rectangle measures approximately 28 cm long. Fasten off and weave in the short starting tail. This narrower section will become a secondary pair of loops positioned over the larger bow. The layered construction is what creates the fuller, more elaborate look associated with decorative Christmas ribbons.
To make the optional decorative gold edging, attach your contrasting yarn to one corner of the main rectangle using a sl st. Work one sc into each stitch along the shorter edges and distribute single crochet stitches evenly along the longer row ends. At the corners, work three single crochet stitches into the corner space to help the border turn smoothly. Join the round with a slip stitch, fasten off, and secure the yarn tail. Repeat the same process around the smaller rectangle. This simple crochet gold border creates a neat, finished appearance without overwhelming the textured fabric. If you prefer a more delicate edge, use a thinner gold thread and a smaller crochet hook.
After completing both rectangles, inspect the fabric carefully before assembly. Check that the edges are even, the ridges are consistent, and the contrasting borders lie relatively flat. If the gold edging begins to ripple, it may contain too many stitches along the sides. If the border pulls inward, you may need to add a few more evenly spaced stitches. Small adjustments at this stage can significantly improve the finished appearance of the handmade crochet bows. Prepare a separate length of matching yarn approximately 50 cm long for gathering the center. You are now ready to transform the flat crocheted pieces into dimensional Christmas decorations with elegant loops and a beautifully defined center.
How to Shape, Assemble, and Decorate Your Crochet Christmas Bows
The most exciting stage of the Christmas decorative bows Pattern is transforming the crocheted rectangles into recognizable bow shapes. Begin with the larger rectangle and place it horizontally on a flat surface, with the right side facing downward. Bring the two short ends toward the center, allowing them to overlap by approximately 2 cm. This creates two large loops, one on each side. Use a yarn needle and matching yarn to secure the overlapping ends with several small stitches. Keep the seam positioned at the back of the bow so that it will not be visible after assembly. The resulting shape should resemble a flattened oval with two rounded sides.
To form the center, pinch the middle of the folded rectangle between your fingers. Create two or three accordion-style folds so that the fabric gathers evenly. Wrap the prepared length of yarn around the gathered center several times, pulling firmly enough to hold the shape without crushing the textured stitches. Tie a secure knot at the back and leave the yarn tails available for attaching additional decorative pieces. Gently spread the two outer loops until they look symmetrical. The textured crochet fabric should naturally form soft ridges and curves, giving the bow a dimensional appearance. Adjust the folds until the center looks compact and the loops extend evenly from both sides.
Repeat the same folding and gathering process with the smaller rectangle. Bring its short ends toward the center, overlap them slightly, and sew them together at the back. Pinch the center into accordion folds and secure it with matching yarn. Place this smaller bow directly over the larger bow, positioning it so that the smaller loops sit prominently in front of the broader background loops. The reference design features layered, petal-like folds, so gently rotate and spread the smaller loops to create a fuller silhouette. Stitch the two bows together through their gathered centers, making several passes with the yarn needle to ensure a strong connection. This creates a decorative layered bow with depth and attractive visual movement.
For an even fuller crochet Christmas ornament, you can add an optional third layer. Make a narrow rectangle using 9 foundation chains and approximately 18 cm of ribbed crochet fabric. Fold and gather this smaller section using the same method, then position it at the front of the bow. The three-layer design produces a rich, flower-like appearance that works especially well for large Christmas tree decorations. You can also use different shades of the same color to highlight each layer. For example, a deep red background, bright crimson middle layer, and burgundy front layer create subtle color variation. Alternatively, combine golden yellow and cream yarn for a softer holiday decoration.
To finish the center neatly, crochet a narrow wrapping band. Chain 6 stitches and work one sc into the second chain from the hook and each remaining chain, creating five stitches. Chain one, turn, and continue working single crochet rows until the band is long enough to wrap around the gathered center, usually approximately 5–7 cm. Wrap the strip around the center of the bow and sew its ends together at the back. This small finishing piece hides the gathering yarn and creates a professional-looking appearance. If desired, add a tiny crocheted flower, decorative button, or simple embroidered detail to the center. Avoid excessively heavy embellishments because they may distort the shape of the bow.
The final assembly step is adding a hanging loop if the bow will be used as a Christmas tree ornament. Cut a length of matching yarn or decorative thread approximately 20 cm long. Fold it in half and thread both ends through the upper back portion of the bow using a yarn needle. Tie the ends securely and conceal the knot beneath the center wrapping. For a more decorative appearance, use thin gold cord that complements the contrasting border. Check that the hanging loop is centered so the ornament hangs evenly. Once attached, gently reshape the loops, spread the layers, and adjust the folds until the finished Christmas decorative bow has a balanced and festive appearance.
Creative Decorating Ideas, Custom Sizes, and Care Tips for Handmade Christmas Bows
One of the greatest advantages of this Christmas decorative bows Pattern is its adaptability to different holiday decorating styles. Traditional red bows with golden edging look beautiful against green Christmas tree branches and warm white lights. Golden yellow bows add brightness and create an inviting contrast with darker ornaments. Pink and burgundy bows offer a softer, more contemporary interpretation of classic Christmas decorations. You can create a coordinated collection by using the same stitch pattern and border color while varying the main yarn shades. Repeating similar shapes throughout your decorations helps create a harmonious appearance. These handmade bows can become the central theme of your Christmas tree or serve as charming accents among other seasonal ornaments.
Another creative possibility is using crochet Christmas bows to decorate wrapped gifts. A small crocheted bow can replace a disposable ribbon and become a reusable keepsake for the recipient. For gift wrapping, choose a smaller version of the pattern using a foundation chain of approximately 11–13 stitches and shorter rectangular sections. The finished bow can be attached with cotton string or decorative cord. Consider coordinating the yarn color with the wrapping paper for a polished presentation. Cream bows look elegant on kraft paper, while red and gold combinations complement traditional holiday packaging. After the gift is opened, the bow can be saved and reused as a tree ornament, making it a thoughtful addition to the present.
These handmade Christmas decorations are also excellent for wreaths, garlands, and festive table arrangements. A large bow can be positioned at the top or bottom of a Christmas wreath, while several smaller bows can be distributed evenly along a staircase garland. For table decorations, attach small bows to napkin rings, decorative baskets, or seasonal centerpiece arrangements. If you are creating a matching set, use the same yarn weight and crochet hook size for every ornament to maintain consistent proportions. When attaching bows to wreaths or garlands, use removable ties rather than permanent adhesive whenever possible. This makes it easier to store, clean, and reuse the decorations in future holiday seasons.
Changing the yarn weight provides another simple way to customize the Christmas decorative bows Pattern. Lightweight cotton yarn creates smaller, delicate bows that work well for miniature trees or gift embellishments. Medium-weight yarn produces versatile ornaments with a balanced combination of softness and structure. Bulky yarn creates oversized bows with pronounced texture and a cozy handmade appearance. When changing yarn weight, select a crochet hook that produces firm but flexible stitches. You may also need to adjust the rectangle dimensions to achieve your desired proportions. Always measure your crocheted fabric before folding it, especially when working with unfamiliar yarn. A consistent approach to sizing helps ensure that multiple bows look attractive when displayed together.
Proper care is essential for preserving the beauty of your crochet Christmas ornaments. Before cleaning, check the yarn manufacturer’s care instructions, particularly if you used metallic thread or decorative embellishments. Many cotton and acrylic yarns can be gently hand-washed in cool water with mild detergent, but delicate metallic finishes may require spot cleaning. Avoid wringing or twisting the bows because this can stretch the stitches and distort the gathered centers. Instead, press out excess moisture gently with a clean towel and allow the ornaments to dry flat. Reshape the loops while the fabric is slightly damp if necessary. Once completely dry, store the bows in a clean container where they will not be compressed by heavier decorations.
For long-term storage, place the finished Christmas decorative bows in a sturdy box with enough space to preserve their dimensional shape. Soft tissue paper can be placed between ornaments to prevent the loops from becoming flattened. Keep the decorations away from excessive moisture, direct sunlight, and heat sources. If you plan to use bows near Christmas lights, choose cool-running LED lights and keep yarn ornaments away from bulbs, flames, candles, and other sources of high heat. Check hanging loops and attachment points before displaying the ornaments each year. With appropriate handling and storage, these crocheted decorations can remain part of your holiday collection for many seasons, bringing back pleasant memories of the time spent creating them.
Frequently Asked Questions About the Christmas Decorative Bows Pattern
1. Is the Christmas decorative bows Pattern suitable for beginners?
Yes. This Christmas decorative bows Pattern is suitable for beginners who understand basic crochet techniques such as chain stitches, single crochet, and slip stitches. The main sections are worked as simple rectangles, making the construction easier than many shaped crochet projects. The most challenging part is gathering and arranging the loops evenly, but this becomes easier with practice. Beginners may want to make a small sample bow before attempting a larger ornament.
2. What is the best yarn for crocheting Christmas decorative bows?
Medium-weight cotton yarn or a cotton-acrylic blend is an excellent choice because it provides visible stitch definition and a relatively stable structure. Acrylic yarn also works well for lightweight decorations. If you prefer a more luxurious appearance, consider adding a thin metallic thread around the edges. The most important factor is choosing yarn that allows the crocheted fabric to fold comfortably while maintaining its shape.
3. How long does it take to make one crochet Christmas bow?
The time required depends on the size of the bow, the number of layers, and your crochet experience. A small bow may take approximately 30–60 minutes, while a medium or large layered bow may require 1–3 hours. Beginners may need additional time to practice the ribbed stitch pattern and complete the assembly. Once you become familiar with the construction process, making several matching bows becomes much faster.
4. Can I make the bows without using metallic yarn?
Absolutely. Although gold edging gives the crochet Christmas bows an elegant holiday appearance, it is completely optional. You can use cream, white, yellow, or another contrasting yarn for the border. You may also leave the edges plain for a simpler design. A single-color bow can look especially attractive when the ribbed texture is clearly visible.
5. How can I make my crochet bows stiffer?
If your bows are too soft, begin by using a slightly smaller crochet hook to produce tighter stitches. Cotton yarn generally provides more structure than very soft acrylic yarn. You can also add a discreet layer of flexible interfacing or use a fabric stiffener compatible with your yarn. Always test stiffening products on a small sample before applying them to the finished ornament. Avoid making the fabric excessively rigid because the loops should retain their natural curves.
6. Can I adjust the pattern to create different bow sizes?
Yes. The pattern is easy to customize because the main components are rectangular. To make a larger bow, increase the foundation chain length and crochet more rows. For smaller bows, reduce both dimensions proportionally. Remember that the rectangle’s width influences the height of the loops, while its length influences their fullness. Keeping these proportions balanced helps create attractive bows in different sizes.
7. What colors work best for Christmas crochet decorations?
Traditional Christmas colors include red, green, gold, white, and burgundy. However, modern holiday decorating styles also incorporate blush pink, champagne, silver, navy blue, and soft neutral shades. For a classic look, combine bright red yarn with gold edging. For a more delicate appearance, try pale pink with cream borders. Coordinating the colors with your existing decorations will help create a cohesive festive display.
8. Can these crochet bows be used outdoors?
These bows are primarily intended for indoor decoration. Outdoor exposure to rain, humidity, strong sunlight, and wind can affect their appearance and durability. If you want to display them outside, choose a protected location and use materials appropriate for outdoor conditions. Bring the decorations indoors during wet weather and allow them to dry completely before storage.
9. How do I prevent the center of the bow from coming loose?
Secure the gathered center with several firm wraps of matching yarn and tie a strong knot at the back. Use a yarn needle to stitch through multiple layers rather than relying only on the wrapping. Adding the crocheted center band provides additional support and conceals the assembly stitches. Check that the loops remain balanced before fastening off the final yarn tails.
10. Can I sell handmade bows created from this pattern?
Handmade bows are popular seasonal craft items, and many crocheters enjoy making them for holiday markets or small handmade businesses. If you create finished decorations using this original tutorial, you can generally sell your handmade items, subject to applicable laws and marketplace requirements. Use your own product photographs and descriptions, and avoid presenting another creator’s photographs or written instructions as your own.
11. Why are my crochet bow loops uneven?
Uneven loops usually result from inconsistent rectangle dimensions, uneven gathering, or off-center seams. Measure each section before assembly and make sure the short ends overlap evenly. When gathering the center, distribute the folds symmetrically. After securing the bow, gently adjust the loops by hand. Minor differences are normal in handmade crochet and can contribute to the charm of the finished decoration.
12. How can I make the decorative gold edging look neater?
Use a consistent crochet tension and distribute the border stitches evenly around the fabric. When working along row ends, avoid placing too many stitches in a small area because this can cause rippling. At corners, add enough stitches to prevent pulling. A thinner yarn and slightly smaller crochet hook can also create a more delicate finish. Practice the border on a small sample if you are unfamiliar with crocheting around rectangular pieces.
Conclusion: Create Beautiful Handmade Christmas Decorative Bows
The Christmas decorative bows Pattern is a creative and rewarding project that combines simple crochet techniques with beautiful festive results. Throughout this tutorial, you learned how to choose suitable yarn, understand essential US crochet stitches, create textured rectangular sections, add decorative edging, and assemble layered bows with elegant dimensional loops. You also discovered how to adjust the size of your ornaments, experiment with different Christmas colors, and care for your finished decorations so they can be enjoyed for years.
One of the most satisfying aspects of making crochet Christmas bows is the freedom to personalize every detail. From classic red and gold ornaments to soft pink and golden yellow decorations, each bow can reflect your individual style. These handmade pieces are perfect for Christmas trees, wreaths, garlands, gift wrapping, and seasonal home accents. Their reusable nature also makes them a thoughtful alternative to disposable decorative ribbons.
Whether you are learning crochet for the first time or searching for a relaxing holiday project, this Christmas decorative bows Pattern offers an enjoyable opportunity to practice your skills while creating something meaningful. With patience, creativity, and attention to the finishing details, you can build a beautiful collection of festive bows that will make your Christmas decorations feel especially personal.
We would love to hear your sincere opinion! What do you think of this Christmas decorative bows Pattern? Which colors would you choose for your Christmas decorations? Share your honest feedback, creative ideas, and suggestions in the comments. Your experiences and recommendations can inspire other crochet enthusiasts to explore new designs and make their own beautiful handmade Christmas ornaments.