
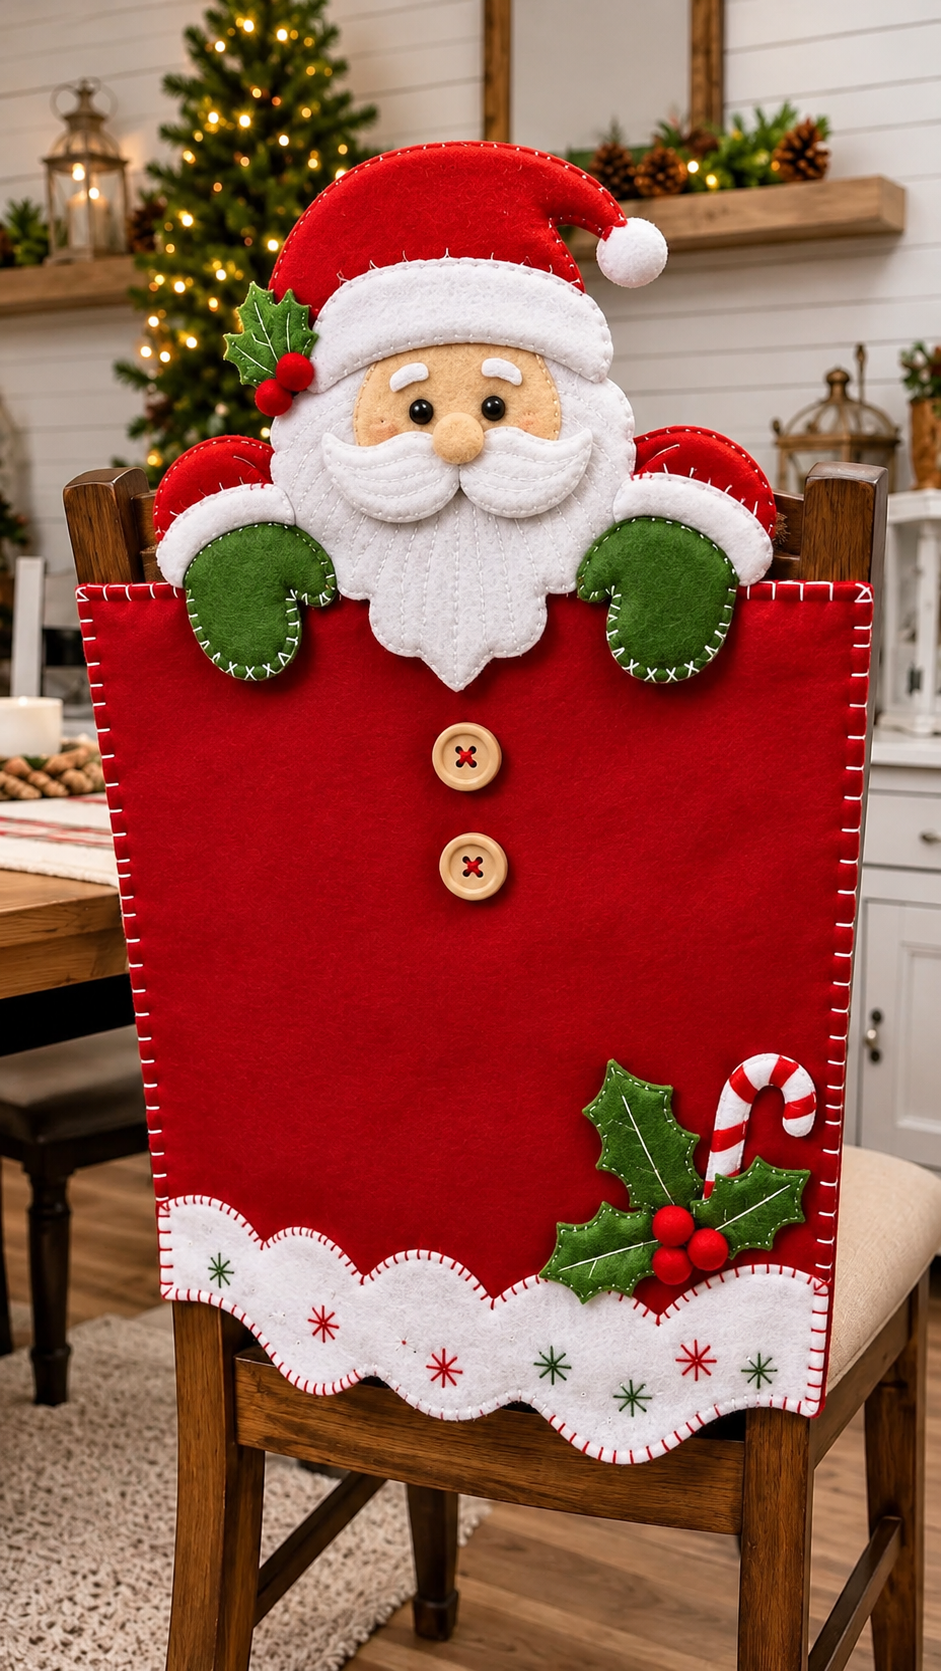
The Santa Claus-themed chair back cover Pattern is a delightful Christmas sewing project that transforms an ordinary dining chair into a festive decoration filled with warmth, personality, and handmade charm. Inspired by traditional holiday crafts, this beautiful design features Santa Claus peeking over a bright red felt chair cover, complete with his signature white beard, cheerful face, fluffy hat, and adorable green mittens. Decorative wooden buttons, holly leaves, red berries, and a miniature candy cane add finishing touches that make the entire piece feel special. Whether you enjoy working with felt, experimenting with fabric appliqué, or creating handmade Christmas decorations, this project offers a wonderful opportunity to combine several simple sewing techniques. The finished chair cover can become part of a coordinated holiday dining room or serve as a thoughtful handmade gift for someone who appreciates seasonal decorations.
One of the most appealing features of this Santa Claus-themed chair back cover Pattern is its combination of accessible construction methods and decorative details. Although the finished design looks elaborate, most of its elements can be created using basic hand-sewing stitches, carefully cut felt shapes, and straightforward layering techniques. The main body consists of a rectangular red fabric panel designed to fit over the backrest of a dining chair, while the Santa Claus figure is assembled from individual pieces of colored felt. White blanket stitching along the edges gives the cover a charming handcrafted appearance, and the layered beard adds dimension without requiring complicated sewing equipment. Beginners can approach this project gradually, completing each decorative component before attaching everything to the main cover. More experienced crafters may enjoy personalizing the design with embroidery, additional appliqués, or alternative holiday color combinations.
Creating a DIY Christmas chair cover is also a practical way to refresh your holiday decorations without replacing existing furniture or purchasing expensive seasonal accessories. Felt is especially suitable for this type of project because it is easy to cut, available in numerous colors, and generally does not require traditional edge finishing. A carefully constructed Christmas felt chair cover can be reused for multiple holiday seasons when stored properly and handled gently. This tutorial explains how to measure your chair, prepare a custom pattern, cut the necessary materials, assemble Santa’s face and clothing details, and finish the decorative cover. The measurements provided are adaptable guidelines rather than dimensions taken from the photograph, allowing you to create a version that fits your own furniture. By following each stage carefully, you can reproduce the main visual characteristics of the pictured decoration while adding your own creative touches.
1. Materials and Measurements for the Santa Claus-themed Chair Back Cover Pattern
The first step in making your Santa Claus-themed chair back cover Pattern is choosing suitable materials. The pictured design uses red felt for the main body, Santa’s hat, and sleeves; white or ivory felt for his beard, hat trim, and decorative lower border; green felt for the mittens and holly leaves; and peach-colored felt for his face and nose. You will also need small pieces of black felt or embroidery thread for the eyes, red felt for the berries, and red-and-white felt for the candy cane. Medium-weight polyester craft felt works well for decorative appliqués, while a sturdier wool-blend felt or felt-backed fabric is a good choice for the main cover. Select materials that are flexible enough to hang neatly over the chair without stretching excessively. Using consistent fabric thicknesses will make it easier to assemble the different layers and produce a balanced finished decoration.
DISCOVER MORE FREE PATTERNS HERE!
Gather the basic sewing supplies before beginning the project so that every stage can be completed without interruption. Recommended tools include sharp fabric scissors, smaller detail scissors, a flexible measuring tape, a fabric marking pencil, sewing pins or clips, hand-sewing needles, and coordinating embroidery floss. White, red, green, and brown embroidery threads will cover most of the visible stitching. You will also need two medium-sized wooden buttons, lightweight polyester stuffing for the dimensional nose and optional hat pom-pom, and paper for drawing the pattern pieces. A sewing machine is optional because the project can be completed entirely by hand. If you prefer machine sewing, use it for the main cover construction and reserve decorative hand stitches for the visible appliqués. A pressing cloth and a low-temperature iron may be useful, provided the felt manufacturer permits ironing.
Accurate measurements are essential because dining chairs vary considerably in width, height, and backrest shape. Begin by measuring the width of the chair back at its widest point, then measure the vertical distance from the top edge to the position where you want the cover to end. For an example chair measuring 42 cm wide, a finished cover approximately 46 cm wide can provide a little extra room, depending on the chair’s thickness and shape. A decorative hanging length of around 55 cm works well for many dining chairs, although taller or shorter furniture may require adjustments. Also measure the thickness of the backrest and determine how far the cover should extend down the rear side. The goal is to create a removable fabric sleeve that fits comfortably without pulling tightly across the chair or sliding off during ordinary use.
For a sample Santa Claus chair cover sewing pattern, plan a front panel measuring approximately 46 cm wide and 55 cm long after assembly. Cut the front red felt rectangle to 48 cm by 57 cm to allow approximately 1 cm for construction and finishing along the sides and lower edge. Cut a matching rear panel if you want a full-length reversible-style sleeve, or a shorter rear panel approximately 48 cm wide by 20 cm long for a simple decorative pocket that slips over the chair’s top. These dimensions are only a starting point; the finished sleeve must accommodate the actual thickness and shape of your chair. Before cutting the final felt, create a paper or inexpensive fabric test version and place it over the backrest. Adjust the width, depth, and length until the cover hangs smoothly. This fitting stage prevents unnecessary fabric waste and helps produce a more professional result.
Next, prepare the individual decorative templates that will form Santa’s face, hat, beard, mittens, and festive accents. For a 46 cm wide cover, a Santa head approximately 25 cm wide and 22 cm tall creates a prominent focal point near the upper edge. The curved red hat can measure about 27 cm across its widest section, with a height of approximately 17 cm, including its drooping tip. Cut a white beard shape around 20 cm wide and 18 cm long, adjusting the lower point to create the familiar flowing Santa silhouette. Each green mitten may measure approximately 9 cm wide and 12 cm tall, including the rounded thumb. The holly decoration can occupy a space around 16 cm wide, while the candy cane can measure approximately 10 cm tall. These proportions are suggested for a pattern inspired by the photograph, not an exact reproduction of a supplied printable template.
Before moving on to assembly, organize the Christmas sewing pattern pieces according to their colors and intended positions. Lay the main red panel on a clean, flat surface and arrange Santa’s face near the top center, allowing the hat to extend above the chair cover for the characteristic peeking effect. Position the green mittens on either side of the face, with the red sleeves appearing to emerge from behind the upper corners. Place the two wooden buttons vertically below the beard, leaving enough space between them to create the impression of Santa’s coat. At the lower edge, arrange a scalloped white felt border and position the holly leaves, berries, and candy cane near the right-hand corner. Take a photograph of this preliminary layout or mark reference points with removable fabric chalk. Planning the composition before stitching ensures that all the decorative elements remain balanced.
2. Cutting and Assembling Santa Claus’s Face, Hat, and Mittens
Begin the decorative construction by preparing Santa’s face, which serves as the visual centerpiece of the Santa Claus-themed chair back cover Pattern. Cut one rounded face shape from peach-colored felt and a slightly larger supporting shape from white felt to represent the hair surrounding his cheeks. Place the peach-colored piece over the white background, leaving a visible border around the sides and lower portion. Secure the layers with small temporary stitches or sewing clips before attaching them permanently. Use a small running stitch or whipstitch around the peach felt, keeping the thread color close to the fabric for a neat appearance. For additional dimension, insert a very thin layer of polyester batting between the face and its backing. Avoid excessive stuffing because the face should remain relatively flat against the chair cover.
The eyes, eyebrows, and nose give Santa his friendly expression, so take time to position these details carefully. Cut two small circles from black felt for the eyes, each approximately 0.8 cm in diameter, or create the eyes with black embroidery using closely packed satin stitches. Space them evenly across the upper-middle portion of the face. Add two small curved eyebrows from white felt, positioning them just above the eyes. For the nose, cut a peach-colored circle approximately 4 cm in diameter, sew a gathering stitch around its perimeter, insert a small amount of polyester stuffing, and pull the thread gently to form a rounded shape. Secure the gathering stitches and attach the nose between the eyes and the upper edge of the mustache. This slightly raised nose gives the handmade Santa Claus decoration a charming three-dimensional effect.
To make the recognizable white beard, cut the main beard shape from soft white or ivory felt, creating rounded upper sides and a pointed lower section. The photographed design features a layered appearance, so prepare additional curved pieces for the mustache and cheek details. Position the beard beneath Santa’s face, ensuring that the top edge overlaps the lower cheeks and leaves the nose visible. Attach the beard with small stitches along its upper edge and selected interior points, allowing the lower portion to hang naturally. Cut two matching mustache sections with outward-curving tips and place them symmetrically beneath the nose. Add subtle lines of embroidery using white or light-gray thread to suggest individual strands of hair. These decorative stitches should follow the natural downward direction of the beard, creating texture without overwhelming the soft felt surface.
Santa’s traditional red hat is another essential component of this Christmas chair decoration pattern. Cut the hat from red felt using a broad curved shape that narrows toward a drooping tip. The lower edge should be wide enough to overlap the upper portion of Santa’s head, while the pointed end should curve gently toward one side. If you want the hat to stand above the chair cover, reinforce the section extending beyond the top edge with an additional felt layer or lightweight sew-in interfacing. Cut a curved white strip approximately 4 cm wide to create the hat brim, following the shape of the lower edge. Attach the brim to the red hat using small running stitches or blanket stitches. Make a small white pom-pom from two gathered felt circles, lightly stuff it, and stitch it securely to the tip. A few visible white stitches around the red hat enhance its handmade appearance.
The green mittens and red sleeves create the impression that Santa is holding the upper edge of the chair cover. Cut two rounded mitten shapes from green felt, remembering that the thumbs should point inward toward Santa’s face. Cut matching red sleeve shapes with curved upper edges, then prepare two white cuffs approximately 3 cm wide. Place the red sleeves behind the green mittens and overlap their lower sections with the white cuffs. Use white embroidery floss to create visible blanket stitches around the mittens, spacing the stitches approximately 0.5 cm apart. For a slightly padded effect, cut duplicate mitten pieces and insert a thin layer of batting before closing the edges. This optional detail creates a soft, dimensional appearance similar to the pictured design. Position the finished mittens on either side of the Santa face, ensuring that they appear balanced and naturally connected to the sleeves.
Once the individual facial components and accessories are complete, assemble them into one coordinated felt Santa Claus appliqué. Begin with the white hair backing, add the peach face, position the beard and mustache, and finally secure the red hat over the upper forehead. Attach the mittens and sleeves behind the sides of the face so that they appear to rest on the top edge of the red cover. Check the arrangement from a distance before sewing the complete decoration to the main panel. If the appliqué contains several thick layers, use a sturdy hand-sewing needle and strong polyester thread to secure the areas that will experience the most movement. Avoid attaching the face only by its outermost edges; add a few concealed anchoring stitches beneath the beard and hat. This distributes the weight of the decoration and helps prevent the felt from sagging during seasonal use.
3. Sewing the Chair Cover and Adding Christmas Appliqué Details
With Santa’s face and accessories prepared, the next stage is constructing the main body of the Santa Claus-themed chair back cover Pattern. Place the red front and rear panels together with their right sides facing, aligning the upper edges and side seams according to your test fitting. Sew across the top and down the sides of the rear pocket area, using a 1 cm seam allowance, while leaving the bottom opening free so the finished cover can slide over the chair back. If you are using felt with no distinct right or wrong side, the layers can also be joined with an exposed blanket stitch for a decorative finish. Turn the cover right side out if you used an internal seam construction. Slip it over the chair to confirm that the opening is wide enough and the upper corners sit correctly. Make any necessary adjustments before attaching the decorative appliqués.
The visible white stitching along the edges is an important feature of this DIY Santa Claus chair cover. To reproduce the handcrafted appearance, use white embroidery floss to sew a blanket stitch along the front panel’s side edges and selected decorative sections. Insert the needle approximately 0.5 cm from the fabric edge, then create evenly spaced stitches around 0.5 cm apart. Keep the thread tension consistent so the edge remains smooth rather than puckering. If the main sleeve has already been assembled with internal seams, the blanket stitches can be added as decorative surface stitching, taking care not to close the opening needed to fit the chair. Work slowly around corners and areas where multiple fabric layers overlap. The contrast between the bright red felt and the white thread creates a traditional Christmas aesthetic that complements Santa’s beard and hat.
Now attach the assembled Santa Claus decoration to the upper portion of the front panel. Place the cover flat with the front side facing upward, and center the appliqué so that the face and beard are clearly visible. The upper part of the hat should extend above the cover’s top edge, while the green mittens overlap the upper corners of the red panel. Secure the decoration with pins or temporary basting stitches before sewing. Use coordinating thread to attach the white hair and beard, following the existing contours of the felt pieces. Sew the sleeves and mittens carefully, allowing their outer edges to remain slightly raised where appropriate. If the hat extends above the chair back, reinforce its lower attachment area with additional concealed stitches. Make sure no stitching passes through the chair itself and that the completed sleeve remains removable.
The two wooden buttons positioned beneath Santa’s beard add a simple but effective finishing detail. Choose natural-colored buttons approximately 2.5 cm in diameter, preferably with four holes, to resemble the buttons on Santa’s traditional winter coat. Mark the center line of the red panel and position the first button approximately 3 cm below the beard’s lowest point. Place the second button around 7 cm below the first, adjusting the spacing according to the overall proportions of your cover. Attach both buttons securely using red embroidery floss, forming a small decorative cross through the holes. These buttons are ornamental rather than functional, so they do not need corresponding buttonholes. However, they should be stitched firmly enough to withstand ordinary handling when the cover is installed or removed. Avoid loose buttons if the decoration will be accessible to very young children.
For the lower decorative border, cut a strip of white felt approximately 8 cm high and wide enough to extend across the front panel. Instead of leaving the lower edge straight, draw a series of gentle scallops to create the appearance of soft, snowy trim. Cut the curves carefully, making sure the scallops remain reasonably consistent in size. Position the white border over the lower portion of the red cover, allowing the scalloped edge to extend slightly beyond the main panel if desired. Attach the upper edge with a red blanket stitch, following the curved outline where the white felt meets the red background. Add small embroidered starbursts or snowflake-inspired motifs using red, green, and neutral-colored embroidery floss. Space these decorations across the white border without making the design appear crowded. This combination of curved felt and simple embroidery creates the cozy finish visible in the reference photograph.
Complete the main decorative arrangement by creating a small holly-and-candy-cane appliqué near the lower right corner. Cut three holly leaves from dark green felt, using pointed lobes along the edges to imitate their recognizable shape. Add a central vein and smaller branching lines with light-green or cream embroidery thread. Cut three small red felt circles for the berries, or create slightly raised berries using gathered felt and a tiny amount of stuffing. Arrange the leaves so that they overlap naturally, then position the berries near their center. For the candy cane, cut a curved white felt base approximately 10 cm tall and attach narrow red felt strips diagonally across its surface. Trim the strips neatly to match the curved outline. Place the candy cane behind the holly leaves and stitch all components securely to the lower right section of the cover. The finished accent adds color, balance, and recognizable holiday symbolism.
4. Finishing, Personalizing, and Caring for Your Handmade Christmas Chair Cover
After completing the appliqués, inspect the entire Santa Claus-themed chair back cover Pattern to ensure that every component is securely attached. Check the edges of Santa’s hat, beard, mittens, buttons, and decorative lower border for loose threads or uneven stitching. Reinforce any areas where several layers overlap, especially near the upper corners of the chair cover. If you used temporary basting stitches, remove them carefully without disturbing the decorative embroidery. Gently smooth the felt with your hands and use a lint roller to remove loose fibers or thread fragments. When necessary, press the project lightly through a protective cloth at a temperature approved for the specific felt material. Synthetic felt can melt or distort under excessive heat, so testing a scrap piece before pressing the finished decoration is always recommended.
Fitting the completed Christmas chair back cover correctly is just as important as the decorative stitching. Slide the open lower section of the sleeve over the top of the chair back and guide it downward until the upper edge rests comfortably against the furniture. Smooth the front panel so that Santa’s face remains centered and the scalloped border hangs evenly. If the cover feels too loose, you can add discreet fabric ties or hook-and-loop fasteners inside the rear section to help stabilize it. Avoid permanent adhesives or fasteners that could damage the chair’s finish. If the cover is too tight, do not force it over the backrest, as this may strain the seams or distort the felt appliqués. Instead, adjust the side seams or remake the rear pocket using the corrected measurements. The final result should be decorative, removable, and comfortable for everyday holiday dining.
One of the advantages of a handmade Santa Claus chair decoration is the freedom to personalize the design. Traditional red, white, and green create a classic Christmas appearance, but alternative colors can produce equally attractive results. Burgundy felt can give Santa’s coat a vintage look, while muted sage-green holly leaves offer a softer farmhouse-inspired style. Cream-colored felt can replace bright white for a warmer, rustic effect. You may also personalize the cover with a small embroidered family name, initials, or a short holiday greeting, provided the additional elements do not overwhelm the original composition. For a coordinated dining room, create several covers using the same basic pattern while varying the small decorative details. One chair might feature extra holly leaves, another embroidered snowflakes, and another a miniature felt gift package.
This Christmas felt sewing project is also suitable for crafters who enjoy combining hand stitching with machine sewing. The main rectangular cover can be assembled quickly using a sewing machine, while the decorative elements benefit from the control and texture of hand embroidery. Beginners may prefer to work with larger felt pieces and simplified facial details, especially when learning to make smooth curves and consistent blanket stitches. More advanced sewists can introduce layered batting, decorative quilting lines, or additional appliqué techniques. If you want to create a particularly durable version, consider using a woven fabric backing behind the felt front panel to provide structural support. However, avoid adding so many layers that the cover becomes stiff or difficult to fit. The most attractive result usually comes from balancing decorative richness with a flexible, practical construction.
Proper care will help your reusable Christmas chair cover remain attractive for several holiday seasons. Because felt and embroidery can be delicate, gentle spot cleaning is usually preferable to machine washing, especially when the design includes stuffed components and wooden buttons. Use a soft cloth lightly dampened with cool water and a small amount of mild detergent to treat minor marks, following the care instructions for your chosen materials. Avoid soaking the decorative areas, rubbing the felt aggressively, or twisting the cover to remove moisture. After cleaning, reshape the project and allow it to air-dry completely on a flat surface. Do not place the decoration in a hot dryer, as heat can affect synthetic fibers, batting, and certain embellishments. For regular maintenance, gently remove dust and loose fibers with a soft brush or lint roller.
When the Christmas season ends, store the Santa Claus-themed chair back cover Pattern project in a clean, dry location away from direct sunlight and excessive humidity. Lay the cover flat if storage space permits, or fold it loosely while avoiding sharp creases across Santa’s face, beard, and hat. Place acid-free tissue paper between heavily decorated sections to help preserve their shape. A breathable fabric storage bag can protect the cover from dust while allowing air circulation. Before the next holiday season, inspect the stitches and make small repairs if needed. With thoughtful construction and appropriate storage, this charming decoration can become a treasured part of your annual Christmas traditions. It may even inspire a collection of coordinating handmade holiday accessories, such as felt placemats, table runners, napkin holders, and decorative wall hangings.
Frequently Asked Questions About the Santa Claus-themed Chair Back Cover Pattern
1. Is the Santa Claus-themed chair back cover Pattern suitable for beginners?
Yes. This project is suitable for beginners who have basic familiarity with cutting fabric and making simple hand stitches. The rectangular cover is straightforward to construct, and most of the decorative components use uncomplicated felt appliqué techniques. Beginners can simplify the facial details and use flat felt pieces instead of stuffed elements. Taking time to prepare accurate paper templates and practicing the blanket stitch on fabric scraps will make the process easier.
2. What is the best fabric for making a Santa Claus chair back cover?
Medium-weight felt is one of the most convenient materials because it is easy to cut, available in traditional Christmas colors, and generally resists fraying. Wool-blend felt offers a soft, high-quality finish, while polyester craft felt is often more affordable and widely available. For the main cover, choose a sufficiently sturdy material to support the appliqués without excessive stretching. A fabric backing can provide additional durability when needed.
3. How much fabric do I need for one Christmas chair cover?
The amount depends on your chair’s measurements and whether you choose a full-length or shorter rear panel. For the sample 46 cm by 55 cm finished cover, approximately 0.75 to 1 meter of red fabric from a sufficiently wide bolt should provide enough material for the main construction and smaller red decorative pieces. You will also need smaller pieces of white, peach, and green felt. Measure your chair and plan the cutting layout before purchasing materials.
4. Can I make the Santa Claus chair cover without a sewing machine?
Absolutely. The entire Santa Claus-themed chair back cover Pattern can be completed using hand-sewing techniques. Running stitches, whipstitches, blanket stitches, and simple embroidery are sufficient for most of the construction. Hand sewing also allows greater control when attaching small facial details and curved appliqué pieces. Although the process may take longer than machine sewing, it produces a traditional handmade appearance.
5. How long does it take to complete one Santa Claus chair cover?
A beginner may need approximately six to ten hours to measure, cut, assemble, decorate, and finish the project. Someone experienced with felt appliqué may complete a simplified version in four to six hours. The exact time depends on the amount of embroidery, the complexity of the facial details, and whether the cover is sewn by hand or machine. Preparing all the templates before beginning can make the workflow more efficient.
6. Can the pattern be adjusted for different dining chair sizes?
Yes. The pattern is designed to be adaptable rather than restricted to one chair model. Measure the width, height, and thickness of your chair back, then adjust the main rectangular panels accordingly. You can also enlarge or reduce the Santa Claus appliqué to maintain balanced proportions. A paper or inexpensive fabric test sleeve is especially helpful when working with curved or unusually shaped chair backs.
7. How do I keep the felt decorations from falling off?
Secure each appliqué with strong thread and small, evenly spaced stitches. Decorative pieces that extend beyond the cover’s edges should receive additional reinforcement where they attach to the main panel. Avoid relying exclusively on craft glue for components that may be pulled or handled frequently. For heavier details, use concealed anchoring stitches through the underlying fabric layers to distribute the weight more evenly.
8. Can I wash a handmade felt Christmas chair cover?
Washing depends on the specific materials used. Many felt projects are best cleaned by gently spot treating marks with a damp cloth and mild detergent. Machine washing may cause distortion, pilling, or damage to embroidered and padded decorations. Always follow the fabric manufacturer’s care recommendations and test cleaning methods on leftover scraps before treating the finished cover.
9. Can I use this Christmas chair cover pattern to create matching decorations?
Yes. The Santa Claus appliqué can be adapted for other holiday sewing projects, including decorative pillows, wall hangings, felt gift bags, and Christmas table accessories. The holly leaves, candy cane, and scalloped trim can also be reused as coordinating decorative motifs. Using similar fabrics and embroidery colors across several projects helps create a consistent handmade Christmas theme.
10. How can I make the Santa Claus face look more realistic and expressive?
Small adjustments to the facial features can make a noticeable difference. Position the eyes symmetrically, use gently curved eyebrows, and add a rounded stuffed nose to create a friendly expression. Layering the mustache over the beard gives the face additional depth. Subtle embroidery lines in the beard and carefully shaped white felt pieces around the cheeks help create the soft, recognizable appearance associated with Santa Claus.
11. Is this project safe to use on chairs during Christmas dinner?
A properly fitted cover can be used as a decorative accessory on dining chairs, provided it does not interfere with the chair’s stability or normal use. Keep the decoration away from open flames, candles, and other heat sources. Check that buttons and small embellishments are firmly attached, and avoid using detachable decorative pieces where young children may reach them. The cover should be removed if it slips, bunches, or interferes with comfortable seating.
12. What makes this Santa Claus-themed chair back cover Pattern different from ordinary Christmas chair decorations?
Its most distinctive feature is the combination of a functional fabric sleeve with a dimensional Santa Claus appliqué. Instead of relying on printed holiday fabric alone, the design uses individually cut felt shapes, visible blanket stitching, embroidered details, and layered accessories. The raised hat, rounded mittens, flowing beard, and scalloped lower border create a playful handcrafted appearance that can be personalized to suit different Christmas decorating styles.
Conclusion: Create a Beautiful Handmade Santa Claus Chair Back Cover
The Santa Claus-themed chair back cover Pattern brings together traditional Christmas colors, approachable sewing techniques, and charming felt appliqué details to create a memorable handmade decoration. Throughout this tutorial, we explored how to select suitable materials, measure a dining chair, prepare adaptable pattern pieces, construct Santa’s face and hat, assemble the main fabric cover, and attach the festive decorations. We also covered practical finishing techniques, personalization ideas, cleaning recommendations, and storage methods to help preserve the finished project.
From the softly layered white beard and rounded green mittens to the decorative wooden buttons, holly leaves, candy cane, and embroidered scalloped border, every element contributes to the cozy holiday character of the design. By following the measurements as adaptable guidelines and taking care with each construction stage, you can create a DIY Christmas chair cover that reflects the visual style of the reference image while fitting your own furniture.
Making handmade Christmas decorations is about more than completing a sewing project. It is an opportunity to develop creative skills, enjoy the process of working with fabric, and add personal meaning to seasonal traditions. Whether you make a single Santa Claus cover for a favorite chair or create a coordinated set for your dining room, the finished decoration can bring warmth and festive personality to your home.
EASILY FIND THE FREE PDF FOR THIS PATTERN HERE!
We would love to hear your sincere opinion! What do you think of this Santa Claus-themed chair back cover Pattern? Would you use the traditional red, white, and green colors, or would you experiment with a different Christmas palette? Share your honest feedback, creative suggestions, and ideas for improving the project in the comments. Your experiences and recommendations can inspire other sewing enthusiasts to create their own beautiful handmade Christmas decorations.